
Get more details about this project
What you need
Yellow fleece, felt, cotton, or soft fabric for the chicken body
Yellow fabric for the wings, legs, and feet
Small scraps of orange or red felt for the beak and comb
Blue, black, or white felt for the eyes
Decorative fabric scrap for the belly band or “sweater” section
Toy stuffing or polyester fiberfill
Sewing machine or needle and thread
Fabric scissors
Pins or clips
Fabric marker or pencil
Embroidery thread for details
Craft glue or hand-sewing needle for attaching face pieces
Optional: ric-rac, ribbon, buttons, felt flowers, yarn, or trims for decoration
Finished Size
The finished Support Chicken can be made any size you like, but a good cuddly size is approximately 12–14 inches long from head to feet.
Instructions
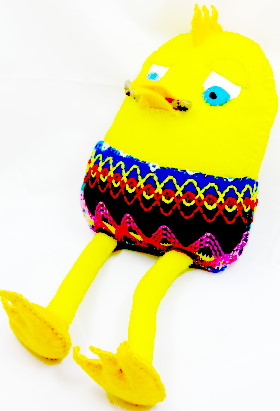
This cheerful Support Chicken plushie is a fun handmade sewing project designed to bring comfort, smiles, and a little silliness wherever it goes. Part soft toy, part emotional support buddy, this bright chicken is perfect for kids, classrooms, craft stalls, care packages, or anyone who needs a quirky handmade friend.
Made with simple fabric shapes, soft stuffing, felt details, and a decorative fabric “body band,” this chicken can be customized in endless ways. Use bold yellow fabric for a classic chicken look, or turn it into a scrappy stash-busting project using fleece, felt, flannel, or cotton scraps.
The finished chicken can be made as a cuddly plush, a desk mascot, a sensory comfort toy, or a funny handmade gift.
Start by printing and cutting out your pattern pieces. This pattern should fit onto an A4 sized paper for a 10 inch toy.
You will need to create the following simple pattern pieces:
2 body pieces
2 wing pieces
4 leg pieces
4 foot pieces
1 beak piece
1 comb piece
2 eye circles
1 decorative belly band or fabric panel
Body Shape
Draw a long rounded chicken body shape, similar to a soft oval with a slightly larger head end. The body should look a little like a stretched pear or teardrop lying on its side.
Cut 2 body pieces from yellow fabric.
Wings
Draw a small rounded wing shape, like a soft teardrop or oval.
Cut 2 wings from yellow fabric.
Legs
Draw a long narrow rectangle with rounded ends for each leg.
Cut 4 leg pieces from yellow fabric.
Feet
Draw a simple chicken foot shape with three rounded toes.
Cut 4 foot pieces from yellow fabric.
Beak
Cut a small diamond or folded triangle shape from orange felt.
Comb
Cut a small crown or scalloped shape from orange, red, or yellow felt for the top of the chicken’s head.
Belly Band
Cut a rectangle or curved panel of decorative fabric large enough to wrap across the chicken’s middle. This creates the colorful “sweater” or belly section.
Instructions
Step 1: Prepare Your Fabric
Print or draw your pattern pieces onto paper first. Cut them out and pin them to your fabric.
Cut all your pieces carefully, making sure to cut two body pieces, two wings, four leg pieces, and four foot pieces.
If you are using stretchy fabric such as fleece or an old sweatshirt, try not to pull the fabric as you cut, as this can distort the shape.
Step 2: Add the Decorative Belly Band
Place the decorative fabric panel across the center of one body piece.
Pin it in place and stitch around the edges. You can use a straight stitch, zigzag stitch, or decorative embroidery stitch.
This is a great place to add personality to your Support Chicken. Use bright fabric, scraps from old clothing, ric-rac, ribbon, lace, or embroidered details.
Step 3: Sew the Wings
Place each wing piece onto the front body piece, one on each side of the belly band.
You can stitch the wings flat onto the body, or sew them separately with a little stuffing first if you want them to be puffy.
To make stuffed wings, place two wing pieces right sides together, sew around the edge, leave a small opening, turn right side out, lightly stuff, and hand-stitch closed. Then sew or glue the wings onto the chicken body.
Step 4: Make the Legs
Place two leg pieces right sides together and sew around the long sides and bottom, leaving the top open.
Turn the leg right side out and lightly stuff it.
Repeat for the second leg.
Step 5: Make the Feet
Place two foot pieces right sides together and sew around the outside edge, leaving a small opening at the back or top.
Clip carefully around the curves and toes, then turn right side out.
Lightly stuff each foot, then stitch the opening closed.
Attach one foot to the end of each leg by hand stitching securely.
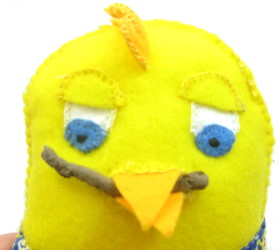
Step 6: Add the Face
Position the eyes on the head area of the front body piece.
You can use felt circles, embroidered eyes, or safety eyes. If making this plushie for a young child, embroidered or felt eyes are safest.
Fold the beak piece in half to create a little triangle beak. Stitch or glue it into place below the eyes.
Add the comb to the top of the head. You can stitch it flat to the front body piece or insert it into the seam when sewing the body together.
Step 7: Assemble the Chicken Body
Place the front and back body pieces right sides together.
Tuck the legs inside the body so the raw edges of the legs line up with the bottom seam. The feet should be hidden inside the body while sewing.
If you want the comb to sit in the seam, tuck it between the body layers at the top of the head, with the raw edge aligned to the seam.
Pin or clip everything carefully.
Sew around the outside of the body, leaving a 3–4 inch opening for turning and stuffing.
Step 8: Turn and Stuff
Turn the chicken right side out through the opening.
Gently push out the curves and shape the head, body, and leg area.
Fill the chicken with toy stuffing. Add small amounts at a time and push the stuffing into the head, body, and corners so the chicken feels soft but firm.
Do not overstuff, or the seams may pull.
Step 9: Close the Opening
Fold the raw edges of the opening inward.
Hand-stitch the opening closed using a ladder stitch or small neat stitches.
Shape the chicken with your hands until it sits or flops the way you like.
Step 10: Add Personality
Now comes the fun part. Give your Support Chicken its own character.
You can add:
A tiny felt heart
A name tag
A ribbon scarf
A funny embroidered mouth
Rosy cheeks
Decorative buttons
A mini apron
A pocket on the belly band
A little fabric label that says “Support Chicken”
Every Support Chicken should feel a little bit quirky and handmade.
Safety Notes
If this chicken is being made for a baby, toddler, or young child, avoid buttons, beads, glued-on eyes, or any small pieces that could come loose.
Use embroidered features instead, and make sure all seams are strongly stitched.
For older children or adults, decorative details can be added more freely.
Crafting Tips
Use fleece or sweatshirt fabric for a soft cuddly chicken.
Use cotton fabric if you want a flatter, more decorative plush.
Add dried lavender inside a small inner pouch for a calming comfort chicken.
Add a little rice or plastic pellets in a sealed inner pouch if you want the chicken to have weight.
Make a whole flock in different colors for gifts, markets, or classroom rewards.
Why Make a Support Chicken?
A Support Chicken is a sweet, funny, and comforting handmade plushie. It can sit on a desk, travel in a bag, keep someone company during a difficult day, or simply make people smile.
It is also a wonderful scrap-busting sewing project because you can use leftover fabric, trims, felt pieces, and old clothing. No two chickens need to look the same, and that is part of their charm.
Whether you make one as a comfort toy, a handmade gift, or just because it makes you laugh, this little chicken is sure to become a favorite.
Make the legs and stitch the two feet and fill slightly. Push your legs into the hole on top and stitch into place.
Close the bottom of the chicken body up stitching your legs into place as you go.
Face:
Stitch the two white circles on first, then the eye lids and the blue eye. Finish off with black embroidery thread to create the iris.
Cut in slit in the face just below the eyes where the mouth should go. Push the beak into place and secure with stitches.
Stitch your chickens comb piece on.
The worm is created by cutting a small strip of brown felt, rolling and securing with thread to create a small brown shape.
Secure it onto the face with a few stitches.


What do you think of this project? Let us know!