
What you need
microscope glass slides
glass cleaner
small clamps
jump ring
copper foil tape
flux
brush for flux
lead-free solder
1″x3″ decorative paper
art project
and bone tool.


Instructions
Tips
1) Silver solder will polish to a nice sheen
2) Microscope slides can be purchased through your vet or online.
3) You may use a glass cutter and make smaller pendants .
4) Glue a pin back to top center for brooch with jewelry glue.
5) Clean both sides of glass for better foil tape adhesion.
Start
Clean both sides of glass for better foil tape adhesion.
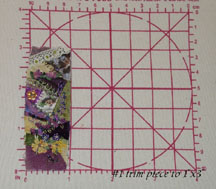
Choose what will be displayed in your pendant. I like to put together miniature crazy quilts. This is a great way to share your handiwork.
A typical glass slide measures 1″x 3″. Cut your insert to that size.
Step 1
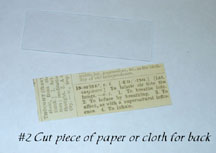
Cut a decorative paper backing to hide unattractive stitching.
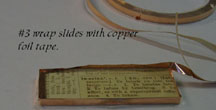
Sandwich your artwork and backing paper between two cleaned microscope slides and wrap with copper foil tape.
Step 2
Make sure 1/3 of copper foil tape adheres to glass on both sides. I go around twice with the tape.
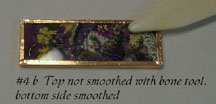
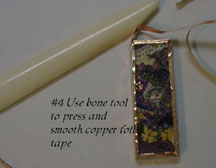
Using bone tool, press foil firmly all around edges, and front and back. This keeps the flux from flowing into your art piece.
Step 3
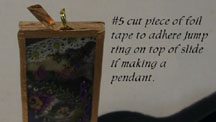
If using a jump ring to accept chain or cord,secure it to top center by pressing a small piece of foil tape and press firmly.
Step 4a
Step 4
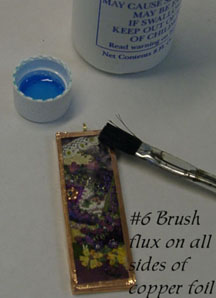
Brush Flux on all surfaces of foil tape. Flux allows solder to flow and adhere metal to metal.
Step 5
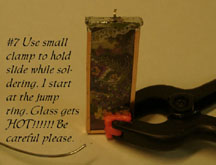
I use small clamps to hold my project while soldering to avoid burning fingers as glass gets very HOT! I solder the top first then work my way around all sides. I then solder front and back.
Step 6
If you do not care for the silver solder appearance you may color it with a gold paint pen . Apply clear sealer or nail polish to seal and prevent color wear.
Step 7
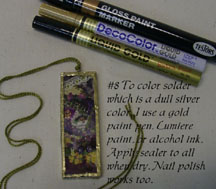
Step 8
This project was contributed by Pat Winters


If I want to make it a brooch, what would I use on the back to glue a pin to it?
This is a great tutorial and I have just made my second slide pendant. Many thanks, Linda C
hi all, I have done these, lots of fun. I did mine with old family pictures. Copy pic on printer, size up or down, cut to fit glass. I made one for my sister of us when we were 3-4.
DANNIELLE
Karen, thanks so much! I still have not bought the slides but now am looking forward to checking Oriental Trading out. Really appreciate the help!!!!
to silvermaven, hope you get this but I just purchased my glass slides from Oriental trading company. they are on line, and then even have the rim that goes around the glass slides so you can just slip you slide into it, already has jump ring and just press in when you are done… good luck…
p.s. my first batch of glass slides came broken, i called them they send me out a new batch no charge, no problem…you may also want to ask your local Vet. the use slides for testing animal problems them may be able to sell you some. have fun..Karen
Thank you! I hadn’t thought about painting the solder another colour…i really like the copper color of the tape and now know how to get that look…
I’m new to this, and I think the tutorial you made is fantastic! I have a few made now, so tonight will be all about soldering the pieces. Thank you!
Love this pendant! Can’t wait to start making them for myself and family. Can anyone suggest a source for the slides? Great project!
Thanxx umm great to do but i heard you can do different shapes and stuufff
Great suggestion about taping on the ring. It looks much nicer than piling on the solder. Thanks!
I love the idea of putting beads on the bottom! I also make these, and if you build up the solder a little more, it adds a nice frame to the pendant. (see an example here: shelane.etsy.com)
Thanks for the tip about foil-taping the ring down before you solder. That’s my biggest problem… getting the ring centered.
What a beautiful neclace. I love it
This information was very helpful.
Thanks for the helpful hints
Thank you for making these early instructions simple to understand. Your photo’s really helped!
Thank you so much! Awesome!!
Thank you so much for sharing this. I have looked for these instructions all over the net!
isn ‘t this very easy to break?
Wonderful project!
This is great. I can’t wait to make this.
Thank you for sharing this with us.
This is great. I can’t wait to make this.
Thank you for sharing this with us.
Loved it! Gorgeous results!
Great! lovely idea and clearly shown =]
Very nice! and for all occasions!
Hello,
Where do you buy the small clamps? thank you
Works of art! They look lovely hanging on the wall
EXCELLENT!!!
Awesome!
superb!! more like this!!
Excellent! And so pretty!!
Very nice! I found a square pendant with graphics like these once on the intenet. Now i know how to do it CHEAP!