
A small opening is left for adding filling before the final section is stitched closed. Oversized eyes, a curved smile, a single fang and a colourful heart give each monster its own playful personality.
The body shapes can be drawn freehand, so every monster can look different.
Get more details about this project
What you need
Coloured felt for the monster bodies
White felt for the eyes and fangs
Black felt for the pupils and smiles
Red or pink felt for the hearts
Sewing needle
Embroidery thread or sewing thread
Polyester toy filling, wool or clean felt scraps
Fabric glue
Pencil or fabric-marking pen
Paper for making a template, optional
Fabric scissors
Pins or sewing clips
Instructions
Not every Halloween monster needs to be frightening. These funny little felt creatures have oversized eyes, wonky smiles and soft stuffed bodies that make them much more cuddly than creepy.
This is an approachable project for someone learning to sew by hand because the shapes do not need to be exact. Uneven horns, mismatched eyes and slightly crooked limbs simply add to the monsters’ personalities.
Make the original tan and red pair or experiment with purple, green, orange and patterned felt. You can also change the number of eyes, add extra fangs or give each monster a different coloured heart.
Instructions
Step 1: Design the monster
Draw a simple monster body onto paper or directly onto the felt.
Keep the outline uncomplicated, with broad arms, legs and horns that will be easy to cut and stitch. Avoid narrow sections because they can be difficult to fill.
For the smaller tan monster, draw a squat body with two short curved horns, two arms and two short legs.
For the taller red monster, draw two long upright horns, two arms and two longer legs.
Step 2: Make a reusable template
If you drew the design on paper, cut around the outline to create a template.
Place the template onto the chosen body felt and trace around it twice. Turn the template over for the second piece if the shape is not symmetrical.
Both body pieces should be the same size and shape.
Step 3: Cut the felt body
Cut out the two matching monster pieces using sharp fabric scissors.
Cut slowly around the horns, arms and legs. Smooth curves will be easier to stitch than sharp internal corners.
Place the pieces together and trim any noticeably uneven edges.
Step 4: Prepare the thread
Thread a hand-sewing needle with matching or contrasting embroidery thread.
Knot the ends securely. A contrasting thread can make the visible stitching part of the monster’s handmade appearance.
Use a running stitch, whipstitch or blanket stitch around the outside. Blanket stitch creates the neat decorative edge shown in the finished monsters.
Step 5: Begin sewing the body
Place the two matching felt pieces together with their edges aligned.
Begin sewing near one side of the body. Work around the legs, arms and horns using small, evenly spaced stitches.
Take extra care at the narrow base of each horn and where the arms join the body. Add a small reinforcing stitch at these points if necessary.
Step 6: Leave a filling opening
Continue sewing until only a small opening remains along one side of the body.
An opening of approximately 1–2 inches, or 2.5–5 cm, should provide enough room to add the filling.
Do not cut or fasten off the thread yet.
Step 7: Stuff the monster
Push small amounts of polyester filling, wool or clean felt scraps through the opening.
Use the blunt end of a pencil or a stuffing tool to gently move filling into the horns, arms and legs. Do not push hard enough to stretch the stitches or damage the felt.
Continue adding small amounts until the monster feels softly and evenly filled. Avoid overstuffing it.
Step 8: Close the opening
Fold the opening edges back into alignment.
Continue using the same stitch to close the remaining section. Make a secure knot and hide the thread end between the felt layers.
Trim away the excess thread.
Step 9: Cut the eyes
Cut two large circles from white felt.
Cut two smaller circles from black felt for the pupils. Slightly uneven circles help create the funny expression seen on the original monsters.
Arrange the pupils in different positions to make the monster look surprised, curious or mischievous.
Step 10: Make the mouth and fang
Cut a thin curved smile from black felt.
Cut one small triangular fang from white felt. Place the fang beneath one side of the smile so that it appears to project from the mouth.
You can also embroider the smile with black thread if cutting a narrow felt strip is difficult.
Step 11: Cut the heart
Cut a small heart from red or pink felt.
The original tan monster has a red heart, while the red monster has a contrasting pink heart.
Position the heart on the lower portion of the body without placing it too close to the edge stitching.
Step 12: Arrange the face
Lay the eyes, pupils, smile, fang and heart on the stuffed body before applying glue.
Move the pieces around until you are happy with the expression. Check that the eyes are large enough to stand out clearly against the body colour.
Take a photograph of the arrangement if you are worried about forgetting the placement.
Step 13: Glue the details
Lift one piece at a time and apply a thin layer of fabric glue to the back.
Press each piece gently into position. Avoid using excessive glue because it may soak through the felt or spread around the edges.
Allow the glue to dry completely according to the product directions.
For a more durable finish, hand-sew the facial features and heart onto the front body piece before assembling and stuffing the monster.
Step 14: Create more characters
Use the same method to create additional monsters in different sizes, shapes and colours.
Try three eyes, mismatched horns, several tiny fangs, spots, stripes or embroidered expressions. Keep the limbs wide enough to sew and fill comfortably.
Safety and Care
Adults should supervise children using needles, scissors and fabric glue.
These felt monsters contain small glued pieces that could become choking hazards. They are decorative softies rather than toys for babies, toddlers or pets.
Spot-clean the finished monsters with a slightly damp cloth. If you want them to be washable, sew the facial pieces in place instead of gluing them and use washable felt and filling.
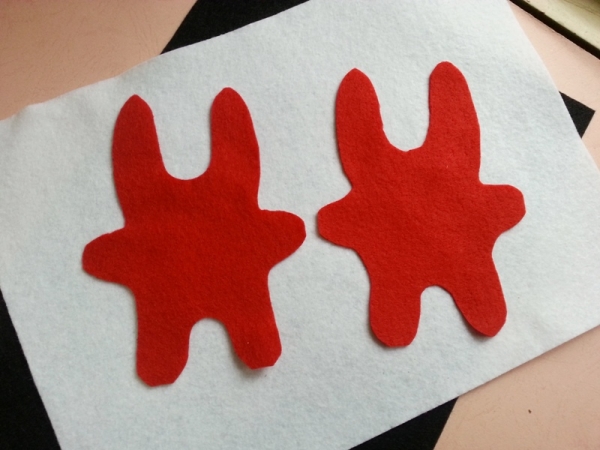
Step-1: You can use a template and trace around the edges on a piece of felt, but I did free hand drawing. You can the whole body of the monster at once since it’s really simple. Draw and cut out the 2 similar sized and shaped piece out of the felt fabric, of any color if your choice.
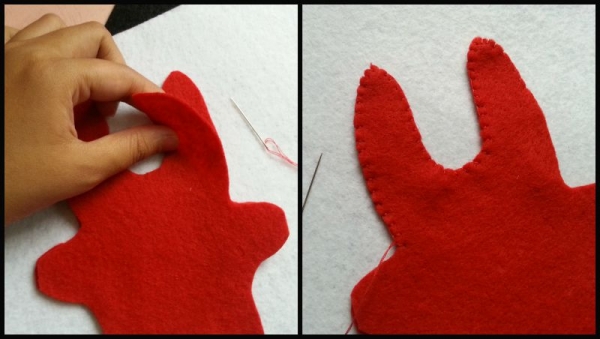
Step-2: Place the same pieces together, one on the top of the other one. Prepare your needle and thread and start to stitch around the sides to attach both pieces together.
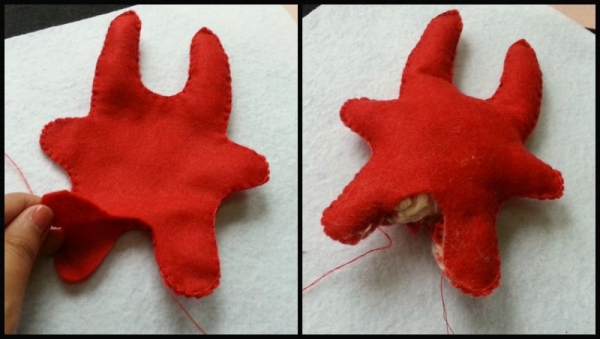
Step-3: While stitching the sides don’t forget to keep a small open end. You can use wool or scrap felt to fill the felt monster through this open end. Stuff the monster nicely and evenly.

Step-4: After you’re done filling the felt monster push the stuffs in and stitch the open end to close it and secure the filling. Trim extra thread.

Step-5: Cut out the eyes, teeth, lips and a small heart out of felts. I used white and black felt for the eyes, lips and teeth. For the small heart I used pink felt for this monster and for another one I used red felt. Glue them on the monsters face to complete it. Use fabric glue to attach the parts on the face. Allow the glue to dry and enjoy!




I have tried to print the little felt halloween dolls, but cannot get it to print anything except the first 2 pages that keep saying it is free to print, but does not print out the pictures or the instructions….
this is a very cute project. i have a suggestion – one that i’ve used in making many stuffed animals and appliques from rayon and/or wool felt. put the felt yardage or squares in the washer and dryer before you cut it out or sew with it. doing this achieves two things that are especially useful for children. the felt shrinks a bit and takes on a really cool almost crinkled texture that adds a lot of interest and dimension. i used that technique to make dinosaur appliques for sweatsuits for my sons many years ago (so no pictures, sadly). the other benefit is that the item becomes machine washable and maybe dryable since the fabric has been ‘pre-treated’ to create that outcome. you don’t lose much square footage and the benefits are amazing!
jd in st louis