
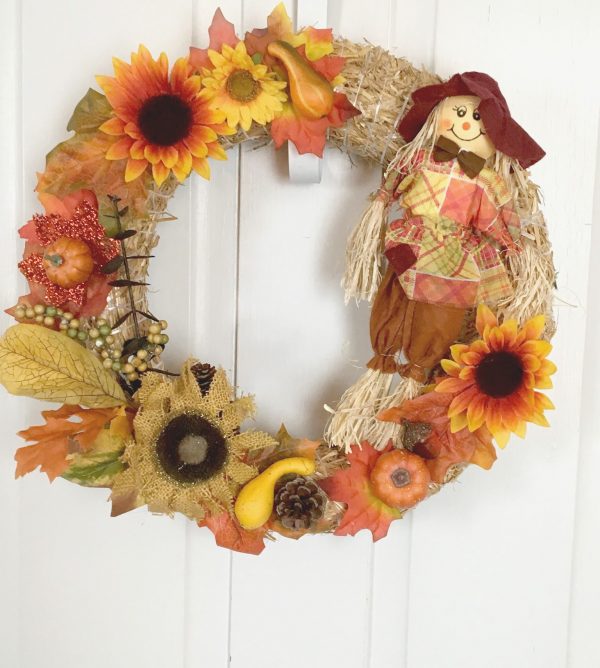
A full-body country scarecrow is secured along one side of the wreath. Sunflowers, miniature pumpkins, gourds, berry picks, pinecones, and rustic embellishments are added around the remaining sections to create a balanced farmhouse-style decoration.
This wreath design was originally shared by Heather K., a member of the CraftBits Facebook Christmas craft group.
Get more details about this project
What you need
Straw, wicker, or grapevine wreath base
Country-style scarecrow decoration
Large artificial fall leaves
Small artificial fall leaves
Artificial sunflowers in assorted sizes
Miniature pumpkin picks
Miniature gourd picks
Artificial berry clusters
Small pinecones, optional
Burlap flowers or ribbon, optional
Wire cutters
Hot-glue gun and glue sticks
Strong craft glue, optional
Wreath hanger or sturdy hanging loop
Protected work surface
Instructions
A cheerful scarecrow surrounded by sunflowers and autumn leaves makes a wonderfully welcoming decoration for the fall season. This country-style wreath can be displayed from the beginning of autumn through Halloween and Thanksgiving.
The design is deliberately full, rustic, and slightly scraggy. A visible straw or wicker base suits the farmhouse appearance, while the scarecrow’s raffia hands, patchwork clothing, and floppy fabric hat give the wreath plenty of handmade personality.
Dollar stores and discount shops are excellent places to find small scarecrows, artificial leaves, pumpkin picks, sunflowers, berries, and decorative gourds. You can also dismantle older fall arrangements and reuse the individual pieces.
Instructions
Step 1: Prepare the wreath base
Place the wreath base flat on a protected work surface.
Remove any loose pieces of straw, wicker, or vine that are likely to fall away. Do not remove all the irregular texture, as the exposed natural base contributes to the country-style finish.
Check that the wreath is strong enough to support the scarecrow and decorations.
Step 2: Plan the scarecrow placement
Position the scarecrow along the right side of the wreath without attaching it.
The head can sit near the upper-right curve, while the body follows the side of the wreath and the feet extend toward the lower-right section.
Make sure the scarecrow does not completely cover the centre opening. Adjust its arms, legs, hat, and raffia details so its face remains visible.
Step 3: Arrange the largest flowers
Place the largest sunflower near the upper-left portion of the wreath to balance the scarecrow on the right.
Position another large sunflower near the lower-right side, below the scarecrow.
Add a third large or medium flower near the bottom-left section if desired.
Do not glue anything yet. Step back and check that the visual weight is distributed around the wreath.
Step 4: Establish the colour arrangement
Lay the large fall leaves around the wreath.
Distribute orange, rust, yellow, and olive leaves so one colour does not dominate a single section. Allow some leaves to extend beyond the outer edge of the wreath to create a loose, natural silhouette.
Leave small areas of the straw or wicker base visible.
Step 5: Attach the largest leaves
Lift one large leaf and apply a small amount of hot glue to its stem and the back of the leaf.
Press it against the wreath until secure.
Continue attaching the remaining large leaves. Work around the wreath gradually rather than completing one area at a time.
If using a grapevine base, the stems can also be tucked between the vines and reinforced with floral wire.
Step 6: Nest the smaller leaves
Place smaller leaves inside and between the larger leaves.
Overlap the edges to create depth while keeping the individual colours visible. Turn some leaves in different directions so the arrangement does not look overly uniform.
Glue or wire the smaller leaves into position.
Step 7: Secure the scarecrow
Return the scarecrow to the planned position on the right side.
Attach it to the wreath with floral wire around the torso, arms, and lower body. Thread the wire through the wreath base and twist the ends securely at the back.
Use hot glue only as additional support. Wire provides a stronger attachment for a large or heavy scarecrow.
Check the front to ensure the wire is concealed beneath the clothing, raffia, leaves, or flowers.
Step 8: Attach the main sunflowers
Glue or wire the largest sunflower near the upper-left section.
Add the second large sunflower near the scarecrow’s feet on the lower-right side. Position another flower near the bottom-left area if using one.
Press each stem securely into the wreath and reinforce heavier flowers with floral wire.
Step 9: Add the pumpkins and gourds
Position miniature pumpkin and gourd picks in the open spaces between the leaves and flowers.
Place one near the upper portion, another near the lower-right sunflower, and one or two among the left-side foliage.
Avoid arranging all the pumpkins at the same height. Varying their positions will make the wreath feel more natural.
Tuck the pick stems into the wreath base and secure them with glue or wire.
Step 10: Add berry clusters
Divide artificial berry stems into smaller clusters if necessary.
Tuck the berries between large leaves, flowers, and pumpkins. Use them to fill small gaps and connect the separate decorative sections.
Keep some clusters compact and allow others to extend slightly beyond the edge of the wreath.
Step 11: Add pinecones and rustic embellishments
Place small pinecones near the bottom of the wreath or beside the pumpkins.
Add burlap flowers, fabric leaves, raffia, or ribbon if the arrangement needs additional texture.
Use these smaller pieces sparingly so they support rather than overwhelm the scarecrow and sunflowers.
Step 12: Fill remaining gaps
Stand the wreath upright and view it from several steps away.
Look for exposed glue, visible wire, or areas that appear noticeably empty. Add smaller leaves or berry pieces where necessary.
Keep the centre opening clear and retain a little visible straw or wicker around the wreath.
Step 13: Check the balance
Make sure the scarecrow is secure and does not pull the wreath noticeably to one side.
Reinforce the attachment points with additional floral wire if needed.
Gently shake the wreath over the work surface. Reattach anything that moves or falls loose.
Step 14: Finish the back
Turn the wreath over carefully.
Trim sharp wire ends and bend them inward so they cannot scratch the door or wall.
Remove any long glue strings. Check that no decorative picks protrude dangerously through the back.
Step 15: Add the hanger
Attach a sturdy hanging loop to the upper back of the wreath or use a wreath hanger suitable for the finished weight.
Before hanging it on a door, test the loop while supporting the wreath from underneath.
Make sure the scarecrow and heavier decorations remain upright.
Step 16: Display the wreath
Hang the completed wreath on a front door, covered porch, interior wall, mantel, or farmhouse-style display.
Protect it from rain and prolonged direct sunlight unless every material and adhesive used is suitable for outdoor conditions.
Store the wreath in a large box or wreath container after the season. Support the scarecrow and flowers with tissue paper so they are not crushed.
This stunning wreath was created by Heather. K who is a member of our Facebook Christmas craft group. Thanks for sharing with us Heather.




What do you think of this project? Let us know!