
Get more details about this project
What you need
Green felt or green fabric
Corduroy, flannel, cotton, silk, or scrap fabric
Contrast fabric for the belly
Plastic filling beads, rice, millet, or bean bag filling
Wobbly eyes, buttons, or felt circles
Needle and thread
Sewing machine, optional
Scissors
Pins or sewing clips
Funnel
Printed frog pattern
Fabric marker or pencil
Instructions
This Bean Bag Frog Plushie is a sweet, squishy, and wonderfully nostalgic sewing project that is perfect for beginners. It is simple enough for kids who are learning to sew, but cute enough that adults will enjoy making one too.
The best part about this frog plushie is that it can be made from small fabric scraps, felt pieces, corduroy, flannel, upholstery fabric, or even an old shirt. It is a great way to use up leftover material while making something playful and practical.
Once filled with plastic beads, rice, millet, or another suitable bean bag filling, the frog becomes soft, floppy, and fun to hold. It can be used as a small toy, a classroom sewing project, a handmade gift, or even a nostalgic craft for anyone who remembers making bean bag animals as a child.
This is also a lovely project for sewing groups, school craft lessons, rainy-day activities, and handmade gifts for frog lovers.
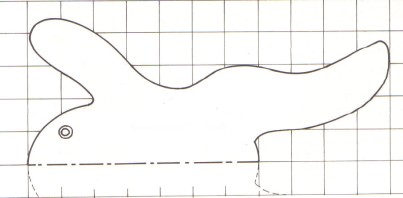
Start by printing off the pattern below and enlarging it to the size you would like your frog to be.
Start by printing the frog pattern and enlarging it to the size you would like your finished frog to be. A smaller frog makes a cute hand-sized bean bag toy, while a larger frog can become a soft floor cushion or sensory-style plushie.
Choose your fabric before cutting. Felt is easy to work with and does not fray, making it a good option for children and beginners. Corduroy, flannel, cotton, upholstery scraps, or soft recycled fabric can also work well. A contrast fabric on the belly gives the frog extra personality.
Cut one piece for the top of the frog and one piece for the bottom. The pattern is designed to be placed on a fold down the middle, so make sure the fold line is positioned correctly before cutting.
Place the two frog pieces together with the right sides facing in. Pin or clip around the edges to keep the fabric from shifting.
Sew around the outside edge of the frog using either a sewing machine or hand stitching. Leave a small opening along one side so you can turn the frog the right way out and add the filling.
Clip carefully around any curved areas, being careful not to cut through your stitches. This helps the frog turn out more neatly, especially around the legs and arms.
Turn the frog right side out. Use the blunt end of a pencil, chopstick, or turning tool to gently push out the legs, arms, and corners. Do not push too hard, especially if you are using felt or a delicate fabric.
Using a funnel, fill the frog with plastic filling beads, rice, millet, or another suitable bean bag filling. Add the filling slowly so it reaches into the legs and body evenly. The frog should feel soft and floppy rather than overstuffed.
Once the frog is filled, use strong thread to sew the opening closed securely. A ladder stitch or small whip stitch works well for this step.
Add the eyes last. You can glue or stitch on wobbly eyes, buttons, felt circles, or embroidered eyes. If the frog is being made for a very young child, stitched felt or embroidered eyes are the safest option.
Extra Tips
For a classroom sewing project, pre-cut the frog shapes before the lesson so children can focus on stitching and filling.
For a softer plushie, add a little toy stuffing along with the filling beads.
For a more traditional bean bag feel, use rice or millet, but keep in mind that natural fillings should be kept dry.
For a washable version, use plastic filling beads instead of rice or grain.
For younger children, avoid small loose eyes and use stitched felt features instead.
Safety Note
If this bean bag frog is being made for toddlers or young children, avoid small buttons, loose wobbly eyes, or any decorations that could become a choking hazard. Sewn or embroidered features are the safest choice for young children.



Wow! Yeah, I remember making these in 5th or 6th grade back in the very early eighties. I had that frog until I was in my late teens. I don’t remember what ever happened to it. I’m going make another one or two just for nostalgia. And then help my youngest kids make one for themselves.
How would I make a plump shell for this to make it a turtle pillow or maybe a foot rest?
This I believe is the same pattern I used as a kid.I really loved making these frogs and am going to start making them again!
Thank you for the sweet idea! I didn’t have a printer so I drew my own frog pattern and used scrap felt and for the eyes I used buttons then filled it with rice! My friends little girl loved it!
i love this project its awesome thx!!!!
Wow! Very cool! I love your website! This is actually one I found with lots of ideas!
VERY creative!!
I’m going to have to make this! 😀
We are using this project in our grade five art class! We did it last year and they were adorable! I find that flannelette works well, and boys usually forget their objections to stitching when they see the cool camoflage patterns they can use for the top… Instant rice works well for the filling (lighter). Students are really looking forward to making them this year as well! Thanks!
We are making a frog like this in my sewing class. It is a bit different, but still used as an easy project for beginners.
It’s fun and cute!
I have made these, can’t remember how many but close to a hundred or more. At first I put beans in them and later put rice. I like the rice better. Good idea and instructions.
i have made those , and filled them with rice and beans , if you can somewhat draw its not hard to make your own pattern, or cheat and cut and paste this one and then enlarge . i love frogs and those are just adorable
My grandmother used to make these out of her scrap fabrics. She said that after much trial and error, she found that millet made the perfect “beans” for the beanbag. Just the right size, weight, and won’t poke through the fabric.
love this idea i made it into a heat thing
This is actually great. It’s the first craft project I’ve seen today that hasn’t made me lose hope in humanity. Dogger670, don’t you dare use different fabrics. It’s perfect as is.
Thank you for your site & pattern it is great Been looking for ages. Just found your site
Just what I was looking for. We had these at my Grandma’s house but never found a pattern until now.
they turn out adorable! love it!
easy and fun to do
mmm im going to try it for a mothers day persent but i might use some different fabrics
Thank you!!!
Ñïàñèáî!!!
Vera
fill it with rice – it makes a great bean bag and is really fun for us kids to play with have just recently learnt to sew sooo gonna make on of these!!!! so cute and easy too
i am going to make this using felt and an old silk shirt but i’m still pondering on what to fill it with.I might fill it will cotton wool but i’m still pondering…
this is a cute project
Hey, how about if we filled with rice or field corn for the neck warmers or microwave heaterthingys; I collect frogs so if they got this they would know it was from “Aunty”
Its ok i think it would be better if ther was a print out pattern on most of the stuff.