
What you need
Craft Glue
Jewelry or Picture Wire
Picture hooks
Picture frame (no glass required)
Craft foam
Pliers
Instructions
If a picture frame isnt big enough try this Canvas Jewelry Holder.
Start by taking the glass out of your picture frame, you can use this to cut your craft foam or thin packaging foam to size. Discard the glass as it is not required for this project.
The wire lines are used to hang hook earrings and the foam flap is used to hang your studded earrings. The wire lines you use will depend on the type of jewelry you wish to hang-up. For small hook earrings you can place the lines closer together but if you have long dangle earrings you will need to allow enough room for the height.
We made several short lines to divide up and accommodate earring styles. Layout your jewelry first to get an idea of what you need and what will fit into your frame.
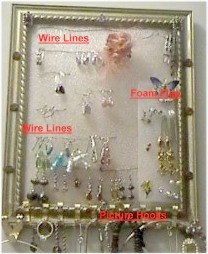
Jewelry Organizer Frame
Wire Lines:
Take your wire and cut it to length. It should be twice the size of the line you want to make so that you have enough wire to twist the ends together at the back. Straighten your cut piece of wire out in your hands and push the ends through the foam in the desired location. It should pierce the foam without much effort. Once it is through the foam secure the ends at the back by twisting them together. Flatten out the wire to make sure that it sits flat in the frame later. Make as many of these wire lines as you will need.
Foam Flap:
The foam flap is made with an off cut of foam. It will depend on the size of your frame and also how many stud earrings you have to hang. The flap should be big enough that you can get your hands behind it with ease as you will need to do this to secure the back of your earring studs. Our flap is 2 inch x 6 inch (5 x 15 cms) in size. Secure the flap at one end with some craft glue and allow it to dry.
Necklace Hooks:
For this we used large 20 lb picture hooks so that we could hang larger, heavier earrings. For fine chains you could add some smaller hooks or even some small brass nails. Secure these with craft glue to the bottom of your frame or hammer them in with a hammer.
Finish off your frame by placing the foam into the frame as you would a picture. Apply some craft glue to the backing board to secure the foam piece in.
Decorate your frame with small trinkets, gem stones or with broken and odd earrings as we did.
Hang it on the wall!
If you want to stand it up on a bench (you wont be able to hang necklaces from the bottom this style, just add the hooks to the upper outer corners so that your necklaces hang down the sides of the frame rather than from the bottom)


Great idea… Like the idea of hooks for necklaces on the bottom and decorating it with odd earrings and broken pieces…
1
i love this idea and made one with an old window frame that still had the screen in it. i still hung the wires and put in the hooks, but it was much easier with the screen
i love this idea i did it without the wire just added all sorts of different styles of hooks as well as the picture hooks and those little hooks people use for hanging net curtins up with ive added the the top of the frame for my earrings i got so fed up with my necklaces being all over the place and could never find what i wanted so this is a great idea thanks =)
Great instructions and good idea. I plan on making this….except I will use 2 or 3 frames. One or two will hold only necklaces–they will hang from hooks at the top of frame so they will be “framed” inside the frame. The other one will be for earrings/necklaces. I think this would work well for my daughters’ hairbows also, just modified so I can clip them on.
This is a CrEaTiVe IdEa but i did make a shelf , i drilled holes in shells, then i super glued them to the shelf and hanged my earrings in the drilled shells!!! that creative with a capital C!!!!!
I made this just before this was posted. I used fabric and double-thickness quilt batting. Gold safety pins blend right into my fabric and I can move them depending on the size of the item I am hanging.
What a good, do-oable idea. Understandable instructions, with affordable materials. Thanks.
Instead of using foam I took a piece of aluminum window screen and cut it using the glass as a template. I inserted it into the frame and used a staple gun (or tacks/pushpins) to secure it. Cup hooks screwed into the bottom & sides for hanging bracelets/necklaces/rings. Earrings go right through the screen holes.
This Project looks absolutly fun and looks like a person could go crazy making this one into whatever a person wanted it to be. I am most definaltly going to be making this one.!!! Thanks, plus have been needing something to hold all my jewerly in.. GREAT IDEA!!
Frame could be larger. But great idea!
You could also use screen to cover the entire open area of the frame to hang earrings on.
Looks ‘disorganised’..
I came up with the same idea a few years back.
I used an brass antique
oval frame I bought dirt cheap. Looks great!
What an excellent idea! Plus, thanks for the tips on drawer knobs and wired ribbon! Excellent touch.
I did this with a frame and pegboard (painted in the same high gloss color) I used inexpensive drawer knobs to hang long necklaces and added tiny circular banks for earrings. You can add decorative corners, a wired ribbon or a small mirror in the center.
good
I need something like that!! Not to actractive though…
this one is cool!
You can see it in use above, I have been using the same one for the past 6 months. I outgrew it and made a bigger one but it certainly worked.
I think it’s a great idea with room for personal creativity. You can use any frame you want in a size that will hold all of your jewlery, and you can make it look like art!
Really cool. I like this better than the canvas jewellery holder, but this is too small for my jewellery collection.
too messy
looks tacky
Great Idea!