
Get more details about this project
What you need
#3 knitting needles with 3-ply sport yarn or 3-ply yarn
#4 knitting needles with 4-ply yarn
#6 knitting needles with Red Heart Knitting Worsted Fleck yarn
Note: One skein makes three bears
Garter Stitch = Knit one row, Purl next row
Instructions
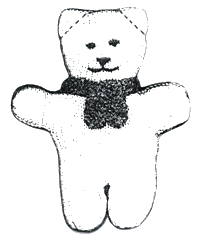
There is something very special about a handmade teddy bear. It does not need to be fancy, oversized, or complicated to mean something. Sometimes the simplest little knitted bear can become the most comforting thing in a child’s hands.
This basic trauma teddy knitting pattern is designed for making soft, simple teddy bears that can be gifted, donated, or tucked into care packages for someone who needs a little extra comfort. Trauma teddies are often made for hospitals, emergency services, children’s support groups, charity drives, and community care projects, but they are just as lovely as a thoughtful handmade gift for a child, grandchild, classroom, or Christmas stocking.
Here is an article with links for donating your trauma teddies.
The design is intentionally simple, which makes it a useful project for knitters who want something meaningful without too much shaping or fuss. You can use different yarn colors for the body, add a small scarf, embroider a gentle face, and make each bear feel individual. One skein can make several bears, so it is also a practical charity knitting project if you are making them in batches.
Use soft washable yarn where possible, especially if the bears are intended for donation. Keep the facial features embroidered rather than using buttons or beads, and make sure all seams are secure before gifting. A little bear like this may not take long to knit, but the comfort it carries can last much longer.
Basic Trauma Teddy Knitting Pattern
Body
Using the main colour and double-pointed needles, cast on 20 stitches for the first leg.
Work in the round in garter stitch throughout, unless otherwise stated.
Continue knitting until the leg measures approximately 1½ inches / 3.5 cm.
Place the first leg on a stitch holder and knit the second leg in the same way.
Place both legs together on the needles and continue working them as one round.
Cast on 2 new stitches at the centre front and 2 new stitches at the centre back, where the legs meet.
You should now have 44 stitches in the round.
Continue knitting for 2 inches / 5 cm to form the body.
On the next round, cast on 20 new stitches on each side of the body to form the arms.
Continue working around all stitches for approximately 1½ inches / 3.5 cm.
On the next round, cast off 30 stitches on each side to complete the arms.
Continue working in the round over the remaining stitches to form the neck and head.
Head Shaping
Increase as follows:
Increase 2 stitches on each side every other round, 3 times.
Then increase 2 stitches on each side every fourth round, 1 time.
Continue knitting without increasing until the head measures approximately 1½ inches / 4 cm.
Cast off.
Finishing
Sew the arms and legs closed, gathering the ends slightly as you sew.
Stuff the bear firmly but gently, shaping the body as you go.
Sew the top of the head closed.
Embroider the eyes, nose, and mouth using black yarn or embroidery thread.
To form the ears, sew diagonally across the top corners of the head, as shown in the photo.
Scarf
Using a contrasting colour and larger double-pointed needles, cast on 7 stitches.
Work back and forth in garter stitch until the scarf measures approximately 7½ inches / 20 cm.
Wrap the scarf around the bear’s neck and tie it neatly.
Sew the knot securely in place so the scarf stays attached to the bear.
Face
Embroider the eyes, nose, and mouth. For donation bears, avoid using buttons, beads, or safety eyes so the teddy remains soft and child-safe.
This project was contributed by CareWear.org and was sent in by Doris K for more volunteer craft patterns visit the Care Wear website.


I think this project is wonderful. I am hoping my granddaughters will like to make some to donate.
Thank you for sharing I!
it would be better with a proper pic