
The five rosettes are stacked in a small, medium, large, medium, and small arrangement to create the rounded pumpkin shape. A rolled green paper stem passes through the centre, while a curled tendril and optional leaf complete the design.
Get more details about this project
What you need
One sheet of A4 orange craft paper
Green craft paper
Pencil
Ruler
Scissors
Craft glue or strong paper glue
Small circular template, optional
Thin pencil, skewer, or paintbrush handle for curling the tendril
Instructions
Paper pumpkins are an easy way to add autumn colour to a mantel, table, classroom, or Halloween display without needing expensive supplies. This clever design creates a surprisingly dimensional pumpkin from five simple accordion-fold paper rosettes.
The changing widths of the rosettes produce the rounded shape. A large rosette forms the pumpkin’s widest point, two medium rosettes fill out the middle, and two smaller rosettes complete the top and bottom.
This project requires careful folding and gluing, particularly when flattening the paper rings into rosettes. Younger children may need help holding the centres in position while the glue dries.
Instructions
Step 1: Measure the orange strips
Place the A4 orange craft paper horizontally so the longer edge runs from left to right.
Measure and draw five strips running along the full length of the paper:
One strip measuring 3.5 cm wide
Two strips measuring 3 cm wide
Two strips measuring 2.5 cm wide
All five strips should be the same length but have the specified different widths.
Step 2: Cut out the strips
Cut carefully along the marked lines.
Keep the two 2.5 cm strips together as the small pair, the two 3 cm strips as the medium pair, and the 3.5 cm strip as the large centre piece.
Step 3: Accordion fold each strip
Beginning at one short end, fold the first strip backwards and forwards in even accordion folds.
Try to keep every fold the same width. Folds of approximately 1 cm work well, although slightly narrower folds will create more detailed pleats.
Continue until you reach the opposite end.
Repeat with all five paper strips.
Step 4: Make the paper rings
Take one accordion-folded strip and bring its two short ends together.
Apply glue to one end and attach it securely to the other, creating a pleated paper ring.
Hold the join until the glue begins to grip. A small paper clip can help keep the seam together while it dries.
Repeat with the remaining four strips.
You should now have five accordion-folded paper rings.
Step 5: Cut the securing circles
Cut small circles from spare orange craft paper. The circles need to cover the centre opening of each flattened rosette without hiding too much of the accordion detail.
Most of the rosettes require two circles—one for the top and one for the bottom.
Make a small hole through the centre of these circles so the green paper stem can pass through the assembled pumpkin.
For one of the 2.5 cm rosettes, prepare one circle with a centre hole and one circle without a hole. This rosette will form the bottom of the pumpkin, and the solid circle will close its base.
Step 6: Flatten the first ring
Stand one accordion-folded ring upright on the work surface.
Gently press its upper edge down and outward while guiding the inner pleats toward the centre. The ring should flatten into a circular fan or rosette.
Keep one hand over the centre because the folded paper may try to spring back into a ring.
Step 7: Secure the rosette
Apply glue to one paper circle and position it over the centre of the flattened rosette.
Hold the circle firmly in place until the glue begins to set.
Carefully turn the rosette over while supporting its centre. Glue another circle to the opposite side.
Make sure the holes in the two circles align.
Repeat this process with four of the five rosettes.
Step 8: Make the bottom rosette
Flatten one of the small 2.5 cm rings.
Glue the circle without a hole to the underside of this rosette. This creates the closed bottom of the pumpkin.
Glue a circle with a centre hole to the upper side.
Allow the glue to dry thoroughly before beginning the final assembly.
Step 9: Arrange the pumpkin layers
Place the completed rosettes in the following order from bottom to top:
Small 2.5 cm rosette with the solid underside
Medium 3 cm rosette
Large 3.5 cm rosette
Medium 3 cm rosette
Small 2.5 cm rosette
Check the arrangement before applying glue. The large rosette should form the widest centre of the pumpkin.
Step 10: Glue the rosettes together
Apply glue around the centre disc on top of the bottom rosette.
Position the first medium rosette over it, carefully aligning the centre holes. Press gently until the pieces begin to hold.
Continue adding the large, medium, and final small rosette in the correct order.
Keep all the centre holes aligned so the stem can pass through the complete pumpkin.
Allow the stacked rosettes to dry completely.
Step 11: Make the green paper stem
Cut a long, narrow strip of green craft paper.
Roll the strip tightly to create a slender paper tube or wicker-like stem. Glue the outer edge so the roll does not open.
Make the stem narrow enough to fit through the aligned holes in the pumpkin.
Step 12: Insert the stem
Guide the rolled green stem through the centre of the upper rosette.
Push it gently through the aligned openings until it reaches the solid circle at the bottom of the pumpkin.
Add a small amount of glue around the stem at the top and between the centre openings if it needs additional support.
Step 13: Create the curled tendril
Cut another thin strip of green paper.
Wrap it firmly around a pencil, skewer, or paintbrush handle. Hold it briefly, then slide it off to reveal a curled tendril.
Glue one end of the tendril beside the stem.
Step 14: Add a paper leaf
Cut a simple pointed leaf shape from green craft paper.
Fold it lightly down the centre to create a vein and add dimension.
Glue the base of the leaf beside the stem and tendril.
Step 15: Finish the pumpkin
Adjust the accordion folds so the pumpkin looks even and rounded from every side.
Allow all the glue to dry before moving or displaying it.
Place the finished paper pumpkin on an autumn table, mantel, bookshelf, or Halloween display. Create several in different shades of orange, rust, cream, or muted green for a coordinated fall arrangement.
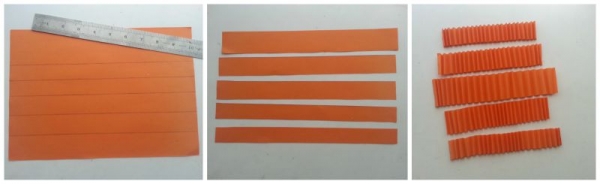
Step-1: take an A4 sized paper and draw lines along the longer side of the paper. You will need to draw 5 lines, all of them of same length but different width. The measurements are, 1 strip- 3.5 cm, 2 strips- 3 cm and 2 strips- 2.5 cm. Cut them out neatly with scissors. Now accordion fold all the strips neatly.
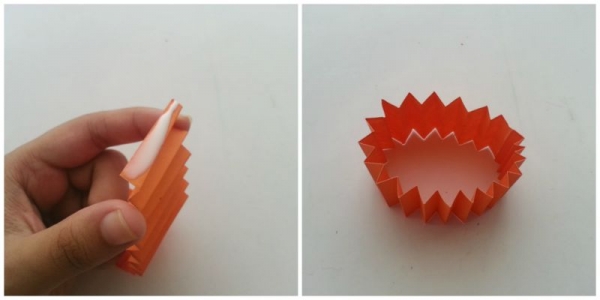
Step-2: Take any 1 folded strip. Apply glue on any one side of the folded strip and stick it with the other side. Similarly glue the sides of the 4 other folded strips. Now we have a accordion folded roll.
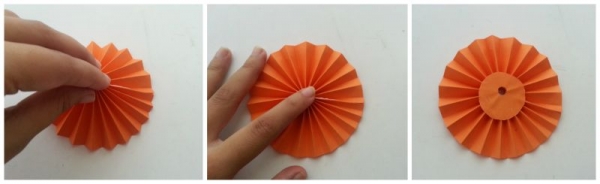
Step-3: Press the top side of the folded roll and flatten it. You will have to cut 2 round pieces and make a hole in the center of them for each of these flattened rolls. Glue the round pieces on the center of the flattened folded roll, on both sides, so that it stays flat. Do same for the rest except for any 1 of the small ones (2.5 cm).
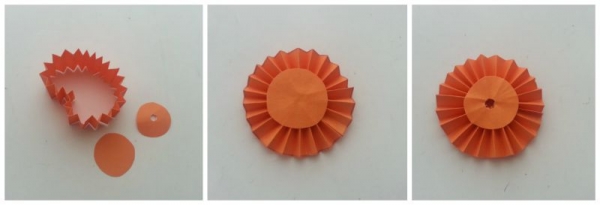
Step-4: For one small one (2.5 cm) you will need need one round piece with hole and one round piece without hole. Flatten it and similarly glue the round piece on both sides of the folded roll.

Step-5: Glue all 5 accordion folded rolls one by one. First the small one, we made in step 4. And then a medium one. Then the large, medium and small one respectively. Allow the glue to dry.
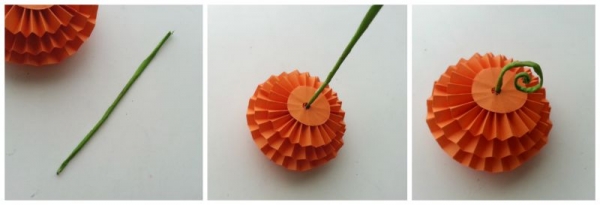
Step-6: Make a paper wicker using green craft paper. Insert the wicker into the center of the joint folded rolls and push it all the way to the bottom. Roll the extra part to create a twirly pattern. You may add leaves to make it look more attractive. Enjoy!




They look cute but they are far too fiddly and time consuming to make with kids, especially the flattening and sticking on the double circles
This is so cute. I’m going to make a few. Think I’ll try making it a little bigger. I can’t wait to get my orange paper. Thanks for the tutorial.