
Get more details about this project
What you need
- Drops Karisma, 100% wool (109yd/100m per 50g ball), or any DK yarn:
- 1 x 50g ball in 16 Dark Grey Mix (A)
- 1 x 50g ball in 21 Medium Grey Mix (B)
- 1 x 50g ball in 44 Light Grey Mix (C)
- 1 x 50g ball in 72 Light Pearl Grey (D)
- Stranded embroidery thread in blue, such as DMC Stranded Cotton, shade 813, for the eyes
- Metallic stranded embroidery thread in black, such as DMC Light Effects, shade E310, for the nose and the pupils of the eyes
- 6 lengths of 0.3mm clear nylon thread, each measuring 4¾in (12cm), for the optional whiskers (not suitable for young children)
- 3.25mm (UK10:USD/3) crochet hook
- Blunt-ended yarn needle
- Toy stuffing
- Stitch marker
Instructions
Size
- Approximately 43/8in (13.5cm) long, from tip of nose to back of hind legs
- Approximately 67/8in (17.5cm) tall from top of head (excluding ears)
Tension
22 sts and 24 rows to 4in (10cm) over double crochet using 3.25mm hook. Use a larger or smaller hook if necessary to obtain the correct tension.
Method
The sitting Siamese cat’s head, neck and body are worked in one piece, in rounds and rows of double crochet.
The shading on the face and legs is formed by changing the yarn to a lighter shade for subsequent rounds. The front of the head is crocheted in rounds and the top of the head is worked in rows.
The neck is worked in rows, crocheting along the edges of the rows that make up the top of the head and into the stitches at the underside of the muzzle.
The shaping of the body is crocheted in short rows, working into just a few stitches of the previous row and then crocheting into an unworked stitch at the end of each subsequent row.
The ears are worked in rows. Each ear is made up of two identical crocheted parts that are joined by crocheting into each stitch of both pieces at the same time.
Double crochet and half treble stitches form the tapered shape of the tail, decreasing the stitches in the last row to form the curl. The long edges of the tail are sewn together, and a small amount of stuffing is inserted before sewing it in place.
The toes on the paws are produced by crocheting bobbles. The bobbles appear on the reverse side of the fabric.
The thighs of the hind legs should be lightly stuffed so they have some flexibility and can easily bend into the sitting position.
The eyes and nose are embroidered with stranded embroidery threads.
1 ch and 2 ch at beg of the row/round does not count as a st throughout.
Head and Body
Head
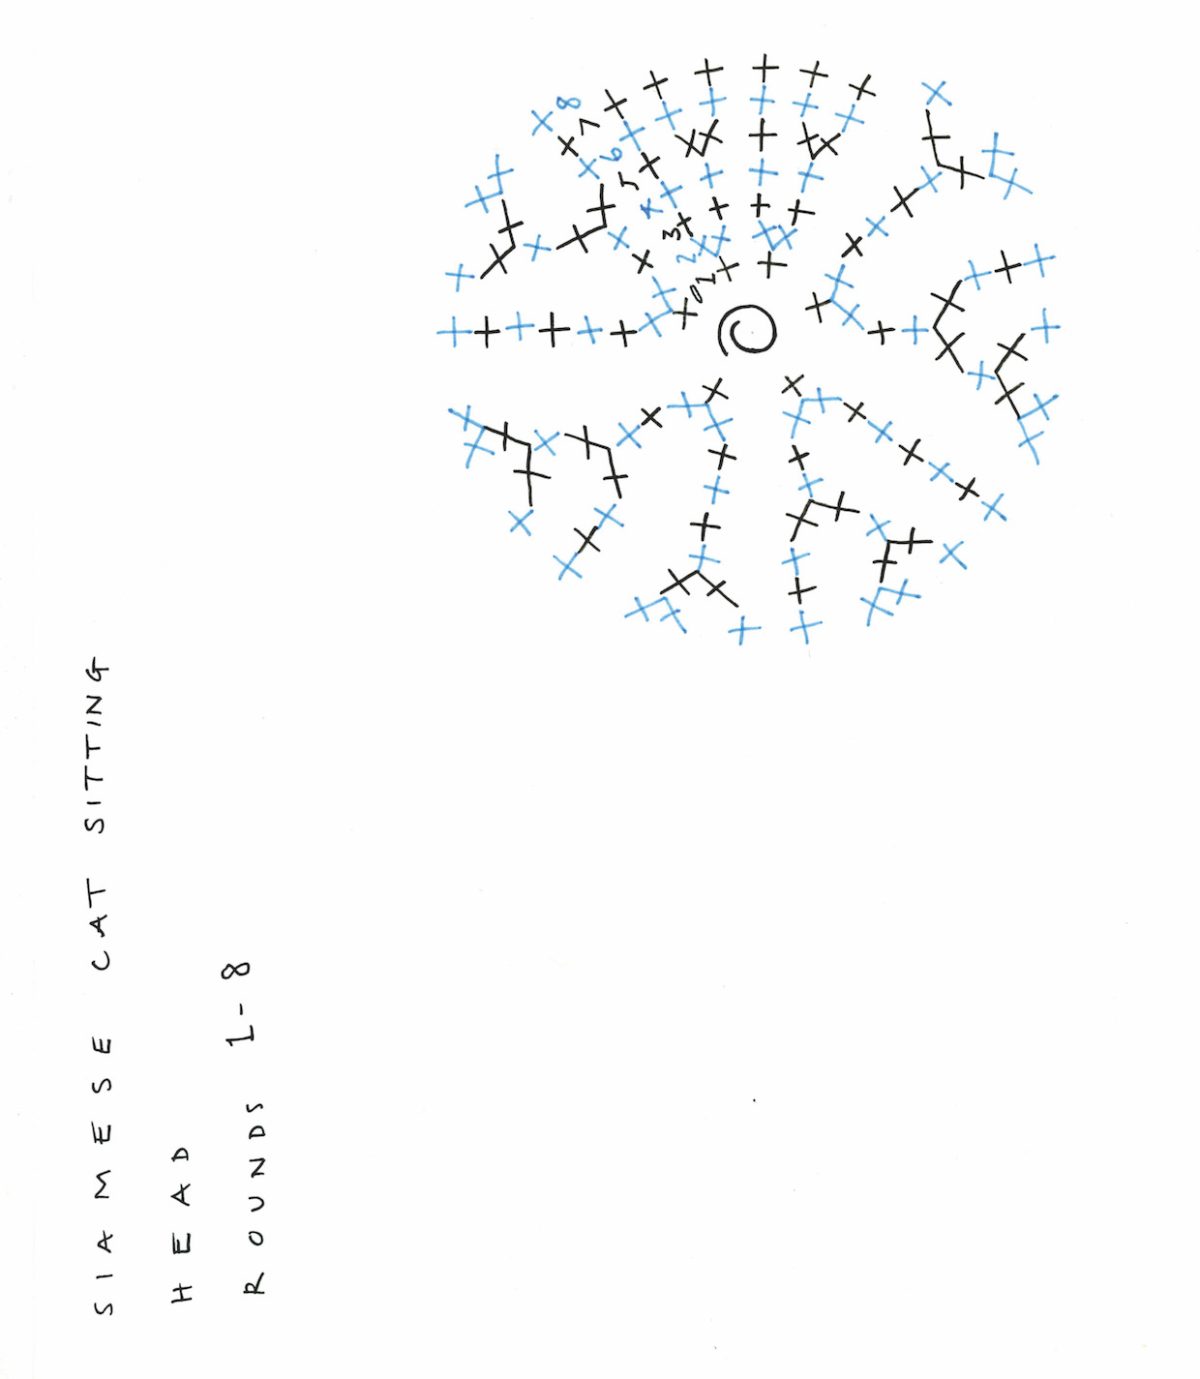

Starting at front of muzzle, with 3.25mm hook and A, make a magic loop.
Round 1: 1 ch, 6 dc into loop (6 sts).
Round 2 (inc): (Dc2inc) 6 times
(12 sts). Pull tightly on short end of yarn to close loop.
Rounds 3–4: 1 dc in each dc.
Round 5: (Dc2inc, 1 dc) 6 times. Join B in last dc (18 sts).
Round 6: With B, 1 dc in each dc.
Round 7 (inc): (1 dc, dc2inc) 6 times, 1 dc in next 6 dc. Join C in last dc
(24 sts).
Round 8 (inc): (1 dc, dc2inc, 1 dc) 6 times finishing 6 sts before the end, turn (30 sts).
Top of head
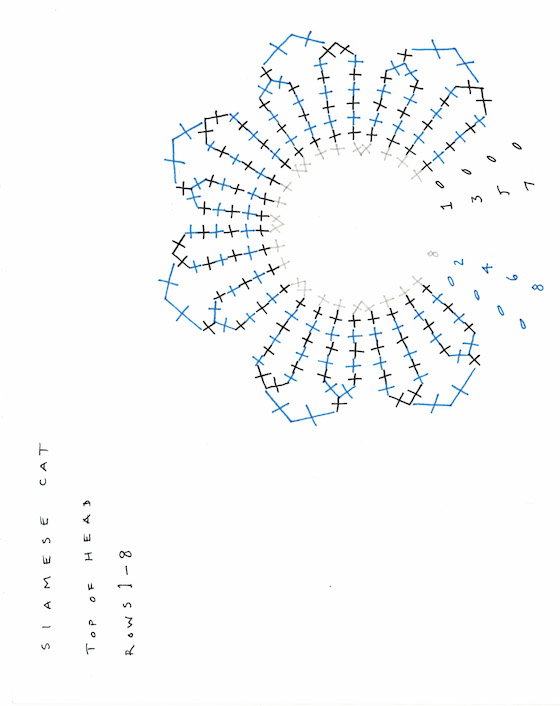
Row 1 (WS): 1 ch, 1 dc in next 24 dc. Join D in last dc, turn.
Continue with D on these 24 sts.
Row 2 (RS): 1 ch, 1 dc in each dc, turn.
Rows 3–5: Rep last row.
Row 6 (dec): 1 ch, (dc2tog, 2 dc) 6 times, turn (18 sts).
Row 7 (dec): 1 ch, (dc2tog, 1 dc) 6 times, turn (12 sts).
Row 8 (dec): 1 ch, (dc2tog) 6 times (6 sts).
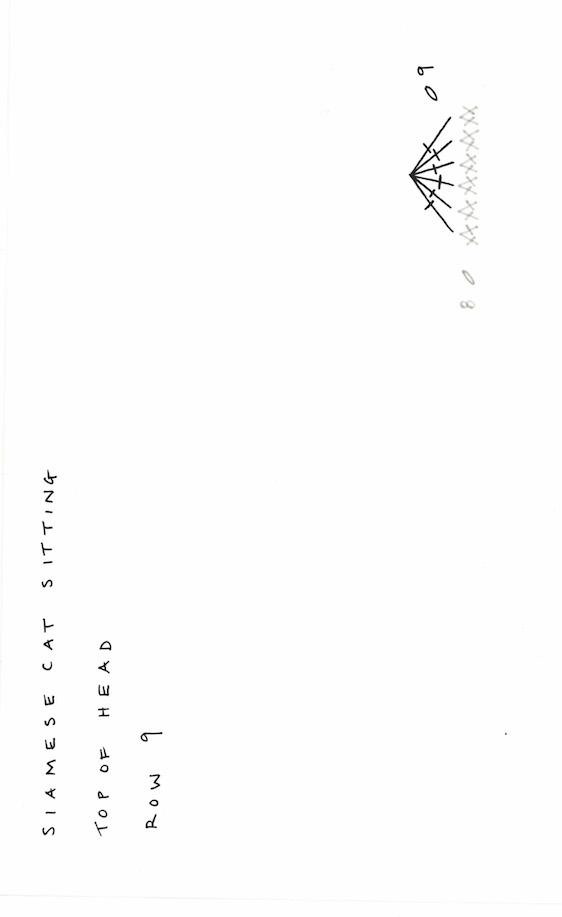
Row 9: 1 ch, dc6tog (insert the hook into the next st, yrh and draw back through the stitch 6 times (7 loops on hook), yrh and draw through all 7 loops on the hook, turn (1 st).
Neck
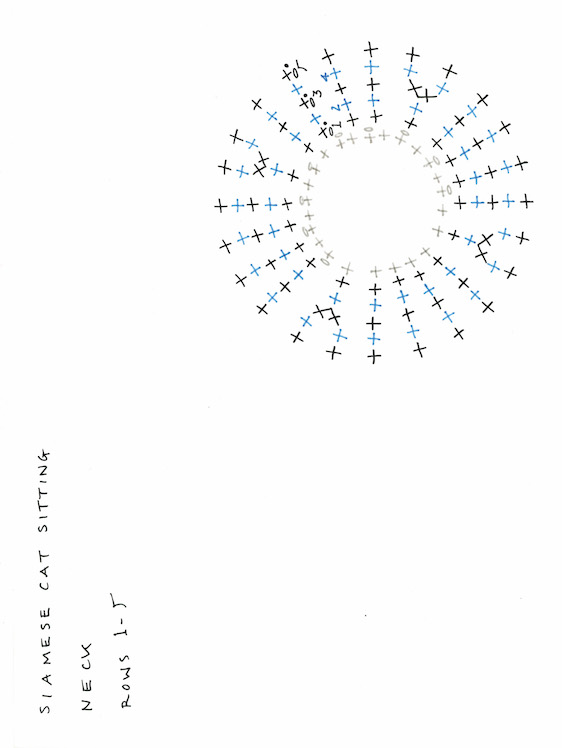
Row 1 (RS): 1 ch, rotate head and work 7 dc evenly along edge of the rows of head, 1 dc in next 6 unworked dc of round 7 of head, work 7 dc evenly along edge of rows of head, sl st to first dc, turn (20 sts).
Row 2 (WS): 1 dc in each dc, turn.
Row 3 (inc): 1 ch, (2 dc, dc2inc, 2 dc) 4 times, sl st to first dc, turn (24 sts).
Row 4: 1 dc in each dc, turn.
Row 5: 1 ch, 1 dc in each dc, sl st to first dc, turn.
Shape front of body
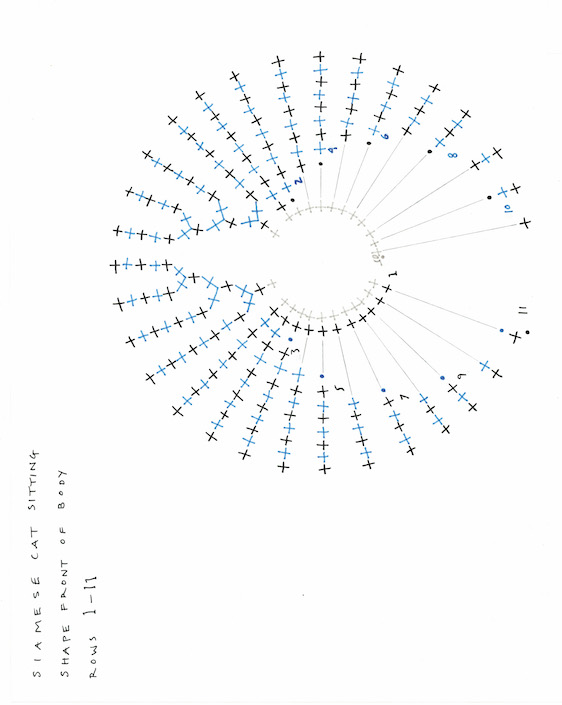
Row 1 (WS): 1 dc in next 14 dc, sl st in next dc, turn.
Row 2 (RS) (inc): 1 dc in same st as sl st, 1 dc in next dc, (dc2inc) twice, 1 dc in next 2 dc, sl st in next dc, turn (26 sts).
Row 3: 1 dc in same st as sl st, 1 dc in next 9 dc, sl st in next dc, turn.
Row 4 (inc): 1 dc in same st as sl st, 1 dc in next 4 dc, (dc2inc) twice, 1 dc in next 5 dc, sl st in next dc, turn (28 sts).
Row 5: 1 dc in same st as sl st, 1 dc in next 15 dc, sl st in next dc, turn.
Row 6 (inc): 1 dc in same st as sl st, 1 dc in next 7 dc, (dc2inc) twice, 1 dc in next 8 dc, sl st in next dc, turn (30 sts).
Row 7: 1 dc in same st as sl st, 1 dc in next 21 dc, sl st in next dc, turn.
Row 8: 1 dc in same st as sl st, 1 dc in next 23 dc, sl st in next dc, turn.
Row 9: 1 dc in same st as sl st, 1 dc in next 25 dc, sl st in next dc, turn.
Row 10: 1 dc in same st as sl st, 1 dc in next 27 dc, sl st in next dc, turn.
Row 11: 1 dc in same st as sl st, 1 dc in next 29 dc, sl st to first dc, turn.
Stuff head and neck before continuing.
Shape back
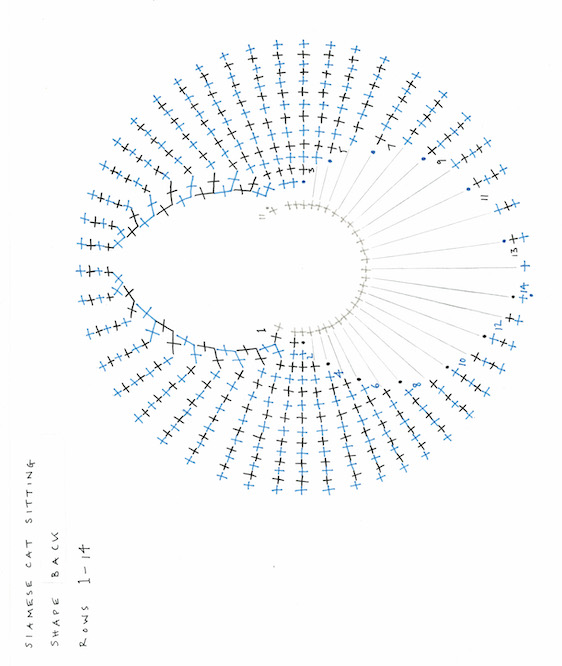
Row 1 (RS): 1 dc in next 2 dc, sl st in next dc, turn.
Row 2 (WS) (inc): 1 dc in same st as sl st, 1 dc in next dc, (dc2inc) twice, 1 dc in next 2 dc, sl st in next dc, turn (32 sts).
Row 3 (inc): 1 dc in same st as sl st, 1 dc in next 3 dc, (dc2inc) twice, 1 dc in next 4 dc, sl st in next dc, turn (34 sts).
Row 4 (inc): 1 dc in same st as sl st, 1 dc in next 5 dc, (dc2inc) twice, 1 dc in next 6 dc, sl st in next dc, turn (36 sts).
Row 5 (inc): 1 dc in same st as sl st, 1 dc in next 7 dc, (dc2inc) twice, 1 dc in next 8 dc, sl st in next dc, turn (38 sts).
Row 6 (inc): 1 dc in same st as sl st,
1 dc in next 9 dc, (dc2inc) twice,
1 dc in next 10 dc, sl st in next dc,
turn (40 sts).
Row 7 (inc): 1 dc in same st as sl st,
1 dc in next 11 dc, (dc2inc) twice,
1 dc in next 12 dc, sl st in next dc,
turn (42 sts).
Row 8 (inc): 1 dc in same st as sl st,
1 dc in next 13 dc, (dc2inc) twice,
1 dc in next 14 dc, sl st in next dc,
turn (44 sts).
Row 9 (inc): 1 dc in same st as sl st,
1 dc in next 15 dc, (dc2inc) twice,
1 dc in next 16 dc, sl st in next dc,
turn (46 sts).
Row 10 (inc): 1 dc in same st as sl st,
1 dc in next 17 dc, (dc2inc) twice,
1 dc in next 18 dc, sl st in next dc,
turn (48 sts).
Row 11: 1 dc in same st as sl st, 1 dc
in next 41 dc, sl st in next dc, turn.
Row 12: 1 dc in same st as sl st, 1 dc
in next 43 dc, sl st in next dc, turn.
Row 13: 1 dc in same st as sl st, 1 dc
in next 45 dc, sl st in next dc, turn.
Row 14: 1 dc in same st as sl st, 1 dc
in next 47 dc, sl st to first dc, turn.
Shape middle of body
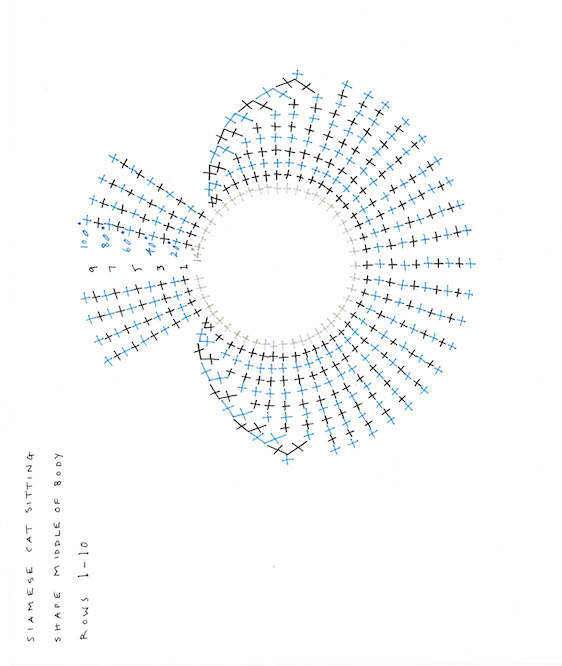
Row 1 (RS) (dec): 1 dc in next 4 dc, dc2tog, 1 dc in next 36 dc, dc2tog,
1 dc in next 4 dc, turn (46 sts).
Row 2 (WS) (dec): 1 ch, 1 dc in next 4 dc, dc2tog, 1 dc in next 34 dc, dc2tog, 1 dc in next 4 dc, sl st to first dc, turn (44 sts).
Row 3 (dec): 1 dc in next 4 dc,
dc2tog, 1 dc in next 32 dc, dc2tog,
1 dc in next 4 dc, turn (42 sts).
Row 4 (dec): 1 ch, 1 dc in next 4 dc, dc2tog, 1 dc in next 30 dc, dc2tog,
1 dc in next 4 dc, sl st to first dc, turn
(40 sts).
Row 5 (dec): 1 dc in next 4 dc,
dc2tog, 1 dc in next 28 dc, dc2tog,
1 dc in next 4 dc, turn (38 sts).
Row 6 (dec): 1 ch, 1 dc in next 4 dc, dc2tog, 1 dc in next 26 dc, dc2tog,
1 dc in next 4 dc, sl st to first dc, turn
(36 sts).
Row 7 (dec): 1 dc in next 4 dc, dc2tog, 1 dc in next 24 dc, dc2tog, 1 dc in next 4 dc, turn (34 sts).
Row 8 (dec): 1 ch, 1 dc in next 4 dc, dc2tog, 1 dc in next 22 dc, dc2tog, 1 dc in next 4 dc, sl st to first dc, turn (32 sts).
Row 9 (dec): 1 dc in next 4 dc, dc2tog, 1 dc in next 20 dc, dc2tog, 1 dc in next 4 dc, turn (30 sts).
Row 10: 1 ch, 1 dc in each dc, sl st to first dc, turn.
Shape end of body
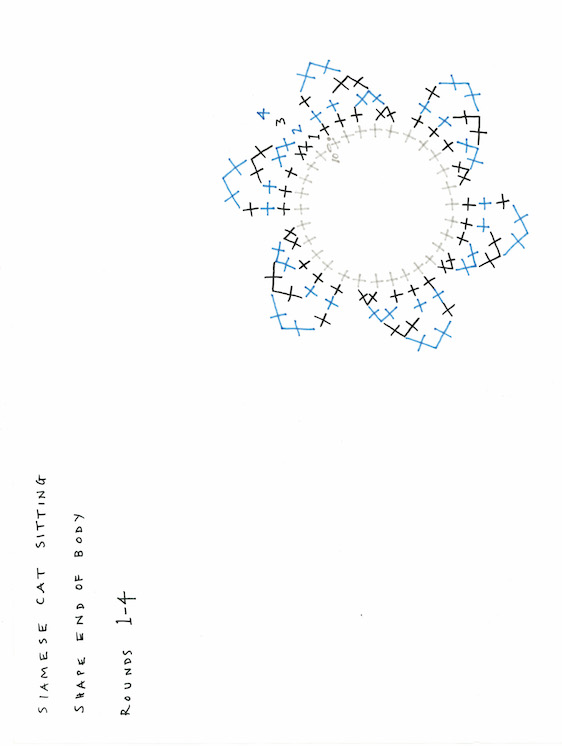
The following is worked in rounds.
Round 1 (dec): (Dc2tog, 3 dc) 6 times (24 sts).
Stuff body before continuing.
Round 2 (dec): (Dc2tog, 2 dc) 6 times (18 sts).
Round 3 (dec): (Dc2tog, 1 dc) 6 times (12 sts).
Round 4 (dec): (Dc2tog) 6 times
(6 sts).
Break yarn and thread through last
6 stitches. Pull tightly on end of yarn to close. Fasten off.
Ears (make 2)
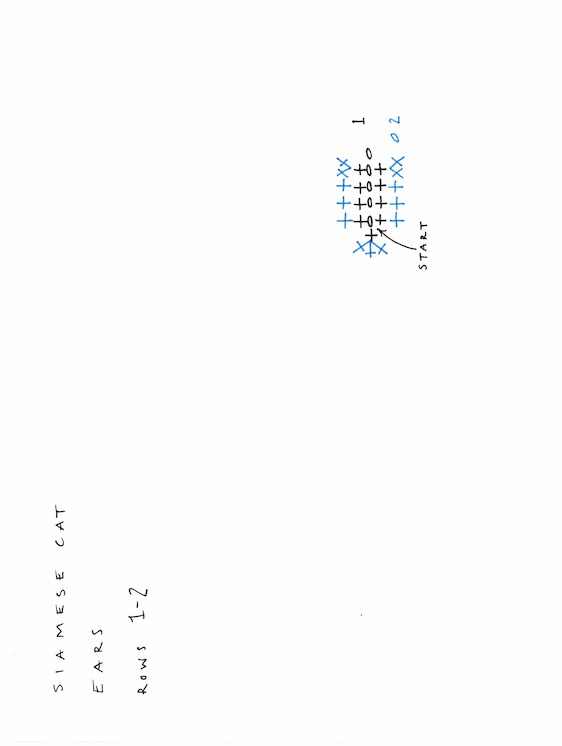
With 3.25mm hook and B, make 5 ch.
Row 1: 1 dc in 2nd ch from hook, 1 dc in next 2 ch, 3 dc in next ch, 1 dc in reverse side of next 3 ch, turn (9 sts).
Row 2 (inc): 1 ch, dc2inc, 1 dc in next 3 dc, dc3inc, 1 dc in next 3 dc, dc2inc. (13 sts).
Fasten off, leaving a long tail of yarn. This completes the inner ear.
With A, make one more piece to match the first for the outer ear. Turn work at the end and do not fasten off.
Join ear pieces
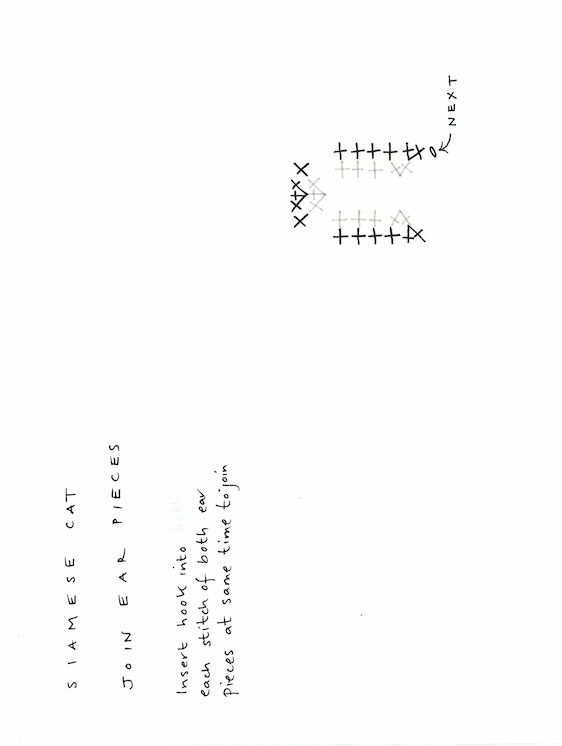
Place the two ear pieces together, with the inner ear facing up.
Next: 1 ch, inserting the hook under both loops of each stitch of the inner ear first, then the outer ear at the same time to join, dc2inc, 1 dc in next 5 dc, dc3inc, 1 dc in next 5 dc, dc2inc (17 sts). Fasten off, leaving a long tail of yarn.
Front legs (make 2)
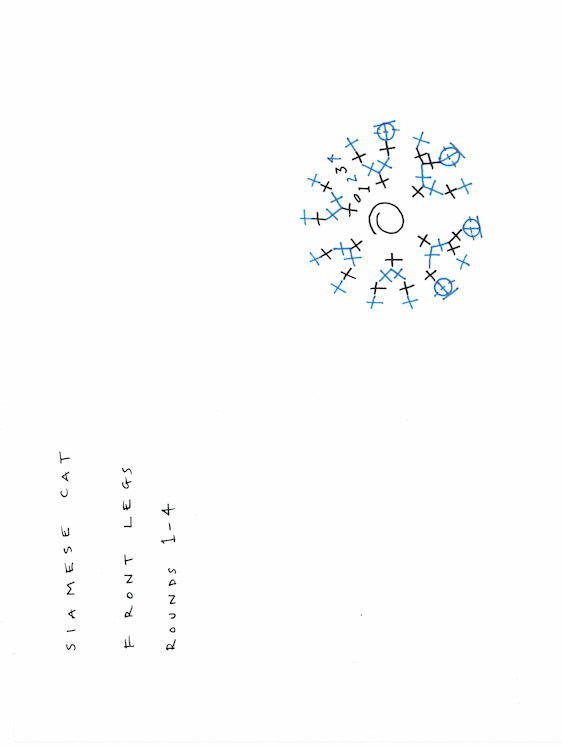
The bobbles appear on the reverse side of the work. This will be the right side.
Starting at the base of the paw,
with 3.25mm hook and A, make a magic loop.
Round 1 (WS): 1 ch, 6 dc into loop
(6 sts).
Round 2 (inc): (Dc2inc) 6 times
(12 sts). Pull tightly on short end of yarn to close loop.
Round 3 (inc): 1 dc in next 7 dc, (dc2inc, 1 dc) twice, 1 dc in next dc (14 sts).
Round 4: 1 dc in next 6 dc, (mb, 1 dc in next dc) 4 times, turn.
Round 5 (RS) (dec): 1 ch, 1 dc in first dc, (1 dc in next st, dc2tog) twice, 1 dc in next 7 dc (12 sts).
Round 6 (dec): (1 dc in next dc, dc2tog) twice, 1 dc in next 6 dc
(10 sts).
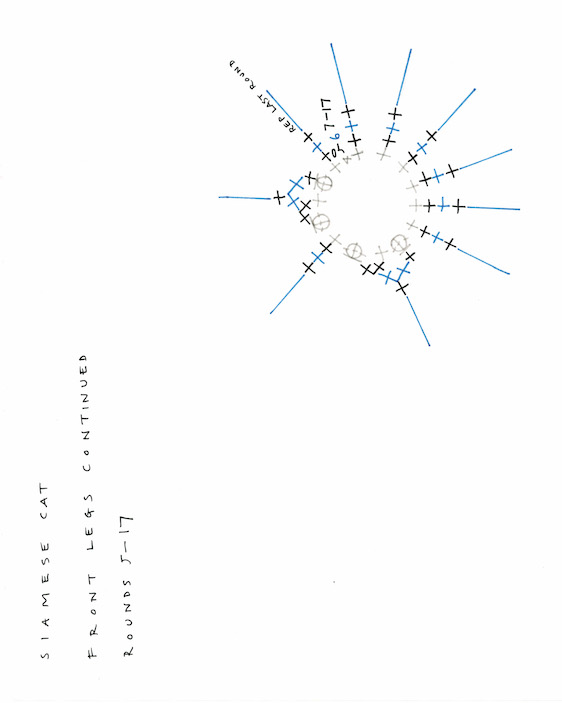
Round 7: 1 dc in each dc. Join B in last dc.
Rounds 8–15: 1 dc in each dc with B. Join C in last dc of round 15.
Rounds 16–17: 1 dc in each dc
with C. Join D in last dc of round 17.
Continue with D.
Round 18 (inc): (Dc2inc, 4 dc) twice (12 sts).
Round 19: 1 dc in each dc.
Round 20 (inc): (Dc2inc, 3 dc) 3 times (15 sts).
Rounds 21–23: 1 dc in each dc.
Stuff leg before continuing.
Round 24 (dec): (Dc2tog, 1 dc) 5 times (10 sts).
Round 25 (dec): (Dc2tog) 5 times
(5 sts).
Break yarn and thread through last round of stitches. Pull tightly on end of yarn to close and fasten off, leaving a long tail of D.
Hind legs (make 2)
Follow charts for the sleeping Russian Blue’s hind legs.
Starting at the front of the paw, with 3.25mm hook and A, make 6 ch.
Round 1 (WS): 1 dc in 2nd ch from hook, (mb, 1 dc in next ch) twice, 1 dc in reverse side of each ch to end (10 sts).
Round 2 (inc): 1 dc in next dc, mb in same st as last dc, 1 dc in next 3 dc, mb, 1 dc in same st as last st, dc2inc,
1 dc in next 3 dc, dc2inc, turn (14 sts).
Round 3 (RS): 1 ch, 1 dc in each st.
Round 4: 1 dc in each dc. Join B in last dc.
Continue with B.
Rounds 5–6: 1 dc in each dc.
Round 7 (dec): (1 dc, dc2tog) twice , 1 dc in next 8 dc (12 sts).
Round 8: 1 dc in each dc.
Round 9 (dec): (Dc2tog, 1 dc) twice, 1 dc in next 6 dc (10 sts).
Rounds 10–14: 1 dc in each dc.
Shape back of leg
Round 15: 1 dc in next 2 dc, ending at the side of the leg; 5 ch, skip the 5 dc at the front of the leg, 1 dc in next 3 dc.
Round 16: 1 dc in next 2 dc, 1 dc in next 5 ch, 1 dc in next 3 dc.
Break yarn and thread through last round of stitches. Pull tightly on end of yarn to close and fasten off.
Shape thigh
With RS of leg facing, 3.25mm hook, join B with a sl st to first of 5 skipped dc.
Round 1: 1 dc in same st as sl st, 1 dc in next 4 dc, 1 dc in reverse side of next 5 ch (10 sts).
Round 2 (inc): (Dc2inc, 1 dc) 5 times (15 sts).
Round 3 (inc): (Dc2inc, 2 dc) 5 times. Join C in last dc (20 sts).
Round 4 (inc): With C, (dc2inc, 3 dc) 5 times (25 sts).
Round 5 (inc): (Dc2inc, 4 dc) 5 times. Join D in last dc (30 sts).
Continue with D.
Rounds 6–11: 1 dc in each dc.
Round 12 (dec): (Dc2tog, 3 dc) 6 times (24 sts).
Stuff the leg and lightly stuff the thigh before continuing.
Round 13 (dec): (Dc2tog, 2 dc)
6 times (18 sts).
Round 14 (dec): (Dc2tog, 1 dc)
6 times (12 sts).
Round 15 (dec): (Dc2tog) 6 times
(6 sts).
Break yarn and thread through last round of stitches. Pull tightly on end of yarn to close and fasten off, leaving a long tail of D.
Tail

With 3.25mm hook and A, make
31 ch.
Row 1: 1 dc in 2nd ch from hook, 1 dc in next 28 ch, 3 dc in end ch, 1 dc in reverse side of next 29 ch, turn
(61 sts).
Row 2 (dec): 2 ch, 1 htr in next 8 dc, 1 dc in next 2 dc, (dc2tog, 1 dc) 4 times, 1 dc in next 8 dc, dc3inc, 1 dc in next 8 dc, (1 dc, dc2tog) 4 times, 1 dc in next 2 dc, 1 htr in next 8 dc (55 sts).
Fasten off, leaving a long tail of yarn at the end.
Making up
Head
Embroider the nose in satin stitch using three strands of metallic embroidery thread. With the thread used for the nose, embroider the pupils of the eyes. Work straight stitches around the pupils to form the irises.
Ears
Stuff the ears lightly, keeping them flat. Sew the ears in place, near the back of the head, stitching all around the lower edges with the tails of yarn left after fastening off.
Legs
Flatten the top of the legs and sew in place, stitching all around the top of the thighs with the tail of yarn left after fastening off.
Tail
Using the length of yarn left after fastening off, fold the tail lengthways and sew the long edges together with whip stitch. Use the end of the crochet hook to push a small amount of stuffing into the tail. Sew the tail in place, so it curls up or wraps around the side of the body.
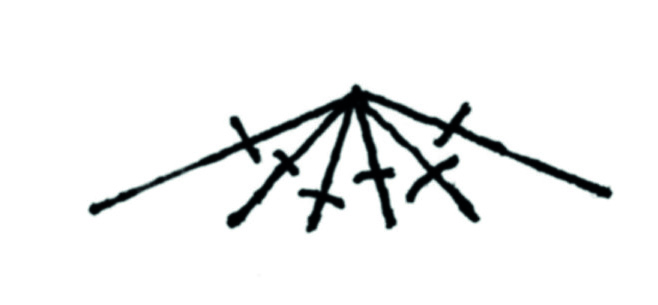
Whiskers (optional)
Attach three whiskers to the posts of the stitches on each side of the muzzle. Trim the ends.
Weave in all the yarn ends.
Head. Rounds 1–8
Top of head. row 9
Top of head. rows 1–8
Neck. Rows 1–5
Shape front of body. Rows 1–11
Shape back. Rows 1–14
Shape middle of body. rows 1–10
Shape end of body. rounds 1–4
Ears. Rows 1–2
Join ear pieces. Insert hook into each stitch of both ear pieces at same time to join
Front legs . Rounds 1–4
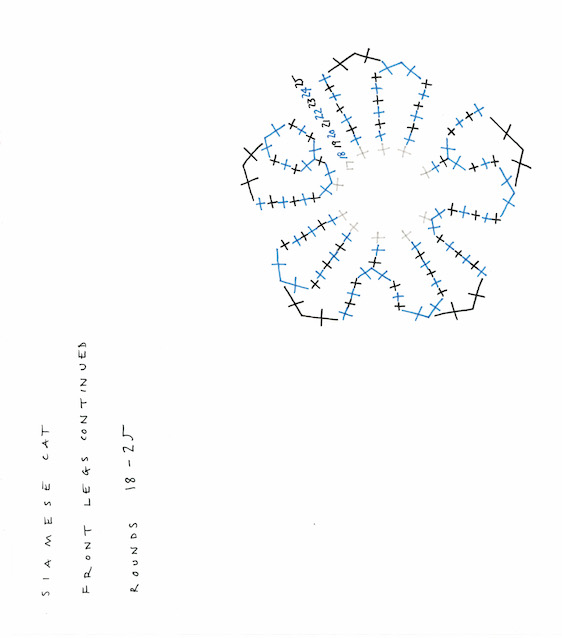
Front legs continued. Rounds 5–17
Front legs continued. Rounds 18–25
Tail. rows 1–2
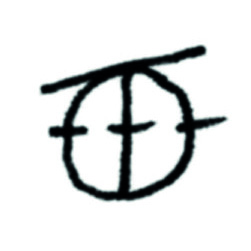
Satin stitch
Satin Stitch and Whiskers
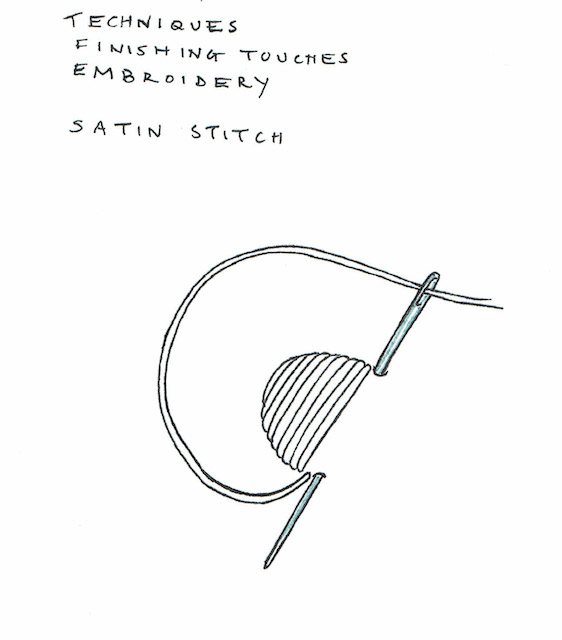
Work straight stitches side by side and close together across a shape. Take care to keep the stitches even and the edge neat. The finished result will look like satin.
Whiskers
Clear nylon thread is used for the optional whiskers of each cat. This thread tends to work loose, so is not suitable for young children. To give your cat whiskers, follow the instructions for attaching tassels.
Straight Stitch and Whip Stitch
Straight stitch
This is a single stitch that can be worked in varying lengths, which is useful for embroidering lines.
Whip stitch
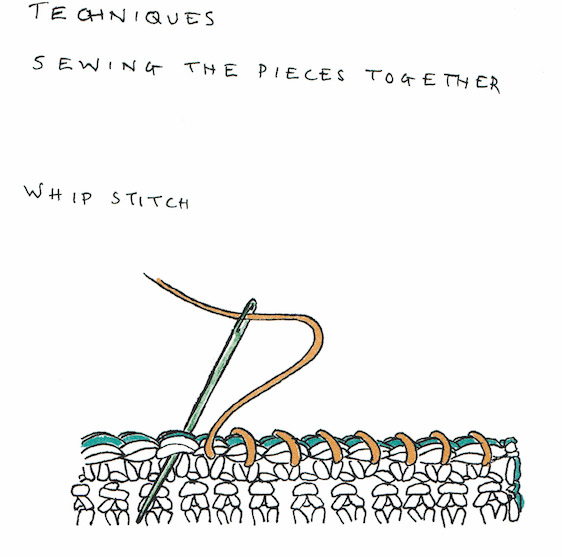
Whip stitch is used to sew together the edges of most of the cats’ tails. Thread the tail of yarn left after fastening off onto a blunt-ended yarn needle. With wrong sides of the tail together, insert the needle, from back to front, through a stitch on both sides at the same time and draw the yarn through the stitch. Insert the needle through the next stitch on both sides, from back to front, as before, and continue to the end. The yarn will be wrapped around the edges, joining the two sides.
Key
Chain (ch)

Slip stitch (sl st)

Double crochet (dc)
dc2inc
dc2tog
Dc6tog
Make bobble (mb)
Republished with permission from Crocheted Cats by Vanessa Mooncie, GMC Publications, RRP $27.99, available online and from all good bookshops.


What do you think of this project? Let us know!