
Get more details about this project
What you need
Broken or discarded computer keyboard
Flat head screwdriver
Pliers
Candle
Small nail
Safety glasses
Dish soap
Jump rings
Dremel tool with grinding attachment (optional)
Jewelers glue (optional)
Instructions
Prepare Keyboard Keys
Begin by removing the keys from the keyboard. This is easily done on most older keyboards by prying each key upwards with a flat head screwdriver. Some of the newer keyboards use small metal spring arms and require each key to be pushed in a certain direction to be removed. If you are having trouble with your keyboard Google the brand/model and ‘key removal’.
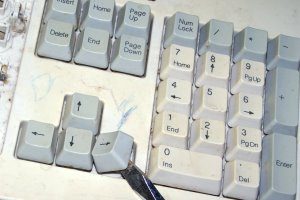
Some keys, like the ones pictured, are attached to the keyboard via four plastic pieces on the back of each key. You may or may not wish to remove them depending on their size, appearance, and how you would like them to lay or hang when being worn.
To remove the plastic pieces twist each one separately with the pliers until it snaps off. Most of the pieces should break neatly at the base but for those that don’t you can use a dremel tool with a grinding attachment to quickly smooth rough edges.
Next, you will need to make holes for stringing or attaching jump rings. If the keys are to be strung you will need to make a hole on each side of the key, if they are to be hung as pendants or earrings you will need to make only one hole at the top of each key.
The following step should be done outdoors or in a well ventilated area! Don’t forget to wipe the nail with a rag between each hole you make. Doing so will help ensure each hole is as clean as possible.
More importantly though, it will minimize the amount of plastic you are burning, keeping this an earth-friendly recycled project!
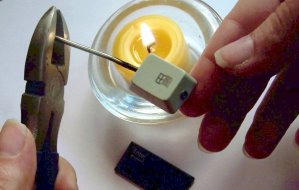
To make each hole:
Use the pliers to hold the tip of the nail in the candle flame for approximately thirty seconds then quickly pierce the key from the back side. To smooth the edges around the hole, re-heat nail and insert again starting from the front side of the key.
When all necessary holes have been made thoroughly wash and dry each key.
Bracelet
If using ribbon or similar stringing material that can be tied to secure rather than using a clasp, string one half of jewelry piece beads etc., add pendant, and complete by beading other half of piece and tying off.
If using beading wire or similar stringing material that requires a clasp start by threading one side of the clasp to the middle of a length of material measuring double the desired finished length.
Holding both ends of your stringing material together, thread beads etc. until you reach the center point of the necklace, anklet, or bracelet. Add keyboard key pendant and continue beading until just before the end of your stringing material, end off necklace as desired using a crimp bead/bead cap etc. and knotting.
Connect the end of your necklace and the other half of a clasp with a jump ring.
Beaded style –
Follow above directions for starting and ending jewelry piece. Do not add jump rings, instead thread keys on stringing material through both holes of each key. Add beads etc. throughout as desired.
All done!


These comments are beyond belief. You don’t like it so it must be bad, right? Get over yourselves. There are a lot of people who would love this. Perhaps the problem is that this project is not something you see every day and some people have a problem with people and things that are different. No one is wearing a keyboard on their wrist here. It is ONE key, not the entire board. It’s cute, it’s quirky, and the tutorial was excellent. You know what they say: Haters gonna hate.
this is too cool!
This bracelet is unusual I don’t know who would like this as a gift or for themselfs. But nice idea for techy people.
wait, who the hell would like to get it for a gift or even make this???????!!!
Although this is a good idea, you need a better picture of the finished bracelet.
the point of this braclet is?
this is awesime
Very SAD people!!!
Wow…… YOU SAD SAD PEOPLE….
I LOVE THIS! this is so up my alley! i have loads off techy junk laying around that is so last years model. Now i can make amazing bracelets and everything out of it!! THANK YOU SO MUCH!
thats just wierd why?
awesome, i am ging to have fun making these!
That is a great bracelet idea! I will defo make this with old keyboards and sell the merch to my collegues
Oh, this sounds cool! I’m a junk collector, and I have a bunch of old keyboard keys in my collection, now I can wear them! Thanks!
I’m a middle school teacher and I’m sure most of my students would find it original and maybe even cool, lol. I’ll try it for Xmas gifts 🙂 Thanx!
I am doing a project assignment for school.
We are learning about sustainability and how we can save the environment.
I was looking for some ways to have fun and reduce, reuse and recycle at the same time.
This is such a great example and I will make sure that I share this example with many people…
Thanks very much… 🙂
i’m going to make a whole set with my grandma and wear it to school as a theme to go with my geeky floppy notebook!!!!
This is a cool idea. I just saw a necklace in a antique store make with an old round, black typewriter key. The single key was on a chain…marked $16. The keyboard would definately sell to the NOW generation. Or should we call them the SCREEN generation?
this is cool and quirky
reduce reuse recycle!!!
I like this idea its different and its cheap, I am going to try it too. Thank you.
I didn’t star rate it because I haven’t tried it yet,but it sounds like fun.
I like this idea its different and its cheap, I am going to try it too. Thank you.
Sounds super bubbly I’m gonna try this!And don’t be bogus.I’d wear a keyboard on MY wrist!
What would you fill in the back of key with to prevent scratching of wrist or ankle. The thing on the inside is twisted off but to smooth it out. Maybe silicone of some sort? Thanks Patty
thats ockward sorry but who wants a keyboard on their wrist?!?!?!
Pretty cool I’ll have to try this one for sure
cant wait to get started on this project.