
Get more details about this project
What you need
One plain black cotton T-shirt
Cream or off-white felt or fabric
Yellow felt or fabric
Orange felt or fabric
Paper-backed fusible webbing
Orange fabric paint
White, cream or pale-gray fabric paint
Orange pony beads
Yellow pony beads
Candy-corn paper template
Fabric scissors
Paper scissors
Pencil or fabric-marking tool
Iron and ironing board
Pressing cloth
Cardboard or thick scrap paper
Ruler
Instructions
Wash and dry the T-shirt before decorating it. Prewashing removes sizing and allows the fabric to shrink before the appliqués are attached.
The candy-corn decorations are created by combining cream, orange and yellow fabric pieces into softly rounded triangular shapes. Painted spirals fill the spaces between the appliqués, while cut-and-beaded sleeves give the finished shirt movement and personality.
Instructions
Step 1: Prewash the T-shirt
Wash and dry the black T-shirt without using fabric softener.
Press the shirt if necessary so the front and sleeves are smooth and easy to work with.
Do not begin decorating the shirt until it is completely dry.
Step 2: Make the candy-corn template
Draw a softly rounded triangle on paper or lightweight cardboard.
The shape should have a narrow point and a wide, slightly curved base. Make the template approximately 4–5 inches tall, or adjust it to suit the shirt size.
Divide the triangle into three horizontal sections.
Label the narrow pointed section yellow, the middle section orange and the wide base cream to match the original shirt design.
Cut the three sections apart to create individual pattern pieces.
Step 3: Apply the fusible webbing
Follow the directions supplied with the paper-backed fusible webbing.
Fuse a piece of webbing to the wrong side of the cream, yellow and orange fabrics.
Use a pressing cloth if required by the fabric or webbing manufacturer.
Allow the fabric to cool before tracing and cutting.
Step 4: Cut the appliqué pieces
Trace the appropriate template section onto the paper backing of each fabric.
Cut out enough yellow, orange and cream sections to make four complete candy-corn appliqués.
Use paper scissors for the template and sharp fabric scissors for the fused fabric.
Keep the corresponding pieces grouped together so the appliqués remain consistent.
Step 5: Assemble the candy corn
Place one cream base, one orange middle and one yellow tip together on the protected ironing surface.
Adjust the edges so they form one complete rounded triangle.
The sections can meet edge-to-edge or overlap very slightly, depending on the fusible webbing and fabric used.
Repeat for the remaining candy-corn shapes.
Step 6: Arrange the appliqués
Lay the T-shirt flat with the front facing upward.
Place a piece of cardboard inside the shirt to keep the front and back layers separate.
Arrange the four candy-corn appliqués across the front. Create a loose diagonal or scattered pattern similar to the original design.
Turn some shapes slightly so the design feels playful rather than perfectly uniform.
Leave room between the appliqués for the painted spirals.
Step 7: Fuse the appliqués
Once you are satisfied with the arrangement, remove the paper backing from the fusible webbing.
Fuse each candy-corn section to the T-shirt according to the webbing manufacturer’s instructions.
Use the recommended heat setting, pressing cloth and pressing time. Do not slide the iron back and forth because this may shift the pieces.
Allow the appliqués to cool completely before moving the shirt.
Step 8: Outline the candy corn
Use fabric paint to outline each candy-corn shape.
A narrow orange, yellow or cream outline can help define the edges and secure the layered appearance.
If the fusible webbing is not designed to remain secure through repeated washing without stitching, sew around the appliqué edges using a narrow zigzag or blanket stitch.
Allow the outline paint to dry before adding the background details.
Step 9: Paint the spirals
Use orange and pale-gray or cream fabric paint to draw small spirals in the open spaces between the candy-corn appliqués.
Vary the spiral sizes and placement across the shirt.
Avoid applying thick puddles of paint because they may crack or feel stiff when dry.
Follow the paint manufacturer’s instructions for drying and heat-setting.
Step 10: Mark the sleeve fringe
Lay one sleeve flat and smooth out any wrinkles.
Beginning at the sleeve hem, mark narrow vertical strips approximately ½ inch wide.
Decide how long you want the fringe to be before cutting. Leave at least 1–1½ inches of uncut fabric beneath the underarm seam so the sleeve remains secure.
Repeat on the second sleeve, keeping the strips approximately the same width and length.
Step 11: Cut the sleeves
Use sharp fabric scissors to cut along each marked line.
Cut upward from the sleeve hem and stop at the chosen fringe depth.
Do not cut through the sleeve seam or into the body of the shirt.
Gently pull each strip lengthwise. Cotton jersey should curl slightly and form a narrow cord-like fringe.
Step 12: Add the beads
Thread four pony beads onto the first sleeve strip.
Use the following alternating sequence:
Yellow, orange, yellow, orange
On the next strip, reverse the order:
Orange, yellow, orange, yellow
Continue alternating the sequences across the sleeve.
Repeat on the second sleeve.
Step 13: Secure the fringe
Tie a firm knot at the end of every fabric strip so the beads cannot slide off.
Check that each knot is larger than the opening in the pony beads.
Trim only small uneven ends beneath the knots. Do not cut so close that the knots can loosen.
Step 14: Finish the shirt
Check every appliqué edge, painted section, bead and knot.
Allow all fabric paint and adhesive to dry or cure fully according to the product directions.
Remove the cardboard from inside the shirt before wearing or washing it.
Optional Variations
Add beaded fringe to the bottom hem using the same technique.
Include cream or white pony beads to create a three-colour candy-corn sequence.
Use a purple shirt for a brighter Halloween colour combination.
Make smaller appliqués for children’s shirts.
Sew around the appliqués with contrasting blanket stitch for a handmade finish.
Care Instructions
Follow the care directions supplied with the fusible webbing and fabric paint.
For best results, turn the finished shirt inside out and place it in a mesh laundry bag.
Wash gently in cold water.
Avoid bleach and high heat.
Allow the shirt to air-dry so the beads do not strike the inside of a hot dryer.
Do not iron directly over the fabric paint, appliqués or pony beads.
Check the fringe knots after washing and tighten them if necessary.
Safety Information
An adult should supervise the use of scissors, irons and fabric paint.
Pony beads can present a choking hazard and are not suitable for children under three.
Make sure every fringe knot is secure before wearing the shirt.
Avoid making the sleeve fringe so long that it can catch on objects or equipment.
Follow all ventilation, heat-setting and safety directions printed on the fabric-paint, fusible-webbing and adhesive packaging.
Wash t-shirt. Fuse the webbing to the felt or fabric. Trace and cut out candy corn pieces.
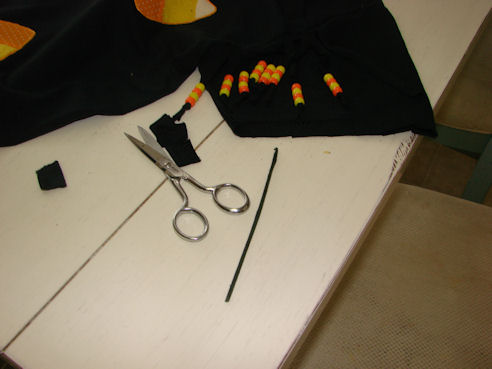
Arrange them how you would like and how ever many you would like.
Press according to directions on the fusing package.
Outline candy corn in fabric paint and make designs on the shirt. Allow to dry.
Cut ½ strips on each sleeve.
Feed each strip through a bead.
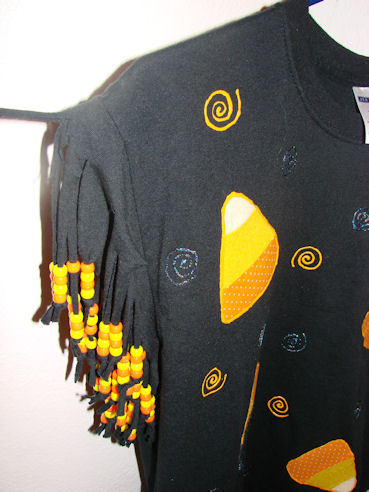
Use 4 beads rotating colors on each strip (Strip one yellow, orange, yellow orange; strip two orange, yellow, orange, yellow) and tie a knot at the end so the bead doesn’t fall off.
You can also bead the bottom of the shirt. Be creative and do your own designs.



This has been most helpful. I have always wanted to make a tee shirt with the pony beads but was unsure of how wide to cut the sleeve strips. This shirt is such a cute idea.
I have a local tee shirt from a band I want to put beads one. I plan on using red, white and blue as those are the colors in the picture on the front of the tee shirt the band
chose for their guitar. Thanks for being so helpful.
Cute shirt – great idea!!!! It would also be cut to use orange, yellow and white beads on the sleeves and hem – candy corn order of course!!!