
Get more details about this project
What you need
7-9 Shamballa Style Beads
1 x 10m pack of 1.5mm shamballa style cord
1 x Shamballa style slider bead
2 x end beads
1 x safety pin
1 x lighter, thread zapper


Instructions
STEP 1. Cut a 40cm piece of Shamballa style cord. Measure around 10cm
from one end and tie a knot. Put a safety pin through the knot and attach to a bead mat. Posititon so the long end points towards you, and the short end points away from you. Put a dab of nail varnish on the end of your thread or use a thread zapper to make threading beads easier. Now cut another piece of Shamballa style cord approx. 1m in length. It is always better to overestimate the length to make sure you don’t run out of cord! Find the centre of this cord and tie around your original cord, as close as you can to the pinned knot (see Pic 1).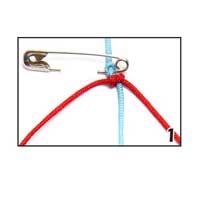

STEP 2. You now need to tie a square knot. Place the left thread over the centre thread & under the right thread, making a 4-shape (pic 2). 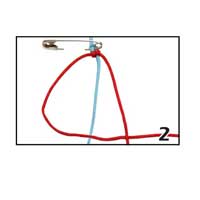

Now take the right thread & post the end underneath the point that the centre and left threads cross. Bring it up through the loop & pull both your outer threads away from each other to tighten (pic 3). 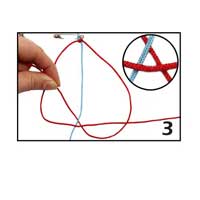

This creates half a square knot. To complete the square knot, do the same thing starting from the opposite side. So, take the right thread over the centre & under the left, creating a D-shape (pic 4). 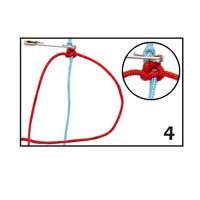

Take the left thread under the point the middle & right threads cross, & bring up through the loop. Pull tight as before (pic 5). 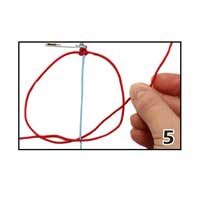

Repeat this process until you have created approx. 3 square knots, then thread a shamballa style bead on to the centre thread. Bring the outer threads around the bead and continue knotting. Add 1 or 2 square knots between each bead and keep going until you have added 7-9 beads. Tie 3 square knots after the last bead (pic 6).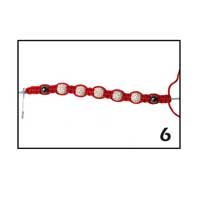

STEP 3. Cut off the outer threads leaving approx. 2mm either side. Glue the ends to hold your knotting. You can also singe the ends with a lighter or a thread zapper, but take great care if you choose this option. Now turn your bracelet over. If you are adding a slider, thread either end of your centre thread through the slider in opposite directions. Take a new piece of cord approx. 1m long and tie over BOTH centre threads. Tie a few square knots before the slider, then bring the cords around the slider as you did with the beads earlier (Pic 7).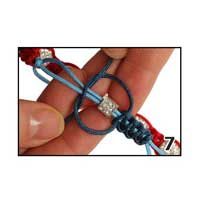

Tie another few square knots after the slider, then secure the cord by glueing or singeing as before.
STEP 4. Finally, thread a small bead on to each end to finish them off. Knot either end to keep the beads on. The knot with the slider should allow the two ends to slide through so you can make the bracelet larger and smaller. Find out how much you need to open the bracelet and make the ends just a little longer than this, then they won’t dangle too much when you are wearing the bracelet.


I LUV THESE THEY ARE SO COOL!
I’ve made a ton of these bracelets and I think they r SUPER CUTE!!!!!!! Thanks!!!!!
I have never tired it and i haven’t yet but it looks so cool! 🙂
Great instructions… Nice pictures to go by… I like this one….
Thank you
what size shamballa beads are used in this project