
What you need
Felted wool sweater
Tape measure or yard stick
Pair of sharp scissors
Marker pen
Blunt end needle
Yarn or thread for sewing pieces together
Pins or safety pins
Instructions
Your sweater should be felted before you begin.
The easiest way is to use the sweater sleeves. You might as well use the cuffs that are already there and reduce the need for stitching.
You will need to know how to sew back stitch too.

Here’s how to make mittens from old wool sweaters…
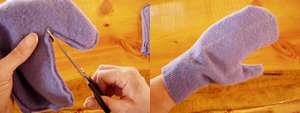
- Push your hand into the sleeve from the cuff end.
You can feel how long your mittens should be at the cuff,
so you know which part of your wrist should be at the start of
the tape measure. - Lay your hand on the tape
measure with your fingers pointing along the numbers. Take into
account the depth of cuff you want and note the measurement
ONE inch past your fingertips. This measurement will include
your seam allowance. - Turn your sweater inside out. Place tape measure on
sweater sleeve and cut straight across sleeve at correct
measurement. Repeat on second sleeve. - Pin or safety pin the sleeve together to prevent twisting.
Place your non-writing hand on one cut sleeve piece with your
wrist over the cuff section and the sleeve seam right next to your
little finger. Spread your thumb away from your hand so that it lays
parallel with the sleeve fold. - Keeping at least a ONE INCH space around your handand tapering from
the sleeve seam, draw a rounded mitten edge around your fingers and
down to your thumb joint. Keeping a HALF INCH space around your thumb,
draw up the length of your thumb and around the top tapering the thumbs’
top curve into the sleeve fold. - Cut along your line. Pin your second sleeve together, place
your mitten template on the other sleeve so the seams are on top of
one another. Draw around and cut out the second mitten. - You’re now ready to
back stitch
your mittens about a quarter inch in from the cut edge. Work
from the sleeve seam all the way around the open edge for
each mitten, tapering into the seam and the fold. - It’s probably more comfortable to wear if you trim your seams down
to about a quarter inch width. You should also make a small snip
in the seam edge of both mittens at the point where your thumb and hand parts meet.
Snip in towards the seam but be sure not to cut your stitching.
This will prevent wrinkling at the thumb joint. - Turn your mittens right side out and you’re done!
Now you know how to make mittens from old wool sweaters. Don’t throw away the rest of the sweater yet. You can save the small pieces to try some needle felting. The rest you can turn into a bag or a multitude of items.
You could try needle felting or embroidering a design onto the back of your mittens to spruce them up a little.
If you think your mittens are a little loose at the cuff, stitch some elastic around the inside of the cuff or make a decorative band across the back of your wrist by crocheting with some fancy yarn around the elastic.
I hope you enjoy making mittens from your old wool sweaters.
Jill Wright is the author of this article. Jill owns Woolcrafting.com – a website dedicated to teaching crochet and felting. Find patterns, techniques and tips to help you learn and master these fun crafts.


This looks like a great idea, but what is “felting”?
What a great idea. Shame that some people seem to miss the point about this being a recycling project and would rather go out and buy more! I’ve book-marked your article and I’m going to have a play. I will use my sewing machine for a better finish. I also like the comment about using shearing elastic if the cuffs are a little loose. Thank you. M x
Thank you for this really useful idea.
Now I know what to do with my old sweaters!
Very cute idea. xx
Cute idea for teaching students how to recycle. These can be donated to nursing homes or shelters. We need to teach children that not everything has to look wonderful. This project can be used to help others in need.
I have seen Christmas stockings made from old sweaters too! Great idea!!!
This is what our Mums did during the war a lost skill in this generation !!!!make do and mend !!
Long may it return as a choice of homemade ,,,WITH LOVE ,,,,
it might be ok for a child to make for their stuffed animals but they really do look cheap and homemade.
That’s brilliant! And if you don’t care for mittens, you can donate them to the homeless…they always need help keeping warm.
I believe they are easy to make and look cheap! Here’s an idea-buy mittens for $2-$3 tops!!!!!:(
living in South Africa, this will also work with what we call “polar fleece” material
I noticed that the cuffs on the mitts were rather loose. Here is a trick I use when I knit mitts with textured yarn. On the wrong side sew thread elastic through the knit stitches all the way around then diagonally down and go around again 4 or 5 times
Since my granddaughter constantly loses her mittens, with this pattern and her Pawpaw’s old sweaters, I can keep her in Mittens all winter long!! Great Idea.
I love it and I want more, Please!
Hugs,
C.
They might be warmer if you make them longer and add elastic to the bottom.
Great idea!!!!!!!!!!
I just felted a fave sweater by accident, but I don’t care for mittens too much. However, these can be modified into gloves! 🙂 Thank you!
great idea and instructions
WOW- I never would have thought of this!! I can’t wait to try it-Thank you.
These look good but really complicated too.