
What you need
Large cookie sheet 17×19 (non-aluminum steel works well)
Scrapbook paper or contact paper
Adhesive (spray adhesive works well)
Embellishments (ribbon, glitter, stickers, stamps and ink, etc.)
Large chipboard letters
Scissors or paper trimmer
Magnets
Instructions
Step 1
Trim the paper to fit the inside of the cookie sheet. Start with a 12×12 sheet of scrapbook paper and trim to size. You will need two sheets in order to cover the entire inside of the cookie sheet. Cut strips of paper to fit on the two ends of the cookie sheet (top and bottom of the magnet board).
Step 2
Spray the adhesive on the back of the paper or on the inside of the pan. Next, gently place the paper on the inside of the cookie sheet paying close attention to the edges of the cookie sheet that you get the paper lined up evenly. The adhesive will have a little bit of give for a few minutes so if you get the paper in the wrong place then quickly and carefully peel it up and put it back down in the correct position. Once the adhesive sets the paper will be there for good.
Step 3
Smooth out the paper making sure there are no wrinkles. Use your embellishments to decorate the inside of the cookie sheet.
Step 4
Cut a piece of ribbon long enough to go the length of the cookie sheet and cover the seam between the two pieces of paper. Cut another piece of ribbon (about 8-inches), thread it though the hole in the top of the cookie sheet, tie it in a knot and use it to hang the message board on the wall or door.
Step 5
Use large chipboard letters to spell out a word at the top of the cookie sheet. You can personalize the message/magnet board by spelling out a name or another word. (example board says: “NOTES”). Decorate the chipboard letters with patterned paper, stamps or glitter to make the letters stand out. (example board: letters are stamped and inked around the edges).
Step 6
Adhere letters to the cookie sheet with a strong adhesive like glue dots. Place the letters evenly across the top or bottom of your message board. Give it some character by placing the letters at different angles across the length of the cookie sheet.
Step 7
Hang the finished message/magnet board on the wall and use magnets to display important messages for yourself or others.
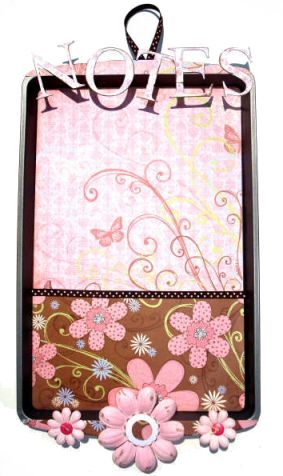
Altered Cookie Tray
Other variations:
Use the decorated cookie sheet as a picture frame. Display pictures on the inside of the cookie sheet (much like a scrapbook page).
Use the board in a bedroom to display certificates of achievement or other documents. Personalize it with a name or word describing the achievement.
Use the cookie sheet magnet board to house a chore chart in the kitchen where each person can check off their jobs.
This project was designed by Milenna Russell


Great idea and thanks for sharing.I am going to make a memory board,and I can incorporate this onto it. ;-D
Love this ! A fab idea. I’m going to try this one for sure.Thanks for the inspiration 😉
This is a great idea. I have been trying to find a cheap magnetic board to put in my craft room and this is an great, inexpensive way to have one. I love it. Plus I can decorate it however I want which is a bonus. Thanks
hmmm how do you come up with such an amazing craft!!!
I am making this right now my old cooking sheets don’t fit in the small German ovens so I know what to do with them now thx!!
how cute is THIS????
I love to repurpose. Great idea!
Gorgeous! Fabulous idea!
I love this! I used a fall theme and plan to use it to hold odds and ends of jewelry making “stuff”. Have put several tins on it already. Need another one!!!!
it is so cute i love it
I love it!! Very easy to make and really cute.
I sooo love this idea. I don’t find too many projects online that I want to persue but this is one I will try. Thanks for sharing. Kim
love this idea