
Get more details about this project
What you need
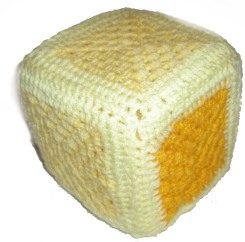
Foam cube
6 Grannie Squares
Darning Needle
Instructions
Turn six traditional granny squares into a soft and colourful crochet baby cube with this clever free pattern.
Each granny square forms one face of the cube, making this a fun way to practise the classic granny stitch while creating a tactile handmade toy. The open chain spaces and clusters give the cube its familiar vintage crochet appearance.
Use soft nursery colours, bright contrasting shades or leftover yarn from your stash. Making every side in a different colour can also turn the finished cube into a simple colour-learning toy for supervised play.
Important Safety Note
This project is intended as a soft supervised play toy.
Make sure every seam is firmly stitched and all yarn ends are securely woven in. Do not add buttons, beads, bells, plastic containers or other loose embellishments that could become a choking hazard.
Check the toy regularly for loose threads, damaged seams or exposed filling. This handmade cube should not be used as a teething toy or placed in a cot with a sleeping baby.
Crochet Abbreviations
- Ch – Chain
- Dc – Double crochet
- Sl st – Slip stitch
- Sp – Space
- Rnd – Round
- St/Sts – Stitch/Stitches
- Rep – Repeat
Granny Square Pattern
Make six matching granny squares.
Each square must be large enough to cover one face of your foam cube. Crochet the first square, place it against the cube and add extra rounds as needed. Make the remaining five squares the same size.
Beginning Ring
Chain 4.
Join with a slip stitch in the first chain to form a ring.
Round 1
Chain 3. This counts as the first double crochet.
Work 2 double crochet into the centre ring, then chain 2.
Work the following sequence three times:
3 double crochet into the ring, chain 2.
Join with a slip stitch into the top of the beginning chain 3.
You should now have four groups of three double crochet with four chain-2 corner spaces.
Round 2
Slip stitch across the next two double crochet and into the first chain-2 corner space.
Chain 3, then work 2 double crochet into the same corner space.
Chain 2 and work another 3 double crochet into the same corner space.
This forms the first corner.
Chain 1.
In the next chain-2 corner space, work:
3 double crochet, chain 2, 3 double crochet.
Chain 1.
Repeat this corner sequence in each of the two remaining chain-2 spaces.
Join with a slip stitch into the top of the beginning chain 3.
Round 3
Slip stitch across the next two double crochet and into the first chain-2 corner space.
Chain 3 and work 2 double crochet into the same corner space.
Chain 2 and work another 3 double crochet into the same corner space.
Chain 1.
Work 3 double crochet into the next chain-1 side space.
Chain 1.
In the next chain-2 corner space, work:
3 double crochet, chain 2, 3 double crochet.
Chain 1 and work 3 double crochet into the next chain-1 side space.
Continue around the square in this way.
Join with a slip stitch into the top of the beginning chain 3.
Additional Rounds
Continue working in the established granny-square pattern.
In every corner space, work:
3 double crochet, chain 2, 3 double crochet.
In every chain-1 space along the sides, work:
3 double crochet.
Chain 1 between each group.
Continue until the square is large enough to cover one side of your cube.
The original project notes that the squares can be enlarged by adding more rounds and suggests working up to six rounds when making larger granny-square projects.
Changing Colours
To change colours at the beginning of a new round:
- Complete the current round and join with a slip stitch.
- Fasten off, leaving a tail approximately 5 inches long.
- Join the new colour in any chain-2 corner space.
- Continue with the next round.
- Weave in the yarn tails securely.
Changing colour after each round creates a bright traditional granny-square appearance. For a softer nursery look, use three coordinating pastel shades or work each square in a single colour with a contrasting final round.
Finishing the Squares
Fasten off each completed granny square.
Weave in the starting yarn tail securely. You may leave a long finishing tail on some squares to help sew the cube together.
Gently block the six squares so they are all the same size and shape. Allow them to dry completely before assembly.
Assembling the Crochet Cube
Lay four squares in a straight row.
Place one additional square above the second square in the row and the final square below it. This creates a cross-shaped cube net.
Join the squares using a yarn needle and mattress stitch, whip stitch or your preferred crochet joining method.
Step 1: Join the Main Row
Sew the four squares together along their adjoining edges.
Keep the seam tension even so the squares remain flat and do not pucker.
Step 2: Attach the Top and Bottom Squares
Sew one square to the upper edge of the second square in the row.
Sew the remaining square to the lower edge of the same square.
Step 3: Form the Cube
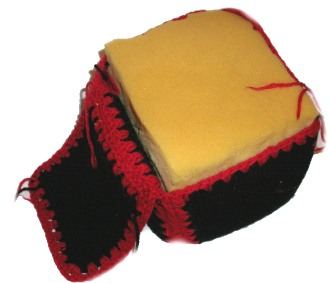
Fold the joined squares around the foam cube.
Pin or hold the remaining edges together and check that the cover fits neatly. It should be snug without stretching the crochet excessively.
Step 4: Complete the Seams
Sew the remaining edges together one at a time.
Leave the final edge open long enough to insert the foam cube or stuffing.
Insert the cube and adjust the corners so they sit neatly inside the crochet cover.
Sew the final opening closed securely.
Weave the yarn tail back through the seam several times before trimming it.
Stuffed Cube Variation
When using polyester toy stuffing instead of a foam insert, sew five sides together first.
Fill the cube gradually, pushing stuffing into each corner. Avoid overfilling, as this can make the sides bulge and distort the square shape.
Add small amounts of filling until the cube feels soft but supportive, then sew the final side closed.
A fabric lining can be added before stuffing to help prevent fibres from working through the crochet openings.
Colour Ideas
Soft Nursery Palette
Try cream, pale yellow, mint, lavender, blush pink or powder blue.
High-Contrast Baby Cube
Use black and white with one bright accent colour. Strong contrast can make the cube visually interesting for young babies.
Scrap-Yarn Cube
Make each granny square in a different combination of leftover yarn. Finish all six squares with the same border colour to tie the design together.
Learning Colours Cube
Make each face a different solid colour. As the child grows, the cube can be used during supervised play to introduce colour names.
Care Instructions
Wash the completed cube gently according to the yarn label.
A removable insert is not included in this design, so handwashing is generally the safest option. Squeeze out excess water without twisting and allow the cube to air-dry completely.
Check that the centre is fully dry before returning it to use.




Cute project. I like the idea of tucking a noise maker inside the foam (sealing it well is very important). Think I’ll try it in bright colors.
How well do you think polyfill would work? I think I’ll make a few for my 16 mo. old and his brother, due in a few weeks.
very cute idea for a baby gift!
cute!
I tucked a small perscription cotainer with 2 small bells and completely sealed into the middle of the foam then put the squares on to seal…makes it noisey and my grandson loves it!
awesome! if you use a plastic block, they’re great for teething!