
Get more details about this project
What you need
Assorted glass bowls in graduated sizes
Glass plates, saucers, or dessert dishes
Glass candle holders or pedestal dishes
Small glass vase, jar, or bowl for the top section
Glass star, ornament, finial, or decorative glass bottle topper or glass bell
E6000 glue
Rubbing alcohol
Paper towel or lint-free cloth
Painter’s tape or masking tape
Toothpicks or wooden skewers
Battery-operated tea lights or fairy lights
Optional: mirror tray, faux snow, mini baubles, pine sprigs, ribbon, crystal beads, glass gems
Instructions
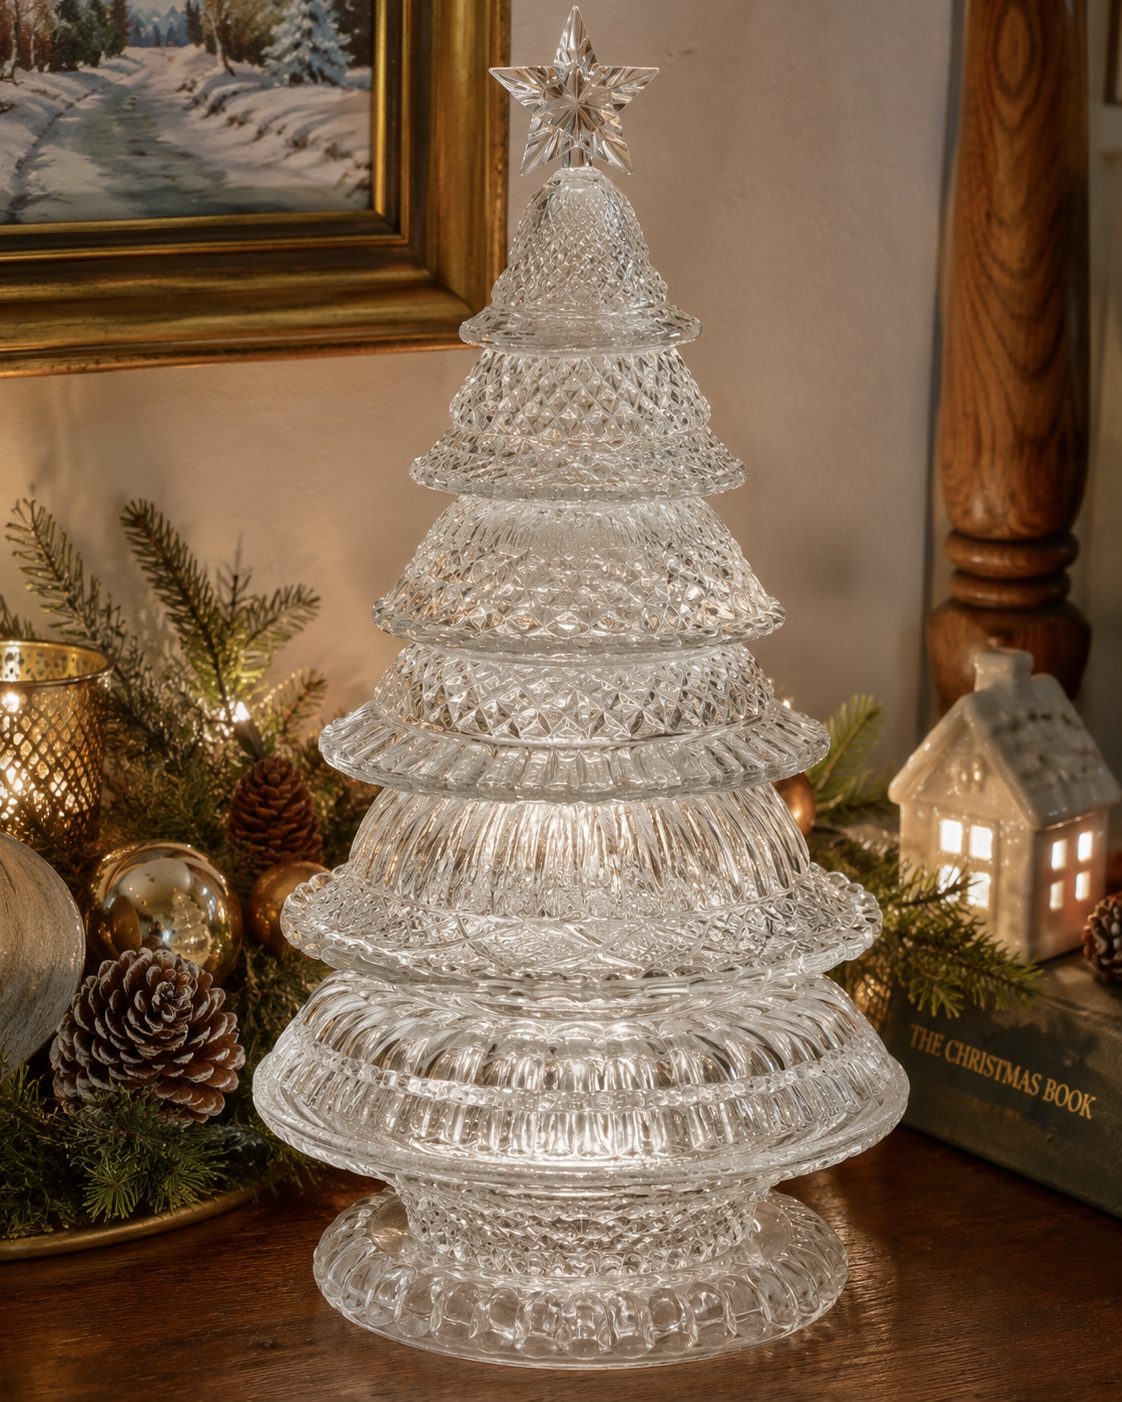
If you love a good thrift-store Christmas craft, this stacked glass bowl Christmas tree is one of those projects that makes you suddenly see the glassware aisle in a completely different way.
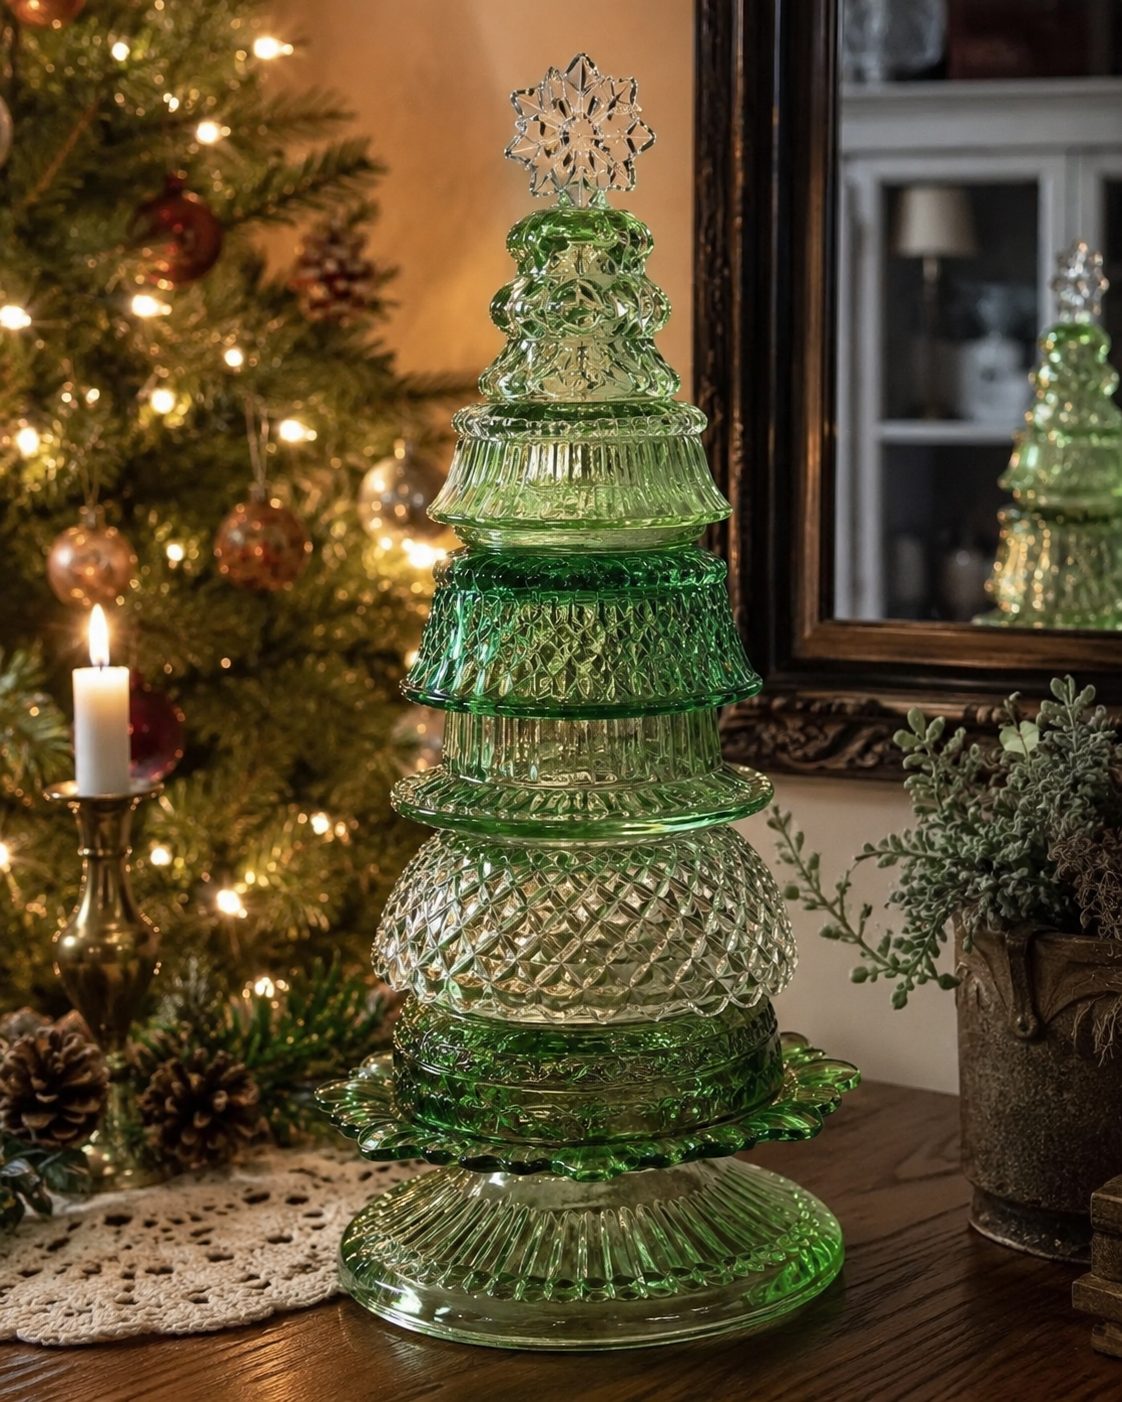
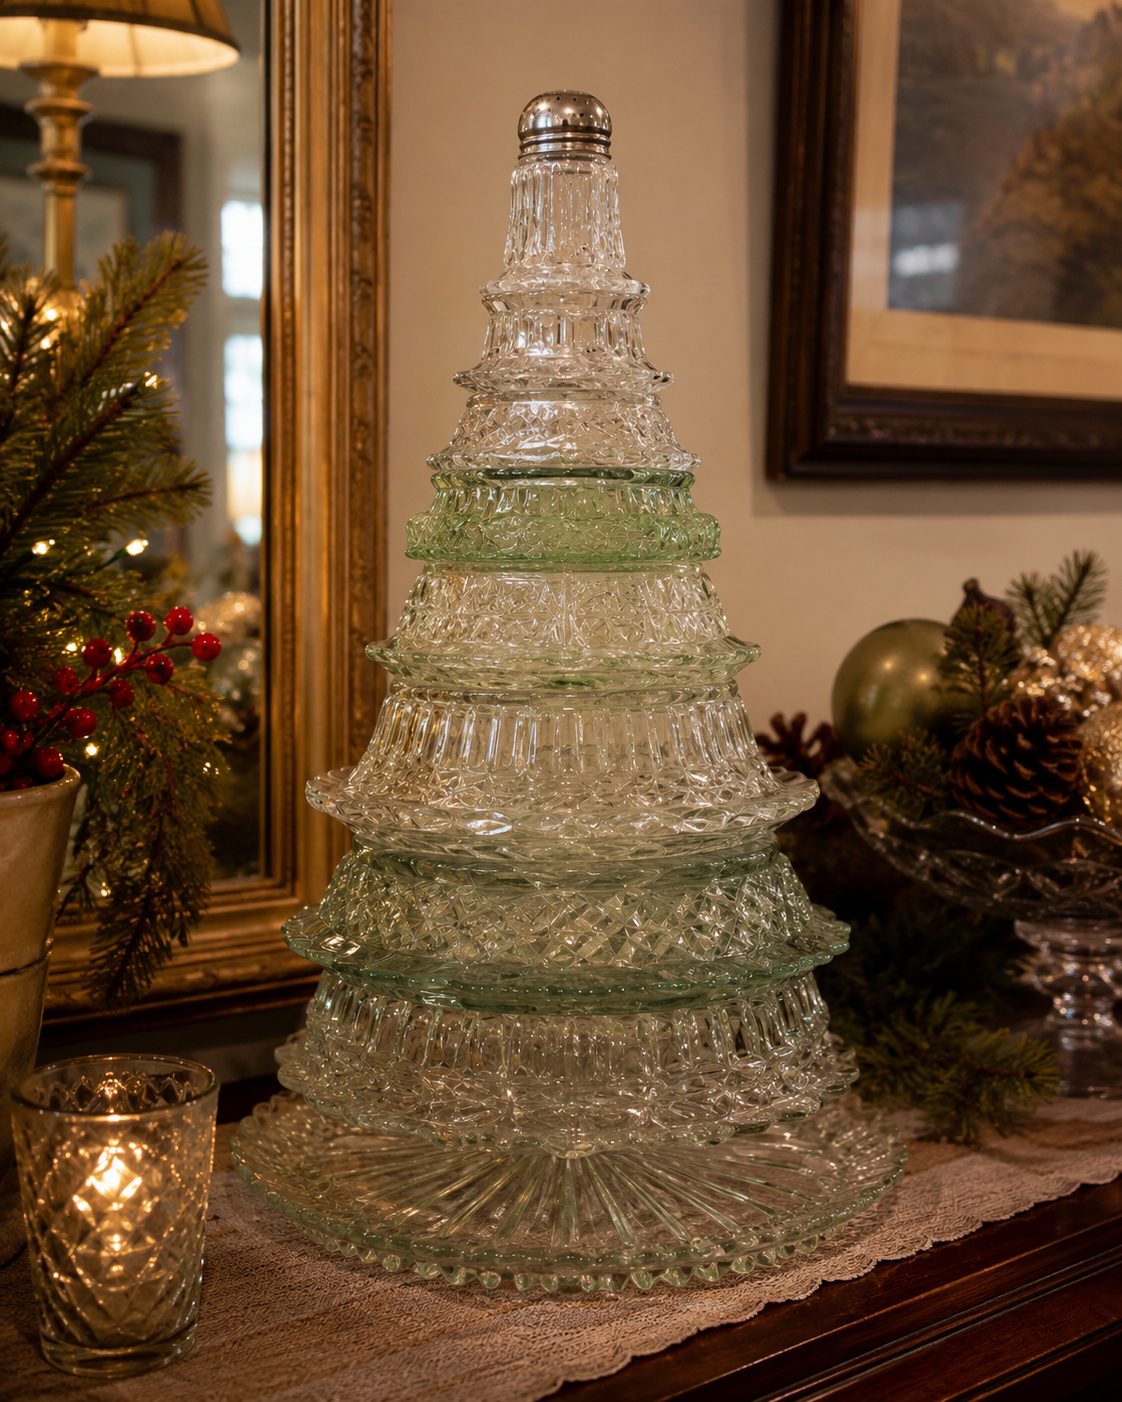
Those lonely glass bowls, old serving dishes, scalloped plates, candy dishes, and candle holders can be stacked together to create a gorgeous sparkling Christmas tree. Clear glass gives a frosty winter look, while green glass has that lovely vintage Christmas feel. Add a small battery tea light or fairy lights nearby and the whole thing glows beautifully.
This is a wonderful recycled Christmas decoration for a mantel, sideboard, entry table, dining table centrepiece, or beside the Christmas tree. It looks far fancier than it really is, which is exactly the sort of craft I like best. A bit of thrifted glass, a tube of E6000, and suddenly we are pretending we planned this level of elegance all along.
The trick is to choose pieces that gradually get smaller as they go upward. Bowls, plates, and candle holders create the tiered tree shape, while a glass star, bauble, or finial finishes the top.
Instructions
Step 1: Collect Your Glass Pieces
Start by gathering glassware in different sizes.
Look for:
Large glass bowl or platter for the base
Medium glass bowls
Small glass bowls
Scalloped glass plates
Dessert dishes
Pressed glass serving bowls
Glass candle holders
Pedestal dishes
Small vases
Glass lids or finials
Star ornaments or crystal toppers
You want the pieces to stack from largest at the bottom to smallest at the top, just like a Christmas tree.
Clear glass works beautifully, but green glass is especially lovely if you want that classic Christmas tree look.
Step 2: Test The Stack Before Gluing
Before you wash, glue, or commit to anything, stack your glass pieces together.
Place the largest bowl or plate at the bottom.
Add a smaller bowl or plate on top.
Continue stacking upward, reducing the size of each layer.
Use candle holders, small jars, or pedestal pieces between layers if you want more height.
Step back and look at the shape. It should feel balanced, tapered, and tree-like.
This is the part where you may swap pieces around ten times. That is completely normal. The thrifted glassware has opinions.
Step 3: Check The Balance
Gently test the stack to make sure it is stable.
The base should be wide and heavy enough to support the upper pieces.
Avoid using very narrow pieces low down unless they are strong and centred.
If the tree feels wobbly, change the base or add a wider glass plate underneath.
For a tabletop Christmas tree, stability matters more than height.
Step 4: Wash And Prepare The Glass
Wash all glass pieces in warm soapy water.
Remove price stickers, wax residue, dust, fingerprints, and any old cupboard grime.
Dry everything completely.
Wipe the areas you plan to glue with rubbing alcohol. This helps the E6000 bond properly to the glass.
Glass can look clean but still have oils on the surface, so this quick wipe makes a big difference.
Step 5: Glue The Bottom Layers
Work from the bottom upward.
Apply a thin bead of E6000 glue around the contact point where the second piece will sit on the base.
Place the next glass piece carefully on top.
Press gently and check that it is centred.
Use painter’s tape if needed to stop the pieces sliding.
Let the bottom layers sit for a few hours before adding too much height.
Step 6: Continue Building The Tree
Once the lower layers feel secure, continue adding the remaining glass pieces.
Apply E6000 to each contact point.
Stack each piece carefully.
Check from the front, back, and sides to make sure the tree is straight.
If a layer starts to lean, adjust it immediately before the glue begins to set.
For taller trees, it is best to glue in stages rather than trying to assemble the whole thing at once.
Step 7: Add The Topper
Finish the tree with a small glass star, crystal finial, bauble, glass lid, or decorative ornament.
A clear star gives a frosty look.
A silver ornament makes it feel more traditional.
A vintage glass knob can look surprisingly beautiful as a tree topper.
Glue the topper in place with E6000 and allow it to set.
Step 8: Let The Tree Cure
Allow the finished tree to cure for at least 24 hours.
For best results, wait 48 to 72 hours before moving it into place.
E6000 needs proper curing time, especially with heavier glass pieces.
Do not rush this step, tempting as it is. The tree may look finished, but the glue is still doing its quiet little behind-the-scenes job.
Step 9: Add Lights And Christmas Styling
Once the tree is fully cured, place it on a mirror tray, silver platter, or white plate.
Add faux snow around the base.
Tuck a battery-operated tea light behind the tree, or wind a short strand of battery fairy lights around the base.
Do not use real candles.
You can also add mini baubles, pine sprigs, ribbon, small bells, or glass gems around the display.
For the prettiest glow, place the lights behind or underneath the glass so they shine through the textured patterns.
Tips For Success
Use textured glass for extra sparkle. Pressed glass, cut glass, hobnail glass, scalloped edges, and ribbed bowls catch the light beautifully.
Choose pieces that reduce in size as they go upward.
Use a heavy base for stability.
Let the lower layers cure before adding more weight.
Avoid cracked or chipped glass.
Use E6000 rather than hot glue for strength.
Keep battery lights accessible so you can switch them on and replace batteries.
Display the finished tree where it will not be knocked over.
If you have pets, children, or enthusiastic Christmas morning traffic, place the tree on a sideboard or mantel rather than the floor.
Light-Up Version
To make a glowing Christmas glass tree, place a small battery tea light behind the finished tree.
You can also set the tree on a mirror tile with fairy lights tucked around the base.
If your bottom glass piece is hollow and open, you may be able to place a battery tea light underneath it, but only if the tree remains stable and the switch is still easy to reach.
Battery lights are best because they give a soft glow without heat.
Christmas Tree Variations
Make a green glass Christmas tree using vintage green bowls and plates.
Make a frosted glass tree using clear glass and faux snow.
Make a silver Christmas tree display by adding silver baubles and mirror tiles.
Make a mini version using small dessert bowls and candle holders.
Make a tall mantel tree by adding pedestal dishes between layers.
Make a farmhouse-style tree by displaying it with pinecones, burlap ribbon, and greenery.
Make a memorial Christmas tree by adding a small charm or tag at the base.
Make a dining table centrepiece by placing the glass tree on a tray with battery candles and pine sprigs.
Safety Notes
This project is made from glass and should be displayed carefully.
Do not use real candles.
Do not place the tree where it may be bumped or knocked over.
Allow the glue to cure fully before moving the tree.
Avoid stacking pieces too high unless the base is heavy and secure.
Do not use cracked, chipped, or fragile glass pieces.
Keep the finished piece away from the edge of tables and shelves.
This upcycled glass bowl Christmas tree is a beautiful way to turn forgotten glassware into something festive and special. It has that lovely vintage sparkle, costs very little to make, and gives old bowls and plates a second life as handmade Christmas decor. And really, any project that gives us an excuse to go hunting through thrift-store glass shelves is already off to a very good start.



What do you think of this project? Let us know!