
Get more details about this project
What you need
6–8 cans of low-expansion polyurethane spray foam
Large sheets of baking paper, freezer paper or silicone craft mats
Disposable nitrile gloves
Safety glasses or protective goggles
Long-sleeved old clothing
Respiratory protection if required by the product label
Cream or warm-white exterior acrylic paint
Pale beige or golden-tan exterior acrylic paint
Exterior-rated clear protective coating
Strong synthetic rope, braided nylon cord or outdoor clothesline
Large upholstery needle, metal skewer or awl
Needle-nose pliers
Scissors
Large red plastic balls, foam balls or wooden beads
Red outdoor paint, if your beads need painting
Cable ties or floral wire
Removable outdoor hooks
Optional evergreen branches, pinecones or ribbon
Instructions
There are certain Christmas decorations that only make sense when they are ridiculously oversized, and giant popcorn garland is definitely one of them.
Traditional popcorn and cranberry garland looks lovely wrapped around a Christmas tree, but the same tiny scale tends to disappear when it is carried outdoors. For a porch, doorway or railing, the popcorn needs to be much larger so it can actually be seen from the street.
This version uses expanding spray foam to create oversized, lightweight popcorn shapes. Once cured, painted and sealed, the pieces can be threaded onto sturdy cord with big red beads to create a whimsical Christmas porch garland.
The finished popcorn should not look neat or identical. Real popcorn certainly does not arrive in matching little spheres, and neither should this. Make some pieces rounded, some long, some knobbly and a few that look as though they have gone slightly rogue. Those odd shapes give the garland its charm.
Because expanding foam is a building product rather than a children’s craft supply, this tutorial is intended for adults. Work carefully, follow the manufacturer’s label and keep children and pets away from the work area.
Important Safety Information
Use expanding foam only outdoors or in a properly ventilated space. Wear gloves, long sleeves and eye protection, and avoid breathing the vapour or spray. The manufacturer’s safety guidance also recommends adequate ventilation and suitable respiratory protection when ventilation is insufficient.
Uncured foam is extremely sticky and difficult to remove from skin, clothing and work surfaces. Cover a much larger area than you think you need. Spray foam has an uncanny ability to find the one uncovered corner of the table.
Keep the can away from flames, sparks and heat, and follow the specific curing and disposal instructions printed on your product.
Instructions
Step 1: Measure the Porch
Measure the area where you plan to hang the garland before making the foam pieces.
Add approximately 15–20 percent to the measurement so the finished garland can hang in soft swags rather than being stretched tightly.
As a rough guide:
- A standard doorway may require 5–7 metres or 16–23 feet.
- A short porch railing may require 3–4 metres or 10–13 feet.
- Several porch posts and railings may require 10 metres or more.
For a long display, make the garland in separate sections. Sections around 2–3 metres long are much easier to thread, carry, install and store than one enormous tangled rope.
Step 2: Prepare the Work Surface
Cover a large outdoor table or concrete area with baking paper, freezer paper placed shiny-side up, or silicone mats.
Tape the paper down so it cannot blow away.
Place the foam cans, gloves, goggles and rubbish bag within easy reach. Once you begin spraying, you do not want to walk through the house looking for scissors with foam dangling from the nozzle.
Shake and prepare the can according to the manufacturer’s directions.
Step 3: Test the Foam Expansion
Spray one small test mound onto the covered surface.
For giant popcorn, begin with a foam mound approximately 5–7 cm or 2–3 inches across. The amount required will vary considerably between products because some foams expand much more than others.
Allow the test piece to expand for several minutes before creating the rest.
A finished giant popcorn piece should generally measure around 10–15 cm or 4–6 inches across. Some can be smaller or larger to keep the garland looking natural.
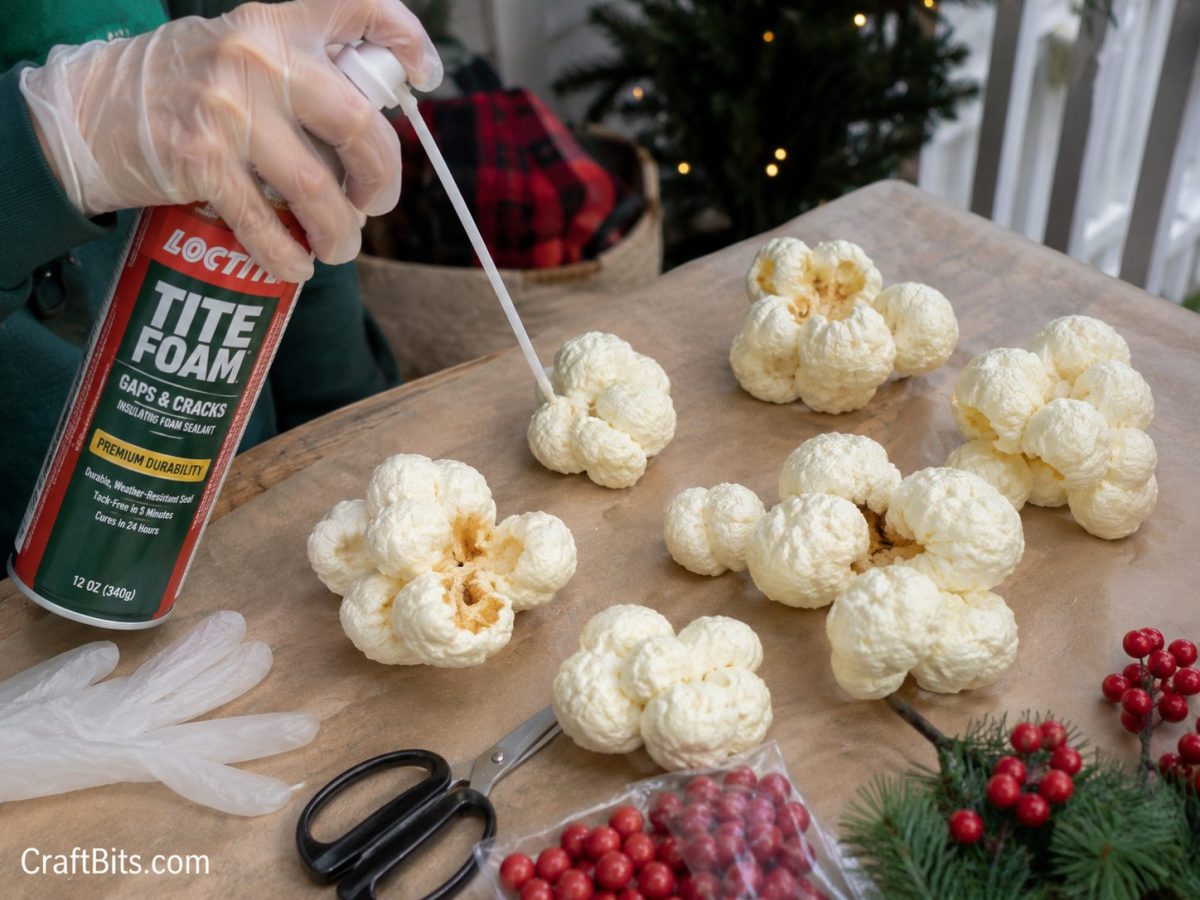
Step 4: Create the Giant Popcorn Shapes
Dispense an irregular mound of foam onto the prepared surface.
Immediately add two or three smaller blobs around the first mound. These extra sections create the random lobes and folded appearance of popped corn.
Try several shapes:
- One large centre with three smaller side blobs
- Two joined mounds with one small blob on top
- A longer curved piece
- A squat, knobbly cluster
- A small piece with one exaggerated “wing”
Leave generous space between each piece because the foam will continue expanding.
Do not touch or sculpt uncured foam with your hands. Allow the expanding action to create the shapes naturally.
For a thick 3-metre or 10-foot garland, you may need approximately 40–60 giant popcorn pieces, depending on their size and how closely they are strung.
Step 5: Cure the Foam Completely
Leave the pieces undisturbed for the full curing period listed on the can.
The outside may feel firm while the centre remains soft, especially with oversized pieces. Give them extra curing time rather than rushing to thread them.
Once cured, peel the pieces away from the paper.
Trim obvious spikes or long strings with a serrated blade or sturdy scissors. The manufacturer notes that fully cured foam can be trimmed with a serrated blade.
Do not over-trim. Uneven pieces look more like popcorn than smooth, perfectly rounded ones.
Step 6: Add Toasted Popcorn Colour
Paint each piece with warm-white or cream exterior acrylic paint.
The base paint does three jobs:
- It evens out the colour.
- It disguises any shiny foam areas.
- It helps protect the foam from outdoor light exposure.
When the cream coat is dry, use a stiff brush to dab pale beige or golden-tan paint into a few creases.
Keep the toasted colour subtle. A few warm shadows are enough to suggest popcorn. Too much brown paint will make the garland look less like popcorn and more like a collection of slightly unfortunate potatoes.
Allow the paint to dry fully.
Step 7: Seal the Popcorn for Outdoor Display
Apply an exterior-rated clear protective coating according to its label.
This step is especially important for porch use. The foam manufacturer advises painting or covering cured foam outdoors because prolonged ultraviolet exposure can discolour it and eventually cause deterioration.
Coat all sides and allow the sealant to cure fully before threading.
This garland is best displayed on a covered porch. Bring it inside during heavy rain, strong wind or extreme weather.
Step 8: Make the Giant Cranberry Beads
Use red plastic balls, painted foam balls or large wooden beads as oversized cranberries.
A diameter of approximately 5–8 cm or 2–3 inches works well beside the giant popcorn.
Choose lightweight balls that already contain holes where possible. Plastic ball-pit balls can also work, but you will need to carefully pierce two opposite sides.
Paint the balls with exterior red paint if required, then seal them with the same outdoor protective coating.
For a more primitive look, use matte burgundy. For a cheerful retro garland, use bright glossy red.
Step 9: Pierce the Foam Pieces
Use a metal skewer, awl or long upholstery needle to create a channel through the thickest part of each cured foam piece.
Work slowly so the foam does not split.
Push the tool straight through from one side to the other, then gently rotate it to widen the opening enough for your chosen cord.
If the foam begins to crack, move slightly closer to the thick central area.
Step 10: String the Giant Garland
Cut the outdoor cord approximately 30–45 cm or 12–18 inches longer than the desired finished section.
Tie a large temporary knot at one end.
Thread the popcorn pieces onto the cord, turning each piece in a different direction as you work.
Add one red bead after every three to five foam pieces. You can also use clusters of three red beads to imitate cranberries.
A good sequence is:
- Four giant popcorn pieces
- One large red bead
- Three giant popcorn pieces
- One large red bead
- Five giant popcorn pieces
- Three red beads together
Varying the arrangement makes the garland feel handmade rather than mass-produced.
Leave a little movement between the pieces. Do not pull them together so tightly that the garland becomes stiff.
Step 11: Secure the Ends
Tie a large loop at both ends of each section.
For extra security, add a cable tie behind the last foam piece so the pieces cannot slide along the cord.
You can also thread the cord back through the final piece and knot it twice.
Test the completed garland by lifting it from both ends before taking it to the porch. It is much easier to repair a loose knot over the craft table than while standing halfway up a ladder.
Step 12: Hang the Garland
Attach removable outdoor hooks to the porch posts, doorway or railing.
Support the garland every 60–90 cm or 2–3 feet rather than hanging the full weight from the two ends. Even though the foam is lightweight, a long garland can place surprising strain on the cord and hooks.
Use clear cable ties or floral wire to fasten the garland to each hook.
Drape it:
- Around the front doorway
- In swags along the porch railing
- Vertically down porch posts
- Across a large window
- Around an outdoor Christmas tree
- Over an evergreen porch garland
Keep it away from porch heaters, fire pits, candles and open flames.
Porch Styling Ideas
Classic Popcorn and Cranberry
Use cream popcorn pieces and glossy red beads. Add evergreen branches and a simple red velvet bow.
Primitive Farmhouse
Use lightly aged cream paint, matte burgundy beads, pinecones and torn gingham ribbon.
Candy Christmas
Add oversized pink, aqua and red beads between the popcorn pieces. This version looks wonderfully playful with pastel baubles and candy-themed decorations.
Woodland Christmas
Replace some of the red beads with pinecones, wooden stars and bundles of cinnamon sticks.
Movie-Night Porch
Add large striped popcorn-box decorations and a vintage-style “Christmas Movie Night” sign.
You will find plenty of complementary handmade decorations in the CraftBits collection of Christmas craft projects, especially if your porch is beginning to look a little too sensible and needs another festive project.
How to Store the Garland
Remove the garland in sections rather than trying to carry the entire display at once.
Wipe away any dust with a dry or barely damp cloth, then allow it to dry completely.
Store each section:
- Loosely coiled inside a rigid plastic tub
- With tissue paper between the layers
- Away from direct sunlight
- Away from excessive heat
- Without heavy decorations stacked on top
Do not squash the pieces into a soft storage bag. The foam is lightweight, but it can dent or crack if placed beneath heavier Christmas decorations.
Helpful Tips
Make more popcorn pieces than you think you need. A few may crack during piercing, and extras are useful for filling gaps after the garland is hung.
Use several smaller garland sections for a large porch. They are easier to install and much easier to store.
Paint every visible surface. Unpainted foam may discolour outdoors under ultraviolet exposure.
Keep the finished garland under cover. Although painted foam can be used for outdoor decorating, a sheltered porch will help it last longer.
Photograph the porch before removing the garland. Next Christmas, you will know exactly where every section belongs instead of standing outside with a tangled rope and questioning all your festive decisions.
Giant Faux Popcorn Garland Safety Reminder
This is a decorative item only.
Do not allow children or pets to chew the foam pieces or beads. Do not display the garland close to flames, heaters or cooking areas. Check the hooks and cord occasionally, particularly after windy weather.
Follow the directions and safety guidance supplied with your particular foam, paint and protective coating products.





What do you think of this project? Let us know!