
Get more details about this project
What you need
4 mm straight knitting needles
Small amounts of brown and white 8-ply/DK yarn
A small amount of red yarn for the cherry
Green felt for holly leaves
Toy stuffing
Tapestry needle
Scissors
Sewing needle and matching thread for attaching felt
Optional yarn or ribbon for a hanging loop
Instructions
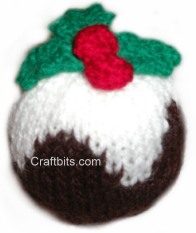
A little knitted Christmas pudding is one of those decorations that never really dates. With its brown base, white icing and tiny red cherry, it has that lovely traditional Christmas look that sits happily beside handmade stockings and treasured family ornaments.
I love small Christmas knitting projects for using up leftover yarn. You don’t need to commit to a big project, and a few simple finishing touches can turn a small piece of knitting into something full of character.
This pudding is knitted flat on straight needles, then sewn together and stuffed. Green felt holly leaves finish the top, and you can add a hanging loop if you’d like to display it on your Christmas tree.
Pattern note: This revised version makes the colourwork repeats fit the 40 stitches and adds clear shaping counts. The stitch counts have been checked mathematically; the revised pattern has not been sample-knitted.
Skill level: Confident beginner with some experience changing colours
Construction: Knitted flat, seamed and stuffed
Finished size: Depends on your yarn, tension and stuffing; measurements have not been verified.
What You Need
- 4 mm straight knitting needles
- Small amounts of brown and white 8-ply/DK yarn
- A small amount of red 8-ply/DK yarn
- Green felt
- Toy stuffing
- Tapestry needle
- Scissors
- Sewing needle and matching green thread
- Optional yarn or narrow ribbon for a hanging loop
Abbreviations
- k: Knit
- p: Purl
- sts: Stitches
- k2tog: Knit two stitches together
- p2tog: Purl two stitches together
- kfb: Knit into the front and back of the same stitch, increasing by one stitch
- Stocking stitch: Alternate one knit row and one purl row
Instructions between asterisks are repeated as directed.
Instructions
1. Knit the Brown Pudding Base
Using brown yarn, cast on 40 stitches, leaving a long tail for gathering the bottom later.
Rows 1–10: Work in stocking stitch, beginning with a knit row.
You will have 40 stitches throughout this section.
2. Knit the White Icing Edge
Introduce white yarn on row 11. The following three rows create a stepped transition from the brown pudding to the white icing.
Carry the unused colour loosely across the wrong side. Spread the stitches along your needle before changing colours so the fabric does not pull tight.
Row 11 — right side:
K1 white, k6 brown, then repeat k2 white, k6 brown four times, k1 white. (40 sts)
Row 12 — wrong side:
P2 white, p4 brown, then repeat p4 white, p4 brown four times, p2 white. (40 sts)
Row 13 — right side:
K3 white, k2 brown, then repeat k6 white, k2 brown four times, k3 white. (40 sts)
Cut the brown yarn, leaving a tail to weave in.
Row 14: Purl all stitches in white.
Rows 15–20: Continue in white stocking stitch, beginning with a knit row and ending with a purl row. (40 sts)
3. Shape the Top
Continue using white yarn.
Row 21: Repeat k2tog, k6 five times. (35 sts)
Row 22: Purl all stitches. (35 sts)
Row 23: Repeat k2tog, k5 five times. (30 sts)
Row 24: Purl all stitches. (30 sts)
Row 25: Repeat k2tog, k4 five times. (25 sts)
Row 26: Purl all stitches. (25 sts)
Row 27: Repeat k2tog, k3 five times. (20 sts)
Row 28: Purl all stitches. (20 sts)
Row 29: Repeat k2tog, k2 five times. (15 sts)
Cut the yarn, leaving a long tail.
Thread this tail through the remaining 15 stitches, remove them from the needle and draw together firmly. Secure with a small stitch on the inside.
4. Sew and Stuff the Pudding
Weave in the colour-change ends on the wrong side without pulling the fabric tight.
Fold the knitting with the right side facing out and bring the two side edges together. Sew the side seam using mattress stitch, matching the brown and white sections carefully.
Using the brown cast-on tail, work a running stitch through the cast-on edge. Begin gathering the bottom, leaving an opening for stuffing.
Add small amounts of toy stuffing through the opening. Gently shape the pudding into a rounded form, keeping the brown section at the bottom and the white icing at the top.
Avoid overstuffing, which can stretch the stitches and expose the filling.
Pull the bottom gathering thread firmly closed. Secure it with several stitches and bury the yarn end inside the pudding.
5. Knit the Cherry
Using red yarn, cast on 3 stitches, leaving a tail for sewing.
Row 1: Kfb into every stitch. (6 sts)
Row 2: Purl all stitches.
Row 3: Knit all stitches.
Row 4: P2tog three times. (3 sts)
Cut the yarn and thread it through the remaining stitches. Draw together.
Sew the side edges together, then tuck the cast-on tail inside to help give the cherry a little shape. Gather any remaining opening closed.
Leave a yarn tail for attaching the cherry.
6. Add the Holly Leaves
Cut two small holly leaves from green felt. Make each leaf approximately the length of the cherry’s width or slightly longer, adjusting them to suit your finished pudding.
Give each leaf a pointed tip and a few shallow points along the sides.
Overlap the narrow ends of the leaves on top of the pudding. Sew them securely in place with green thread.
Position the knitted cherry over the overlapping ends and stitch it firmly to the pudding.
7. Add an Optional Hanging Loop
Thread a length of yarn or narrow ribbon through the knitted fabric at the top, close to the cherry.
Tie the ends securely to form a loop. If using yarn, you can stitch the ends into the top of the decoration and conceal them beneath the holly leaves.
Your knitted Christmas pudding is ready to display.
Finishing Tips
- Use small pieces of stuffing to achieve a smoother shape.
- Keep the colourwork strands loose so the icing section can expand.
- Position the side seam towards the back when attaching the leaves.
- For a standing decoration, gently flatten the base with your fingers after stuffing.
- Keep the slightly uneven handmade character—it’s part of the charm.




What size child will this fit please
Pattern was not correct
Quick and easy to knit and looks unbelievably cute when finished.
Were you able to supply pattern for holly leaves?
At row 12 of pattern I ended up with purl 2 white (NOT 3) as stated.
At row 13 of pattern I finished with knit 2 white. Why?
i would like to knit the holly…instructions please?
Holly instructions plz otherwise fab pattern
But what if you want to knit the leaf too!? Can we have some leaf instructions please? Otherwise, fab pattern, this years Xmas decs – solved!
Am I casting on with brown, or with white?
very good indeed,got to do this one
Have been looking without success for a Christmas Pudding Tea Cosy pattern – am hoping I can adapt this. Thanks