
Get more details about this project
What you need
White plastic cups
Paper kitchen towel
craft glue
marker pen
Instructions
Step 1: Protect the work surface
Cover the table with scrap paper, a reusable craft mat or another protective covering.
Craft glue can drip from the cup while the paper strips are being attached, so keep a damp cloth nearby for wiping hands and spills.
Step 2: Prepare the paper towel
Tear the white paper kitchen towel into long, narrow strips.
The strips do not need to be straight or identical. Uneven edges, wrinkles and small folds will make the wrapping resemble old mummy bandages.
Separate multi-ply paper towel if it feels too thick to wrap easily.
Step 3: Coat the cup with glue
Place the white plastic cup upside down or hold it carefully by the rim.
Use a foam brush or paintbrush to apply a thin, even coat of non-toxic craft glue to the outside of the cup.
Do not apply glue inside the cup or along the surface that will hold the treats.
Work on one section at a time if the glue begins to dry before the paper towel can be attached.
Step 4: Wrap the cup
Press the end of a paper-towel strip onto the glued cup.
Wrap the strip around the cup, allowing it to wrinkle, overlap and change direction slightly.
Add more strips until the outside of the cup is covered. Leave some raised edges and folds rather than smoothing everything flat.
Keep the top rim and inside of the cup free from paper and glue.
Step 5: Create the face area
Position a few paper strips across the front of the cup, leaving enough open space for two eyes and a small mouth.
You can also cross a narrow strip above or below the eyes to make the face appear partly hidden beneath the mummy wrapping.
Avoid adding so many layers that the cup becomes wet or loses its shape.
Step 6: Allow the cup to dry
Stand the cup upright on the protected surface and allow the glue to dry completely.
Drying time will depend on the amount and type of glue used. The paper towel should feel firm and securely attached before the face is added.
Step 7: Draw the mummy face
Use a black marker to draw two uneven oval eyes and a small curved or straight mouth.
Simple shapes suit the rough, handmade appearance of the mummy. The eyes do not need to match perfectly.
Alternatively, attach two googly eyes with craft glue and allow them to dry securely.
Step 8: Add the treats
Once the glue and marker are completely dry, fill the cup with individually wrapped Halloween candy, stickers, pencils or other small party favors.
Do not place loose or unwrapped food directly inside a cup that has been handled with craft glue and markers.
Creative Variations
Create several mummy cups with different expressions, including surprised, sleepy, happy and silly faces.
Use glow-in-the-dark googly eyes for an extra Halloween effect.
Write each child’s name on the back of the cup to create personalized party favors.
Add a small amount of diluted brown washable paint to the paper towel for an aged mummy appearance.
Make larger mummy containers by wrapping clean white plastic tubs using the same technique.
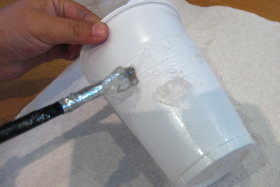
Glue the Cup
Start by taking your plastic white cup and coating it in craft glue.
Tear strips of paper towel and wrap them around the cup as shown.
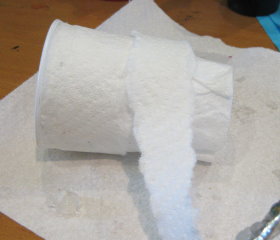
Add Paper Towel
Don’t be too neat as the more torn, folded and creased you make them, the better they look.
Once the paper towel has dried, finish the cup off by drawing on the face. You could also add wobble eyes for a wobbly effect.



pretty cool
easy!!