
Get more details about this project
What you need
Plain copy paper
A pencil (I used an art pencil from Faber Castell – 2B)
An eraser for fixing mistakes in your drawing
A thick piece of rubber or other material meant for carving stamps (I used Speedball™s Speedy-Cut – they make a pink one and a white one. The white one seems to be softer than the pink one but both cut like butter as it says on the packaging for many such products. )
A carving tool (Mine was a set that came with 5 differently sized cutting heads Speedball™s Lino Cut Assortment)
Ink specifically for your application (fabric, paper, cardstock, etc.) just make sure it is a thicker ink if you plan to apply it with a roller. A water-based ink pad will work too for many stamping projects.
A piece of wood just larger than your final stamp to use as a backing
Instructions
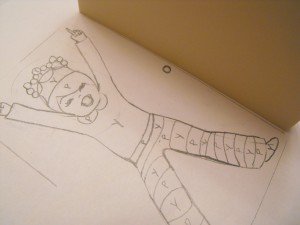
This project is a one color stamp project but you can separate your drawing into as many colors as you like. Just be careful when you’re marking your tracing that you determine which areas will be which colors. In the example drawing in the pictures provided I marked different sections with a “P” or a “Y” so I could keep track of which color would go where in preparation to cut two different compatible stamps. The print pictured is one color.
Are you ready? It’s really not very difficult but it does take a bit of time to cut out your stamp.
Draw an image for your block print
How to do it:
First make a line drawing. If this is your first ever stamp-making project you might want to keep details to a minimum and stick with thick, wide lines. This will make it easier when it’s time to carve. You can either color in the areas you plan to carve with your drawing (this will be the space that doesn’t get inked) or the areas that will print so it will look more like your final piece as your carving it – just decide ahead of time and stick with it.
Ok, so I thought it was insanely cool when I found this out – The Speedball material will actually pick up the outline of your drawing…no tedious tracing needed! Put your drawing face down on the material and rub the back of the paper with something hard and smooth. Martha would surely use a boning tool here…but if you don’t have one, the back of your lino cutting tool works too – just make sure you don’t have the sharp attachments on yet! Also take care not to move the drawing once you have started transferring the image.
Once your image is sufficiently transferred onto your rubber material, you can begin carving out the details of your drawing. I start by outlining the areas with a small tool then cutting in with the larger tools. You’ll get a feel for the material as you work with it. It is extremely easy to cut which makes projects like this simple (imagine having to carve an intricate drawing in to wood!?) but that also means it is easy to carve out something you didn’t mean to. If this happens just go with it…maybe it was meant to be! If you have a big mess up you can always retrace your drawing and start over if you need to.
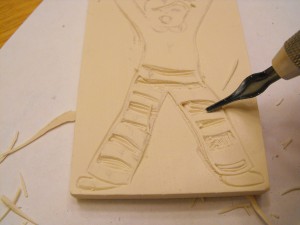
Carve out the parts of your image you do not want to print
Once you have cut out all the fine details you will need to remove the excess material from the sides so your image comes out cleanly. If you are used to creating shading and dimension in your artwork you can get a similar effect from making shallow, light, strategically placed cuts in your stamp.
Glue your finished stamp to the wood backing…if you don’t put a backing on it, it’s wigglyness may cause an uneven impression on your finished piece. Sometimes I get excited and skip this step, but it is the proper way to do it.
Get ready to do a test print!
Ink your rolling surface and get a good, even coating of ink on your roller. Roll the ink on to your stamp and test it on a non-essential piece of paper. You will likely see areas you need to fix in your stamp. Just cut these areas away, and test one more time before you’re ready to create you’re finished stamped piece.
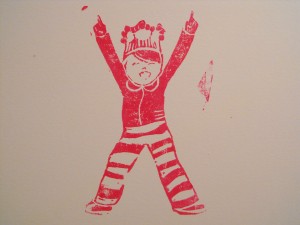
The Dancing Baby Disco Princess Stamp
You’re Done!
Use your stamp for anything you like – scrapbooking, block printing on fabric, cards and invitations, posters, even walls. Use water-based inks for easiest clean up and clean your stamps thoroughly with soap and water after use and be careful no ink is hiding in the crevices of your stamp… Fine details can get clogged if your stamp is not cleaned properly.
Our stamp is mostly carved out and almost ready for a test print (looks scary at this stage doesn’t it?)


cool it realy works!
cute 🙂
This is great : D. Thanks.
Ah Ha! I have been looking for just such a tutorial! Thank You!
What a great idea! Can’t wait to find the supplies and get started. Thanks for sharing.
How much does the rubber you carve the stamp into cost?
I did this craft in school and it was just so cool. We did our portraits, and made all different colored stamps. I loved it!