
The finished fingers are solid decorative props and are not wearable. Use them in haunted-house displays, Halloween table decorations, party games, or bowls containing individually wrapped treats.
Get more details about this project
What you need
Disposable rubber, latex, or nitrile gloves
Plaster of Paris or another casting plaster
Water
Measuring cup
Disposable mixing container
Craft stick or disposable spoon
Elastic bands
Skin-coloured acrylic paint
Red acrylic paint
White or ivory acrylic paint for the fingernails
Small paintbrushes
Fine-grit sandpaper, optional
Scissors
Disposable gloves for mixing and painting
Protective mask suitable for fine plaster dust
Protected work surface
Clear acrylic sealer, optional
Instructions
If you are looking for a Halloween decoration that is inexpensive, creepy, and likely to make party guests look twice, these plaster fingers are wonderfully effective.
Each finger is cast separately inside the finger section of a disposable glove. This naturally gives the plaster a rounded finger shape without requiring a special mould. Once the plaster has cured, the rubber glove is peeled away and the individual fingers are painted to resemble spooky broken fingers.
Place the finished props around a Halloween table, add them to a haunted-house display, or scatter them among individually wrapped sweets. Do not place painted plaster fingers in contact with unwrapped food.
Instructions
Step 1: Prepare the work area
Cover the table before mixing the casting plaster. Wear old clothes or an apron, as wet plaster and acrylic paint can be difficult to remove from fabric.
Read and follow the safety and mixing instructions supplied with your chosen plaster. Avoid inhaling dry plaster powder and work in a ventilated area.
This project requires adult supervision. Casting plaster can become warm while it sets and should never be applied directly to skin.
Step 2: Calculate how much plaster you need
Take one unused disposable glove and fill its finger sections with water.
Pour the water from the glove fingers into a measuring cup. This will give you an approximate measurement of the mixed plaster needed to fill the fingers.
Dry the glove completely or use a fresh dry glove for casting.
Step 3: Mix the casting plaster
Measure the plaster powder and water according to the manufacturer’s directions.
Mix them in a disposable container using a craft stick or disposable spoon. Stir slowly to reduce air bubbles and continue until the mixture is smooth and pourable.
Only prepare as much plaster as you can use before it begins to set. Never pour leftover plaster or plaster water down a sink or drain. Allow it to harden in the container before disposing of it according to local requirements.
Step 4: Fill the glove fingers
Hold the disposable glove upright and carefully pour or spoon the mixed plaster into each finger section.
Gently tap or massage the outside of the glove to encourage the plaster to move all the way into the fingertips. This also helps release trapped air bubbles.
The fingers do not need to be perfectly shaped. Small bumps and irregularities will make the completed Halloween props look more unsettling.
Step 5: Secure the glove
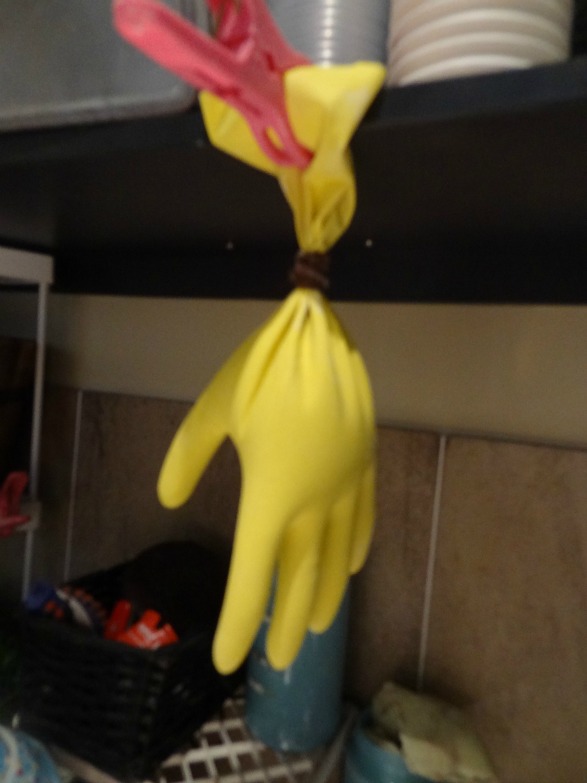
Once the finger sections are filled, gather the glove immediately above the plaster.
Wrap an elastic band tightly around the glove to prevent the wet plaster from leaking out.
Do not place your hand inside the plaster-filled glove.
Step 6: Position the filled glove
Lay the filled glove on a flat, protected surface or suspend it securely with the fingers hanging downward.
Adjust the fingers before the plaster begins to firm. You can leave them straight or position them at slightly different angles.
Make sure the glove cannot fall or leak while the plaster is setting.
Step 7: Allow the plaster to set
Leave the plaster undisturbed for the full setting time listed on its packaging.
The outside may feel firm before the centre has completely cured, so avoid removing the glove too early. Leaving the cast overnight is a practical option if the product directions permit it.
The plaster may become warm during the setting process. Allow it to cool completely before handling or removing the glove.
Step 8: Remove the glove
Once the plaster is fully set and cool, carefully cut or tear the disposable glove away from the cast.
Separate the individual plaster fingers by gently snapping away the thin sections connecting them near the palm. The irregular broken edges will become the red-painted ends of the fingers.
Do not force a finger if the plaster still feels damp or soft. Allow it to cure longer before continuing.
Step 9: Tidy the plaster fingers
Remove any loose or badly misshapen pieces from the broken ends.
If necessary, use fine-grit sandpaper to smooth sharp points or rough seams. Wear a suitable mask while sanding and wipe away the plaster dust with a slightly damp disposable cloth.
Small pits and casting marks can be left in place because they add texture to the finished props.
Step 10: Paint the skin colour
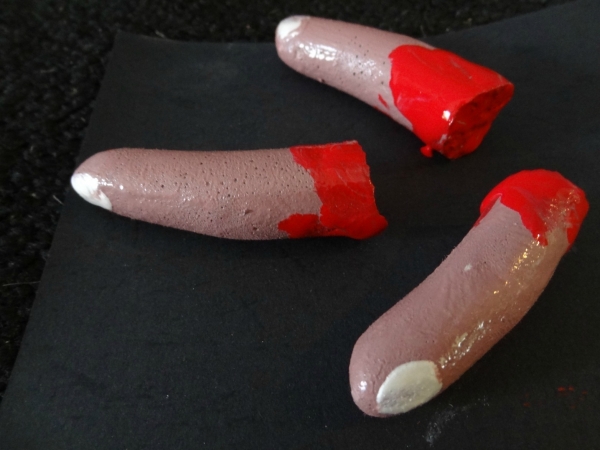
Apply skin-coloured acrylic paint over the sides and rounded tips of the plaster fingers.
Allow the first coat to dry, then add another coat if the plaster is still showing through. Different skin tones can be used to create a varied collection.
Leave the irregular broken ends unpainted for now.
Step 11: Paint the fingernails
Use a small paintbrush and white or ivory acrylic paint to create a simple oval fingernail near the rounded end of each finger.
The nail shapes do not need to be identical. Uneven, chipped-looking nails suit the handmade Halloween design.
Allow the nail paint to dry before handling the fingers.
Step 12: Add the red painted ends
Paint the rough broken end of each finger with bright red acrylic paint.
Extend a little of the red paint along the sides to create drips or irregular patches. Keep the effect playful and theatrical rather than realistic if the decorations will be used around children.
Allow the paint to dry completely.
Step 13: Seal the fingers if desired
For a more durable finish, apply a clear acrylic sealer that is compatible with plaster and acrylic paint.
Follow the product directions and use spray sealers only in a well-ventilated area. Let the fingers dry and air thoroughly before adding them to your Halloween display.
Step 14: Display the finished fingers
Arrange the plaster fingers on a Halloween party table, inside a decorative cauldron, or among individually wrapped sweets.
Keep the decorations away from unwrapped food, drinks, serving utensils, and surfaces used for food preparation. Make sure guests understand that the fingers are solid plaster decorations and are not edible toys.
Store the finished props in a dry box between Halloween celebrations. Plaster can chip if dropped, so wrap the fingers individually before packing them away.
Once the plaster has set remove the glove and take out the fingers. Break off any mis-shaped pieces.
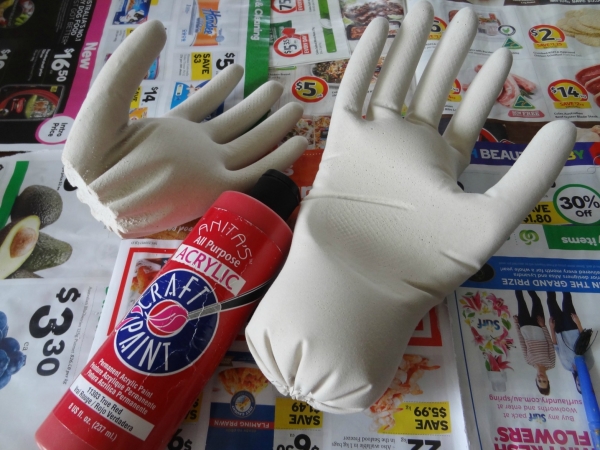
You should have what looks like a broken off finger.
Use your paints to paint the stumps of the fingers red like dripping blood and the other parts a natural skin color.



wouldn’t it look and feel more realistic if you carved your fingers out of carrots and let them sit out on the counter till they’re leathery? that’d be cool.. just a thought.
easy yet so cool:D:D:D
it is an awesome idea
OMG the kids love it at the party
not that good, because they cant be actually like, worn on the actual fingers or sumthin like thatu could like put on another glove and put the glove with the plasterofparis in it on,waitfor it to dry take it off and put them on,but this is pretty useless
sorry fluffyjo but what was wrong with it???!?!
Super spooky sweet idea!
love to see pics.but great idea
Not very good. (no hate mail please)