
What you need
5 oval 12mm glass beads
10 round 6mm glass pearls
10 4mm glass beads
6 6mm glass cube beads
10 silver metal bead caps
12 4mm silver daisy spacers
Tiger tail beading wire
2 metal 2mm crimp tubes
2 silver metal 4mm beads
1 hook and eye clasp
Approximately 150 seed beads
Tape
Tools:
Bead board
Wire cutters
Crimping pliers
Instructions
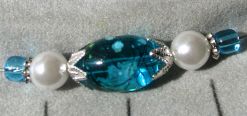
This necklace is crafted using “sets” of beads in the combination of your choice. In this piece, the sets consist of an aqua oval focal bead with bead caps on either side followed by white glass pearls, a daisy spacer and finally a 4 mm aqua glass bead. There are 5 of these “sets” in this necklace. The sets are separated by 8 to 10 seed beads, a 6 mm aqua cube bead with tiny 4 mm bead caps on either side and another 8 to 10 seed beads.
This pattern of bead sets, seed beads, cubes, seed beads, and bead sets is repeated throughout the necklace. To create a longer necklace, use more seed beads or add more sets, keeping the flow and balance of the pattern intact.
1. Cut a length of beading wire to the desired size of your necklace, adding a few extra inches.
2. Fold a piece of scotch or other tape over one end of the wire to form a tab. This is to keep the beads from sliding off the wire as you string them on. Lay the wire aside until you are ready to string your necklace.
3. Lay out your beads in the groove of the bead board in your desired pattern, placing the center set of the necklace at the zero. (If you don’t have a bead board, a towel or some other surface that will keep the beads from rolling will do.) Refer to the general instructions above to design your “sets”. You should now have the general design laid out before you on the bead board or your chosen surface.
4. Now it is time to string the beads. Start stringing them on to the un-taped end of the wire, letting the first bead rest against the tape. String the beads one by one starting at one side of the bead board and working your way around to the other side until all beads are strung on the wire. Now, add a piece of tape to the un-taped end to secure the beads until you get the clasp attached.
5. Gather the 2 metal beads, the crimp tubes, the hook and eye clasp and the crimping pliers.
6. Remove the tape from one end of the necklace, being careful not to let the beads slide off the wire.
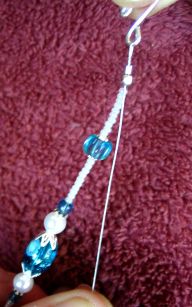
7. Holding the wire of the un-taped end securely, string on a 4 mm silver metal bead, a crimp tube and the “eye” portion of the clasp. (a simple jump ring may be used for the “eye” if desired).
8. Grasping the end of the wire, thread it back through the crimp bead only, toward the other beads creating a loop of wire that should have the “eye” or jump ring on it. Thread this end of wire through the hole of the 4 mm silver metal bead as well to make it more secure.
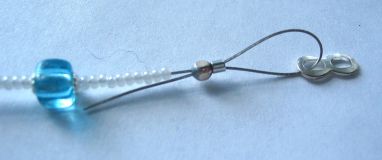
9. Holding the necklace end in your hand, use your fingers to support the section with the crimp tube. Slide the crimp tube toward the clasp “eye” to adjust the loop. You do not want the loop too large or too tight. The “eye” or jump ring should be able to move freely in the loop, but not flop around.
10. Grasping the crimping pliers in the other hand, gently position the crimp tube in the lower (closer to the handle) indention of the open pliers. Once the tube is in position, squeeze the pliers firmly to form the first crimp in the tube. Your crimp tube should be “dented” on one side.
11. Now reposition the dented crimp tube in the upper (toward the end) indention of the pliers, and again squeeze firmly. This should fold the crimp tube in half with the previously dented side now on the inside of the fold. A little extra squeeze with the pliers should securely set the crimp. This step may take a little practice to master, but the results are well worth the effort. Clip off the excess wire, and this end is finished.
12. Now, repeat steps 6 through 11 for the other end of the necklace, adding on the hook part of the clasp. But before squeezing the crimp tube, hold the necklace up by the hook and pull the end of the wire to form a loop similar to the one on the other end, paying close attention that there are no spaces between the beads. Once you have determined that the beads are all snug and even, crimp the tube as before. Trim off the excess wire, and you are done. Enjoy your beautiful new necklace!


Amazing!!!!!!!
Can you use dental floss
OMG
I really like this project and the color. Its really cool!
Cool! I love it. Thanks for sharing!
looks great!
great for beginners, good job & nice photos!
Good instructions. I liked that you encouraged the reader to be creative. Nice touch!
This is a nice necklace but i would add a wire guard on each end to protect the wire from shaffing. a silver crimp cover would add the look of another bead on each end.
nice =)
good instructions.