
What you need
Felt
needle & thread
Instructions
If you’re blessed with math skills, and you know how to break down the measurements of a circle to come up with a rectangle of the same size, then you’re a better person than I. Since I’m a dunce when it comes to ‘rithmetic, I used the Dummy Method:
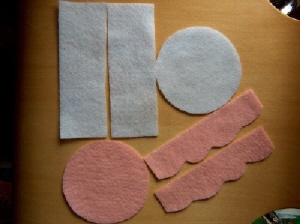
Trace a ramekin (or mug). This will be your cake top and bottom. Then, using a piece of string, measure around the ramekin. This will be the length of your rectangle, which will be the sides of your cake. In my case, I use synthetic felt that doesn’t come in the length I needed, so I just cut two rectangles. As for the height of your cake, that’s completely up to you. I went for a couple of inches.
Cut out two circles–one in the color of your cake, and one in the color of your frosting. The frosting circle will be your top, and the cake circle will be the bottom. Using the same rectangle pattern, cut out another rectangle in your frosting color. You can cut this in half for a nice clean look, or just trim a little of it off, depending on how far you want the frosting to “drip” down the cake. I trimmed out the scalloped pattern freehand to save time. Now you’re ready to assemble.
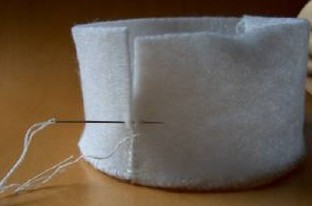
If you’re using two pieces of felt for the cake sides, go ahead and stitch those together, end to end. The only stitch you’ll need to use for the body of this project is an overhand stitch, by the way. Easy peasy. Don’t pull your stitches too tight, since you want to have a little give when it comes time to shape everything. But do make your stitches snug enough to keep any gaps from appearing. If the pieces stick up where they’re joined, don’t worry. They’ll flatten with some gentle encouragement. Once your rectangles are joined, you can stitch the bottom circle on.
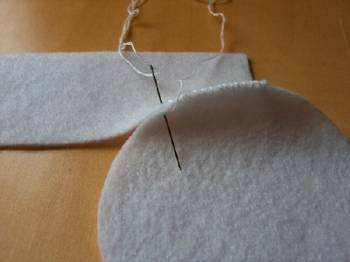
Once you’ve got the circle stitched on, you can join up the other two ends of your rectangle.
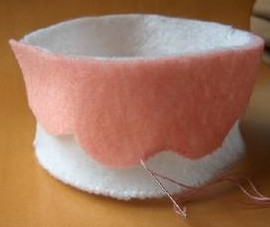
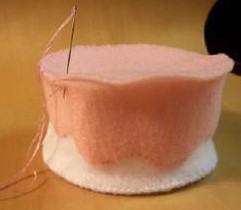
Now, on to the frosting. Stitch your scalloped pieces onto the cake body, again using an overhand stitch. I leave the top unstitched, since you’ll be sewing the cake top onto it anyway. Sew the ends of the frosting together (and to the cake) as you go along. Add any embellishments, if you’d like. I used a french knot on each scallop for extra cuteness on my first few cakes. Now you can stitch your cake top on, using the same method as for the bottom piece. Don’t forget to leave a couple of inches open for stuffing!
At this point, I found it handy to cut out two pieces of cardstock slightly smaller than my circle pattern. I put one in the bottom of the cake before stuffing, and one in the top before I sew it closed. It just gives it a little more definition and structure. Of course, without the cardstock, you’ve got a cute little pincushion!
Stuff your cake to your liking, sew the opening closed, and there you go! Your very own felt cake!
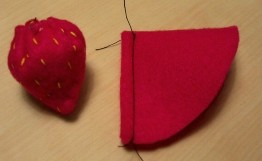
As for toppings, I’ve only made the strawberry and the cream puff. Both are fairly simple as well. For the strawberry, use the same circle pattern from your cake to cut out a half circle. Fold that circle in half to make a triangle. Handstitch or machine sew the seam closed, then turn inside out. Embellish with french knots or simple lines in contrasting color for “seeds”. Sew a loose running stitch around the bottom, and pull the thread to gather the ends together. Add a little stuffing, and you’ve got a strawberry! Don’t worry about the bottom part showing, since you’ll be stitching that on to your cake anyway. If you do it well enough, no one will notice.
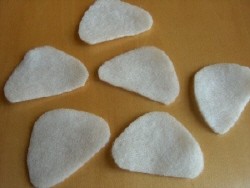
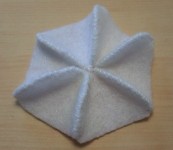
Now the cream puff. Cut out six rounded triangles. I didn’t measure mine, and just cut them out freehand. The easiest way was to cut out six small squares of felt, stack them up in threes, and cut them out together. That way they’re fairly uniform. Take two of these triangles and sew them together on one side, starting from the bottom all the way to the tips. Sew a third piece onto the second in the same way, and so on, and the last piece will be sewn onto the first. You’ll end up with a funny looking, slightly concave, six-sided thingy. Once you add a little stuffing to that one, it will look like a cream puff in no time. Sew the bottom opening shut, and ta-daa! Yummy cream puff! By the way, you’ll get a much better result if your pieces are a little narrower and taller than the ones I used in the photos.
Sew your topping onto your cake, being careful to hide the stiching as well as possible. You could probably even use velcro, if you want to have interchangeable toppings! Stand back and admire your felt confection. Gather all of your imaginary (or even real!) friends for a play tea party, and be ready for the flood of admiration that will be washing over you. ^_^
This project was contributed by AOI
This work is licensed under a Creative Commons Attribution-NonCommercial 2.5 License. http://creativecommons.org/licenses/by-nc/2.5/


You can buy kits for making these (Exactly the same) from this mall near me which imports a lot of products from Japan and Korea. They’re actually a whole line of “SUPER CUTE FUN CAKES!” I bought a few. They show some super neat ways of making oranges slices and chocolate drops and so on as well.
nice felt cake! It look real
So Cute! Just what i was looking for to decorate my room
<3
It is perfect.I will make it for my daughter,but i will make a few changes so it will become a beautifyl box.Thanks for the idea!!!
I’ve never made a felt cake before and the pictures make it look easy so I’m going to give it a try. The cream puff thing is so cute!
Awesome!! I hope I will be able to do this ^_^ hope its not TOO hard
the cake nice but too simple to do…its good for the beginner
Omg it looks soo yummy and cool I’m going to make it !!! If i have time <,<
aww!
awesome!! would have been better if there were exact dimensions !
How wonderful, but just cannot work out how to get from 8 to 9. Help!!
Can’t wait to have a go !
Looks fantastic!
Looks fantastic!
this is really cool
great little cake going to make loads with all colours
perfect birthday gift!!
i twisted the project a bit and put confetti, a five-dollar bill and a love letter on the inside. i didn’t tell the person i gave the gift too until a few months later when they were down in the dumps.
It is so cute
It’s awesome! The only thing I want to say about it is that I’m looking at figure 8 and 9, and I just don’t undrstand how you get from one to the other. It’s probably just me though. Great directions by the way!
This project is great for people who like making cakes, it looks realistic and tasty! Happy Crafting!
woww.amazingly cute
I loved this project! The only thing I did different was instead of using the white as the cake, I used brown. I also used dark pink for the frosting! Have Fun!
Amazing. Just the cutest!
Fantastic so cute!
Awesome idea! Looks very …delicious!
very cute! I’m going to makeit for my mum for mothers day.
very cute! i saw that in softies!
I’m going out to buy felt today to make these for Christmas for my kids. Thanks for the great tutorial!
i forgot to add – excellent directions!
very COOL !!
What an imagination! Just too cute. Going to get my supplies today. Thanks for sharing.
cute,yummy,fun… i haven’t made it yet but i’m going to! i’ll take your word for it and have a felt tea party with all may gals!
OMG! I’ve always wanted to learn how to make a felt cake! will make one later today now that I found this! (will have to get a nice colored flet though)
These things are an arm and a leg in shops! I’m making one now!
C = ΠD
circumference of a circle can be found by multiplying its diameter by pi (you’ll need a calculator, or use 3.14 but it won’t be exact).
Yes Of Course We have permission to use it.
This project was also submitted by its Contributor on that website too.
ive seen the exact same thing on crafster. I mean EXACT
Really very cute! Have you made more patterns? This is a great pin cushion or sachet.
yummy