
The original project uses a black Sharpie and heat-sets the finished mug in the oven. An oil-based ceramic paint marker generally produces a more durable result, but you should always follow the directions supplied with the mug and marker you use.
Keep all decoration away from the rim and inside of the mug. Hand-washing will help the design last longer.
Get more details about this project
What you need
Plain white oven-safe ceramic mug
Black Sharpie or oil-based ceramic paint marker
Skin-safe washable black stamping ink, optional for children
Paper towel
Rubbing alcohol
Cotton pad or lint-free cloth
Pencil and scrap paper, optional
Baking tray
Oven mitts
Wrapped Halloween sweets, optional
Instructions
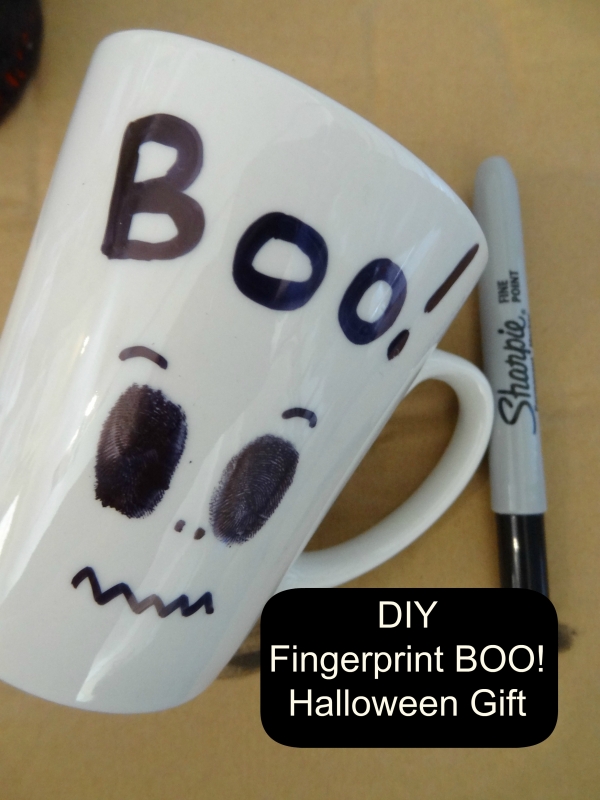
Fingerprint crafts make lovely keepsakes because every finished design is slightly different. On this Halloween mug, two textured black ovals become the eyes of a surprised little ghost.
Add a few simple marker lines and the fingerprint shapes suddenly have eyebrows, a nose and a zigzag mouth. The handwritten “BOO!” message gives the mug a playful homemade appearance.
Fill the finished mug with wrapped sweets, hot-chocolate packets or Halloween stationery for an inexpensive handmade gift.
Instructions
Step 1: Check the mug
Choose a plain white ceramic mug labelled oven-safe if you intend to heat-set the design.
Inspect it for cracks, chips or glaze damage. Do not bake a damaged mug or one with metallic trim.
Marker results vary considerably between ceramic glazes. Test a small mark on the base if possible.
Step 2: Clean the ceramic
Wash the mug and dry it thoroughly.
Wipe the outside with rubbing alcohol and a lint-free cloth. This removes fingerprints, grease and detergent residue that could prevent the marker from adhering.
Allow the alcohol to evaporate completely.
Step 3: Plan the design
Place the mug with its handle facing to the right.
The ghost face should sit on the broad front area. Leave a generous undecorated band below the drinking rim.
Plan space for “BOO!” above the face, two large oval eyes, small eyebrows, two nostril dots and a zigzag mouth.
Step 4: Choose a fingerprint method
The original tutorial colours a fingertip or thumb with black permanent marker and presses it against the mug.
For adult crafters who choose that method, minimise skin contact, work quickly and wash the marker off promptly. Do not use permanent marker on broken, irritated or sensitive skin.
For children, use a washable, non-toxic, skin-safe stamping ink designed for handprint crafts. Once the print is dry, an adult can trace or fill it with a compatible ceramic paint marker if necessary.
Another no-skin option is to recreate the fingerprint texture with a small oval piece of sponge.
Step 5: Make the first eye
Press the inked fingertip, thumb or small sponge firmly onto the front of the mug.
Lift it straight away rather than sliding it across the glaze. The result should be a textured vertical oval.
If the print is very faint, allow it to dry before carefully adding more colour.
Step 6: Add the second eye
Create another vertical oval beside the first.
The eyes do not need to match perfectly. Slightly different sizes and angles make the ghost look more expressive.
Leave enough space between them for the small nostrils.
Step 7: Draw the eyebrows
Use the black marker to draw a short curved eyebrow above each fingerprint eye.
Angle the eyebrows slightly upward or downward to change the ghost’s expression.
Keep the lines simple and slightly uneven.
Step 8: Add the nose
Place two tiny black dots between and below the eyes.
These dots form the ghost’s nostrils. Keep them much smaller than the fingerprint eyes.
Step 9: Draw the mouth
Draw a short zigzag line beneath the nose.
Use four or five loose peaks to create the wobbly mouth shown in the original design.
Avoid repeatedly colouring over the same area, as thick marker may take longer to dry or become uneven during baking.
Step 10: Add “BOO!”
Write “BOO!” above the ghost’s face in large uneven capital letters.
Leave plenty of space between the lettering and the drinking rim. Check that the exclamation mark is clearly visible.
A handmade finish suits this project, so the letters do not need to be perfectly straight.
Step 11: Correct mistakes
If the marker is still fresh, a small amount of rubbing alcohol on a cotton bud may remove unwanted marks.
Clean the area carefully, let it dry and redraw the detail.
Once the design has been heat-set, corrections will be more difficult.
Step 12: Let the design dry
Place the mug somewhere it will not be touched or smeared.
Allow the marker to dry for at least several hours. Some paint markers require a longer air-curing period before baking, so check the manufacturer’s directions.
Step 13: Place the mug in a cold oven
Set the decorated mug on a baking tray.
Place the tray in the oven while the oven is still completely cold. Gradual heating reduces the risk of thermal shock.
Do not preheat the oven before adding the mug.
Step 14: Heat-set the design
The original tutorial heats the mug to 350°F or approximately 175°C for 30 minutes.
Only use this temperature if it is compatible with both the mug and marker. If the ceramic-marker manufacturer supplies different instructions, follow those directions instead.
Adults should supervise all oven steps.
Step 15: Cool the mug gradually
Turn off the oven after the recommended heating time.
Leave the mug inside as the oven cools. Do not touch, move or place the hot mug on a cold surface.
Once it has cooled completely, remove it with oven mitts.
Step 16: Test and wash carefully
Wait at least 24 hours before washing unless the marker manufacturer recommends a longer curing period.
Hand-wash the mug gently with warm water, mild detergent and a soft cloth. Do not scrub the design with abrasive cleaners.
Avoid soaking the mug or placing it in the dishwasher.
Gift Ideas
Fill the mug with individually wrapped Halloween sweets.
Add a hot-chocolate sachet, marshmallows and a Halloween spoon.
Personalise the reverse side with the recipient’s name and year.
Create a family set with a different ghost expression on each mug.
Use the same technique to decorate a pencil cup or treat container instead of drinkware.
Important Safety and Care Information
Keep all marker and stamped designs away from the drinking rim and inside surface of the mug.
Permanent markers and ordinary craft paints are not automatically food-safe. Only undecorated, food-contact areas should touch drinks or mouths.
Check that the mug is oven-safe before baking it. Do not heat a cracked mug or one with metallic decoration.
Permanent markers are not intended as children’s skin products. Use skin-safe washable stamping ink for fingerprinting with children.
Even baked marker designs may fade over time. Treat the mug as a hand-wash-only decorative item unless the ceramic-marker manufacturer specifically states otherwise.





What do you think of this project? Let us know!