
Get more details about this project
What you need
Postal Tube
Red Felt
White Felt
Black Felt
Craft Glue
Red Cord for Handle
Red Paint
White Paint
Cream Paint
Black Paint
1 Red pom pom for nose
Instructions
DIY Vintage Santa Gift Box
There’s something wonderfully nostalgic about an old-fashioned Santa with rosy cheeks, expressive eyes and a slightly untidy beard. I love Christmas decorations that look as though they have a story behind them, especially when they double as somewhere to hide a small present.
This vintage Santa gift box is a lovely project to work on slowly, adding a little character with each stage. Don’t worry about making his face perfectly symmetrical. A raised eyebrow or a slightly crooked smile can be the detail that makes him yours.
For a coordinated Christmas display, pair your finished box with our country wooden Santa. Both suit that cosy, collected-over-the-years decorating style.
Instructions
1. Decorate the Box
Cover the box sides with brick-patterned paper. Paint exposed areas and line the interior if desired. Keep the lid edges clear enough to close comfortably.
2. Prepare the Foam Shapes
Use an egg-shaped foam piece for the head and half a round foam ball for the shoulders. An adult should cut the foam.
3. Sculpt the Face
Glue a dowel into the head as a working handle. Cover with prepared paper pulp; dry fully. Add small amounts to form cheeks, nose, eyebrows and chin. Dry again.
4. Paint Santa
Paint the skin, eyes and eyebrows. Keep paint layers light. Practise the eye details on scrap paper before painting the face.
5. Assemble the Bust
Shorten the dowel to join the head securely to the shoulders without protruding underneath. Cover and paint the shoulders red.
6. Create an Aged Finish
Once dry, lightly sand selected painted areas. Work gently so you soften the finish without exposing the foam.
7. Attach Santa
Glue the shoulders’ flat underside to the removable lid. Support upright until secure.
8. Add Hair and Hat
Glue on wool hair and beard. Fit a red fabric or batting hat with a white brim and pompom. Using red fabric avoids painting the batting.
Let everything dry thoroughly before adding small gifts. Keep edible treats individually wrapped.

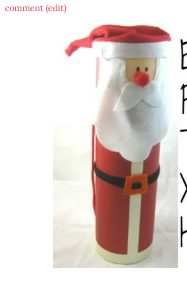
Take your postal tube and paint with red paint. You may need to give it several coats to cover any existing writing.

Attach the red cord by piercing a hole into the top side of the tube and threading the cord through. Secure with a strong knot.
Paint a oval for the face as shown and a white stripe down the middle for the seam of his jacket. (You could also use felt for both these sections).
Using black cut a 1.2 inch strip of felt to go around his belly. (measure your tube).
Cut the belt buckle, beard and mustache using the pattern below.
Thread the buckle through the belt and secure with glue. Place the seam of the belt towards the back for a neater finish.
Measure the circumference of your tube and create a Santa hat with red felt. Add a white felt trim around the hat for the fur as shown. Do not glue on the hat as this acts as the lid for your wine bottle.
If you have the plastic cap from the postal tube you can simply glue the hat to the original postal tube cap for an actual lid.
Paint on Santa’s eyes, glue on his nose and glue on beard and mustache.
All done!





What do you think of this project? Let us know!