
Get more details about this project
What you need
Thin fabric (can be white or light colored)
Freezer paper
Interfacing (optional)
Stuffing
needle and thread
Instructions
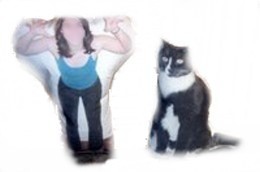
First you’ll need to take a picture. Take a picture of whatever you want to make into a doll, your friend, a pet, etc.
Get the photo on your computer by either scanning it or using a digital camera.
Arrange the image the way you want it. You may need to resize it. Make sure it is small enough to fit on a 8 1/2 x 11 piece of paper.
Before printing you need to prep your fabric.
Take a piece of fabric a little bigger than a normal 8 1/2 x 11-inch piece of paper.
Warm up your iron.
Make sure it’s nice and flat and smooth.
Take an equal size of freezer paper. Iron the shinny side of the freezer paper to the fabric. This gives it some heft to help get it through the printer.
Now carefully cut the fabric and freezer paper down to an 8 1/2 x 11-inch size so it can easily feed through your printer.
It’s printing time!
Put your fabric in the printer and choose to print in color or black ink.
Once you have printed the fabric, carefully peel away the freezer paper.
Cut out the shape of the doll on the fabric, leaving an inch around for the seam allowance. Cut out another piece of plain fabric for the backing of the doll.
Place the plain fabric over and covering the doll image so it is inside out. Pin it together.
If you have a sewing machine sew it together leaving about a two-inch space for stuffing. Otherwise you’ll have to hand sew, leaving the same space open.
Flip your doll right side out and stuff. Fold the seams under and hand stitch or machine sew the opening closed.
You can embellish the doll if you want with clothes, sequins, buttons, yarn, etc. The possibilities are endless with these dolls.
Make a mini-me for a friend, trade with your boyfriend or girlfriend, make a voodoo doll, or pet toy.
This project was contributed by Rebecca McCoy who is the woman behind , Bake Sale Designs


To Guest Below:
You need to put the fabric part down when printing. This is just like when you are printing pictures and need the glossy side down. You put whatever side you want the picture down when printing.
love this idea!!! quick question…when you put the fabric in your printer tray does it go fabric side down or freezer paper side down? i dont want to mess up this super cute idea!!!
Perfect for when you miss someone 🙂
This is so cute.
WOw. Can’t wait to make this.
it needs to have more topics and projects
have more choices
This is great!
I used a black and white photo and kept it in its regular square size, then sewed it onto some black fabric and made a square pillow out of it. It looks super cool. Thanks for the idea!
So glad to find this we are hoping to make dolls for children who’s dads are away. Thank you!!
This is now Christmas presents for the family !!!Thanks a bunch !! — You can even make these 2 sided 1 photo on 1 side 1 on the other.. — I made one like this and added little jewels, beads peices of fabric etc to make parts of the photo stand out!!!
Fanatastic idea. Thank you.
No this can not be washed unless you use fabric suitable printer ink. (check your ink brand)
wow i can save a fortune BUT can it be washed do i need to fix it
i like the idea but the instructions weren’t very clear. i got lost on what to do with the iron, fabric and freezer paper. very confusing
This is so cool! I can’t wait to get started!!
Was not colorfast! Made a pillow for my niece and water dropped on it and the colors ran, so I had to take the whole pillow apart and go buy the expensive stuff for the photo and then redo the whole thing!
haha this is so cute, I just need to find a good picture to use with it!
Finally a way to get around buying the expensive iron on transfer paper!
Awesome.
love this idea can’t wait to try it..Thanks