
What you need
See below.
Instructions
Ch 8; join to form ring.
1st Rd: * ch 10; 1 sc into ring; repeat from * 7 times.
2nd Rd: Sl st to center of 1st loop; * ch 6; 1 sc in center of next loop; repeat from *; join to 1st st.
3rd Rd: 6 sc in each space.
4th Rd: * 1 sc; ch 12; 1 so in same place as former st; ch 14; skip 5; 1 sc in next st; repeat from *; join at the end of row.
5th Rd: Sl st to center of 1st loop; * ch 6; 1 sc in center of next loop; repeat from * to end of row.
6th Rd: 6 sc in each space.
7th Rd: 1 sc; * ch 11; skip 5; 1 sc in next st; repeat from *.
8th Rd: 11 sc in each space.
9th Rd: Sl st 5 times; 1 so in next st; * ch 11; skip 10; 1 sc in next st; repeat from *; join.
10th Rd: Sl st 6 times. * 5 sc; 1 dc in next sc of previous row; 11 sc; 1 dc in next sc of previous row; 6 sc; ch 12; 1 sc in center of next space; ch 12; 1 sc in same place; ch 12; 1 sc in center of next space; repeat from *; join to 6th sl st at the beginning,
11th Rd: * 25 sc in sc of previous row; 6 sc in next 6 ch; ch 6; 1 sc in center of next space; ch 6; skip 1st 6 ch of following space; 6 sc; repeat from *.
12th Rd: Ch 4; skip 1 st; 1 dc in next st; * ch 2; skip 1 dc; repeat from * until corner is reached. Work 2 tr into this with 2 ch between them: repeat from *. Same for other corner.
13th Rd: 1 sc in 1st space; * ch 7; skip 2 dc; 1 sc in next space; repeat from *; join.
14th Rd: Sl st to center of 1st loop; 1 sc * ch 7; 1 sc in next loop; repeat from *.
15th Rd: Same as 14th.
16th Rd: Sl st to center of 1st loop; * ch 7; 1 sc in 5th ch from hook; ch 2; 1 sc in next loop; repeat from *. Join.
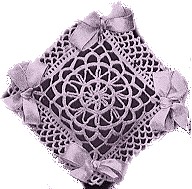


I just tried this with size 10 thread and a 1.15 mm steel hook. It’s very pretty, not too difficult so far! It’s about 3.5 I’m in diameter at the end of the 6th row with this size hook.
Has anyone tried making this? The pattern doesn’t look right and what is so? There is not a supply list or any thing telling what yarn, hook to use? This pattern is way to simple minded written that I can’t figure it out. I’m not a mind reader, so why do people post patterns that are not right? I’m not even going to try this and waist my time and having it not work out! Thanks anyways!!
what does the abbreviation so mean in this pattern???
In the 4th round, so should be single crochet. It took awhile to get everything figured out and I made a few adjustments to eliminate most of the slip stitches. It comes out a little smaller than I thought but then it depends on what yarn you are using. I wanted mine to be quite dainty looking so I chose to use Iris nylon yarn and a size 9 hook.
I finished this making it the same on both sides. I altered the instructions slightly and joined the 2 pieces together as I finished the last row and enclosed the pillow in at the same time. I used a 10″ square pillow in it and I think it would of looked better with an 8″ pillow that was 2″ thick in stead of flat at the edges.
Instructions should be rewritten by someone who got this pillow pattern correct. I keep looking at the printed picture but it is so small. I’ve stumbled through Row/Rnd 9. The so was defeating me. by the way, what does the back look like??? I planned on making 2 and slip stitching together.
My first one came out wrong; but, instead of ripping it apart to start over I turned it into a bun cover. Looks great!! Get many compliments.
Amanda, did you finish with yours yet? Hoping you can figure this out for us. I just found it so haven’t started it yet. Oct 14,2012 Thank you for your help so far.
OK… posted but did not sign in…. don’t know if previous post will show up… I’m working the pattern right now and here are some answers that I’ve found so far…. the “10” at the end of round 1….ignore it (apparently a misprint)…. round 2 ….. to sl st to center of 1st loop you have to sl st in each chain until you get to the top (5sl)…. round 4 says 1sc; ch12; 1so in same place as former st… type o should be 1sc in same place as former st. I’m starting round 5. Also noticed in other comments about how after round 4 it looked more like a circle and not a square…. most patterns will provide proper stitching in later rounds to convert the circle into a square. Will keep you posted on how it goes from here….
OK… posted but did not sign in…. don’t know if previous post will show up… I’m working the pattern right now and here are some answers that I’ve found so far…. the “10” at the end of round 1….ignore it (apparently a misprint)…. round 2 ….. to sl st to center of 1st loop you have to sl st in each chain until you get to the top (5sl)…. round 4 says 1sc; ch12; 1so in same place as former st… type o should be 1sc in same place as former st. I’m starting round 5. Also noticed in other comments about how after round 4 it looked more like a circle and not a square…. most patterns will provide proper stitching in later rounds to convert the circle into a square. Will keep you posted on how it goes from here….
I love the look and I’m actually pretty good at figuring these out, but the transition from round 1 to round 2 and then round 2 to round three are not clear. If you chain 10 at the end of round one, Exactly where does it connect at the end of round two. I really would like to make this, but cannot figure this out. Anyone who has completed this successfully, please contact me at suz.labombard@comcast.net. Thank you so much!
Same question as the others: what does the ’10’ mean between rounds 1 & 2. Although this could be made in any yarn once gauge was established, a list of materials and finished size would be helpful. I hope to get a early response as I’ve chosen cushions as my Christmas gifts this year and this pattern certainly appears to be THE ONE! (March 22, 2012) Thank you. I’ll give the pattern a 3* in spite of not really knowing how it will turn out.
Pattern worked great as written. Very pretty results. Thanks!
I have the same question as others… what does that “10” mean? And how do you perform the slip stitch to the center of the loop in rnd 2? Any help would be much appreciated. thanks.
I TRIED TO FOLLOW THE PATTERN AT THE END OF ROUND 10 I HAVE WAY TO MUCH SPACE IN BETWEEN THE SET OF LOOPS 1 AND 4 SO ENDS UP AS A CIRCLE INSTEAD OF A SQUARE , SO THE PATTERN IS WRONG .
no answer to the other 2 people that asked the same question, 10? How do you get the slip stich from the ring all the way up to the center of the chain 10?
It is beautiful. I have been looking for the Irish Lace patterns.Do you have more.
Why has this got no materials listed in the materials box? Please indicate materials used.
It is beauiful so please put out the materials used
If you’ve made this could you tell me what materials you used? Thanks
And in the 1st Rd, the las “10”..means ch10?
Please, can you explain me how is “sl st to center of 1st loop”..in the 2nd rd. Thanxs
FAbulous
wow…hard.
Amazingly beautiful though!