
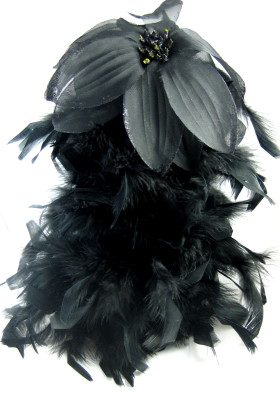
A large charcoal or black artificial flower finishes the top and gives the tree its dramatic silhouette. You can also use a black bow, decorative pick or cluster of dark ornaments.
Get more details about this project
What you need
Black marabou feather boa or feather trim with a central cord
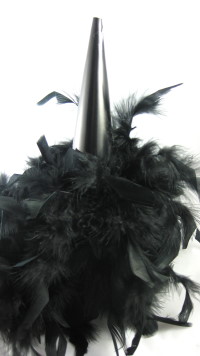
Black cardstock or a ready-made polystyrene cone
Craft glue suitable for the chosen cone
Low-temperature hot-glue gun, optional
Scissors
Sticky tape or stapler, if making a cardstock cone
Large charcoal or black artificial flower
Black ribbon, bow or decorative craft pick, optional
Black acrylic paint and paintbrush, optional
Black felt, optional
Instructions
Choose a feather trim with a cord running through its centre. The cord provides a secure gluing surface without requiring adhesive to be applied directly to the delicate feathers.
If the cone is white, paint it black and allow it to dry before adding the feathers. This prevents pale patches from showing through small gaps. Painting is unnecessary when using black cardstock.
Work over a protected surface because loose marabou fibres can shed during assembly. Arrange the feathers with your fingers before starting, but avoid pulling them away from their central cord.
Instructions
Step 1: Choose the tree size
Select a cone that suits the intended display area.
A short cone works well on a shelf, while a taller cone can become a table centrepiece. Check that the base is level so the finished tree will stand without rocking.
Step 2: Make a cardstock cone
Skip this step when using a ready-made polystyrene cone.
Roll a sheet of black cardstock into a cone. Adjust the overlap until the cone has the desired height and width.
Secure the overlapping edge with strong sticky tape, staples or craft glue. Trim the bottom evenly so the cone stands upright.
Step 3: Prepare the cone
Paint a white or light-coloured cone with black acrylic paint if desired. Allow it to dry completely.
For a neat underside, trace the base onto black felt and cut out the circle. Set it aside until the tree is finished.
Step 4: Prepare the marabou trim
Locate the central cord that holds the marabou feathers together.
Gently separate any tangled feathers without pulling on them. Begin with the fullest end of the trim at the bottom of the tree.
Avoid cutting the marabou into short sections unless necessary. One continuous length produces a fuller finish with fewer visible joins.
Step 5: Secure the starting point
Place a small amount of craft glue near the bottom edge of the cone.
Press the marabou’s central cord into the adhesive. Keep the loose feathers lifted away from the glue.
Hold the cord in position until it remains secure. A small dot of low-temperature hot glue may be used for a faster hold, but keep the hot nozzle away from the feathers and your fingers.
Step 6: Wrap the first row
Guide the trim around the base of the cone.
Apply a narrow line or small dots of glue beneath the central cord as you work. Keep the first row close to the lower edge so the feathers disguise the base.
Allow some feather tips to extend beyond the edge for a soft, natural silhouette.
Step 7: Continue wrapping upward
Spiral the marabou around the cone, gradually working toward the top.
Position each new round close enough to overlap the cord below it. The feathers should conceal the cone and any visible adhesive without forming perfectly rigid rows.
Rotate the cone as you work rather than twisting or stretching the feather trim.
Step 8: Keep the feathers free-flowing
After completing every few rounds, use your fingertips to lift and fluff the feathers.
Check that loose sections have not become trapped in the glue. If they have, release them carefully before the adhesive sets.
Add more trim wherever the cone remains visible, but preserve the slightly irregular handmade texture of the tree.
Step 9: Cover the top
Continue wrapping until the marabou reaches the narrowest part of the cone.
Use smaller amounts of glue near the top to prevent bulky adhesive from showing. Cut off the excess trim and glue the end of its cord firmly in place.
Fluff the upper feathers to conceal the final join.
Step 10: Prepare the flower topper
Remove any long plastic stem from the artificial flower, leaving a short section if it will help anchor the flower.
Arrange the petals and remove any brightly coloured leaves or decorations that do not suit the design.
A charcoal flower with a black bead or glitter centre closely recreates the dramatic appearance of the original decoration.
Step 11: Attach the topper
Position the flower prominently at the top of the tree.
Secure it with craft glue or a carefully applied dot of low-temperature hot glue. Hold it in place until stable.
The flower should overlap the upper feathers slightly and appear generously sized in relation to the cone.
Step 12: Finish the base
Glue the prepared felt circle underneath the cone if desired.
Trim away any exposed glue strands and fluff the feathers one final time. Rotate the tree and fill any obvious gaps with small pieces of marabou attached by their cords.
Allow all adhesive to dry completely before displaying the tree.
Design Variations
Use dark-purple, burgundy or midnight-blue feathers for a jewel-toned Gothic tree.
Replace the flower with a large black satin bow.
Add small silver skull charms among the feathers.
Decorate the tree with miniature black baubles or faux crystal drops.
Use black roses instead of a poinsettia-style flower.
Wrap a narrow strand of battery-operated cool-white micro lights around the finished tree.
Make several trees in different sizes to create a Gothic forest display.
Display Ideas
Place the tree on a silver tray surrounded by black candles and antique-style ornaments.
Use it as the centrepiece for a Gothic Christmas dinner.
Display it with white ceramic houses for a dramatic monochrome Christmas village.
Add it to a Halloween mantel, entry table or party display.
Pair it with deep-purple flowers, silver baubles and black lace.





To the previous guest don’t be judgmental, many Goths are Catholic as well as protestants. So, yeah they can celebrate their way. Sheesh
Merry Gothmas to one and all! LOL
Loved it! How beautiful if done in dark purples and deep reds too. Could be beautiful for a black and white tie affair during the holidays!
Sorry, but Christmas and goth do not even go in the same sentence. JMHO