
In this tutorial, we'll show you how to create your own felt bunny peeps from scratch. You'll learn everything from choosing the right materials and cutting out the shapes to sewing and stuffing your bunnies. With our helpful tips and tricks, you'll be able to make your own custom bunny peeps in no time.
Get more details about this project
What you need
9×12″ felt rectangle in Peeps colors
Polyfil stuffing
Dark brown acrylic paint
Pattern
Needle, matching thread & sewing pins.
Scissors
Disappearing marker
Pencil with an eraser
Fabric Glitter Spray (I used Tulip brand) Optional


Instructions
With Dana’s pattern as your guide, you can easily create your own custom felt peeps. And with a few simple modifications, you can take these already cute bunnies to the next level.
One easy modification is to add a light stuffing to the bunnies to make them stiffer and more durable. This not only makes them more visually appealing, but also helps them stand up on their own for display purposes.
But why stop there? For an even more dimensional look, try adding a narrow gusset between the two layers of felt. This will give your peeps even more depth and dimension, making them truly stand out as a unique and eye-catching addition to your Easter decor.
This peeps project idea was inspired by Dana Willard flat bunting pattern.
Cut 2 strips, each about 3/4″ wide from one narrow (9″) end of the felt.
Cut 2 pieces from the pattern & mark the center bottom.
Stitch the 2 strips together on one end & press the seam open with your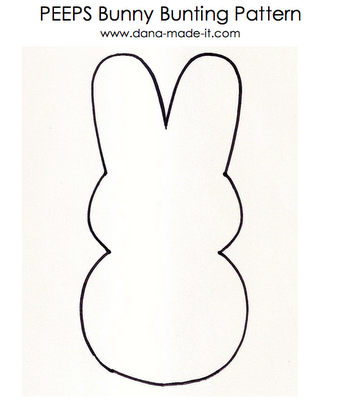 fingers.
Match the seam, right sides together, to the point between the bunny’s ears & stitch to secure.
Align the strip with the bunny edge & stitch halfway around ending at the center bottom using a very narrow seam—no more than 1/8″.
Return to the beginning & stitch the other half from the ear to the center bottom. This method keeps the seams even at the top & bottom. Join the 2 strips where they meet & trim the excess.
Turn the seam to the inside.
Pin the back piece to the gusset strip, aligning the edges & matching the center bottom.
Stitch the seam leaving an opening to stuff it. The back seam will remain exposed.
Stuff lightly & stitch the opening.
Dip the eraser on the pencil into a bit of the brown paint & place a dot on the bunny for each eye & the nose. Allow this to dry.
If desired, spray with fabric glitter to give your peep a sugary appearance.
Original idea source & Pattern
I want everyone to know that this isn’t my original. Credit for that goes to Dana Willard.
I merely fell in love with her Bunny peeps banner & took it in a different direction. Using her pattern, I began by adding a light stuffing to her peeps so they were a bit stiffer.
They looked great in my “candy dish” but I carried it a bit beyond when I added a narrow gusset between the 2 layers of felt to give the peeps more dimension.
Also, where Dana sewed her Peeps by machine, I prefer stitching mine by hand. The pattern measures about 5″ tall & the finished bunny are about 4.5″ tall.


What do you think of this project? Let us know!