
Get more details about this project
What you need
Plant pot
Clear bauble
Pom Poms or sprinkles
Soda can tab
Craft glue
Paints
Instructions
This adorable Christmas craft was contributed by Loreen M. She is a member of our Christmas crafts group on facebook. Thanks for sharing your version of this adorable little Christmas craft Loreen.
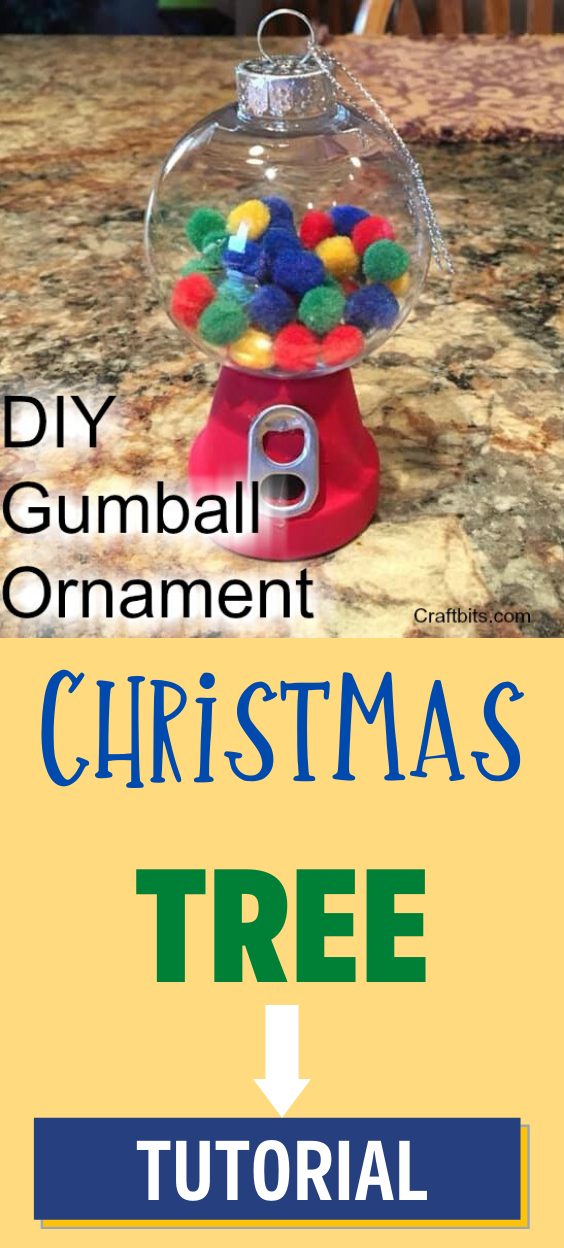
To begin with, you will need a clear plastic bauble 
Fill your bauble and gue the top on securerly, this will be used for hanging the whole ornament so it will be bearing a lot of added weight so use a strong glue.
Paint the pot (1/1/2 inch base ) red and add a black circle to give the illusion of the opening to the machine, this black section will sit behind the soda can tab to give the depth.
Once the pot has dried glue the tab in place and glue it to the bauble.
You could also use a red cup shot glass
They are so easy to make and adorable, would make cute gifts filled with real candy for school gifts too.
DIY Gumball Machine Christmas Ornaments
There’s something wonderfully cheerful about a miniature gumball machine hanging on the Christmas tree. The bright colours, little red base and clever soda can tab detail give this ornament an old-fashioned sweet-shop feel.
This lovely version was contributed by Loreen M., a member of our Christmas crafts group. Thank you for sharing your creation with us, Loreen!
I love that you can change the colours to suit your decorating. Try a rainbow of pom-poms like the pictured ornament, or choose pastels for a candy-themed tree.
1. Choose Your Bauble and Base
Start with a clear, fillable plastic bauble and a miniature plant pot. The pictured project uses a pot with a base approximately 1½ inches across.
Turn the pot upside down and rest the bauble on its narrow base to check the proportions. The globe should sit centrally without looking unbalanced.
For a lighter alternative, use a small red plastic shot cup as the base.
2. Fill the Globe
Remove the bauble cap and add small, colourful pom-poms to represent the gumballs. Leave some empty space so you can see the individual colours through the globe.
Pom-poms keep the ornament lightweight. Sprinkles or miniature gumballs create a different look but add weight, so those versions may be better displayed standing on a shelf.
3. Secure the Cap
Replace the cap and secure it with an adhesive suitable for the plastic and cap materials.
This connection will carry the weight of the entire decoration when hanging, so allow the adhesive to cure completely and check that the cap cannot pull free.
4. Paint the Pot
Paint the outside of the plant pot red, including its rim, and let it dry. Apply another coat if needed.
With the pot upside down, paint a small black oval on the front where the dispenser opening will sit.
5. Add the Soda Can Tab
Use a clean, undamaged soda can tab. Position it vertically over the black oval so the dark paint shows through the lower opening, creating the illusion of depth.
Glue the tab in place and allow it to set.
6. Attach the Globe
Apply suitable adhesive to the contact area between the bauble and the inverted pot. Centre the globe carefully and support the decoration upright while the glue cures.
Avoid using more glue than necessary, as excess adhesive can remain visible through the clear globe.
7. Finish and Display
Attach ribbon or cord to the ornament’s hanging loop. Check every connection before placing it on a sturdy tree branch.
If your finished ornament feels heavy, stand it among your Christmas decorations instead. It makes a lovely miniature sweet-shop display alongside our hot chocolate Christmas ornaments.
For school gifts, keep edible treats separately packaged and tie the ornament onto the outside. This keeps food away from the craft adhesive and allows the decoration to be enjoyed year after year.




How large are the clear baubles?