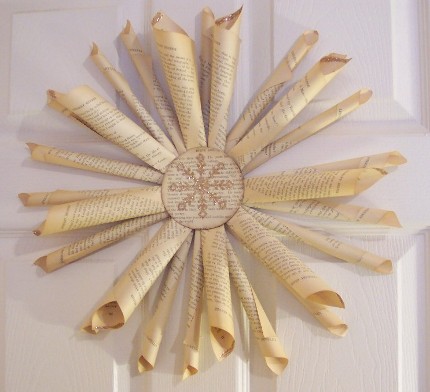
What you need
-Silhouette or Other Die Cutting Machine
-Circle and Snowflake Dies
-Vintage Book
-Thin Chipboard
-Glitter
-Brown Stamping Ink Pad
-Sponge
-Glue Stick
-Regular and Double Sided Tape
-Double Sided Adhesive Sheets (from Silhouette)
-Exacto Knife
-Hanger or Velcro
Instructions
-Note: This project uses pages from a vintage book, old books can be found at used book stores, thrift and antique stores, garage sales and library sales for very little cost. Choose a book that has good pages, make sure they are not fragile or crumbling. The size of the book pages will determine the final width of your wreath, use small pages for a small wreath, etc.
-Begin buy cutting out pages from your book. Open the book and carefully run the exacto knife along the edge of the pages close to the spine, try to make a straight cut, you should be able to cut through several pages at once. Or you can carefully tear out pages and use a paper trimmer to straighten the edges. This wreath used about 27 pages, more pages makes for a fuller wreath, always cut a few more than needed in case of mistakes.
-To form the paper cones run a line of double sided adhesive down the left side of a page (a tape runner is very helpful with this step). Starting from the lower right hand corner begin to curl and roll the paper up toward toward the left top side at a slight angle to form the cone, the tape will hold the shape. Repeat this step with all your book pages, make 8 of these cones wider than all the others.
-Using the die cutting machine (This project used the Silhouette Portrait electronic die cutting machine) cut two 4″ circles from the chipboard and one 4″ circle from an extra book page.
-Using the glue stick adhere the book page circle onto one of the chipboard circles. Using the sponge and stamping ink rub ink along the side of the paper circle for an aged look.
-Using the die cutting machine cut a snowflake shape from the double sided adhesive sheet, remove one side of the backing and apply the sticky side down in the middle of the paper circle. Remove the other backing from the top and pour glitter onto the adhesive shape, pour the excess glitter back into the bottle.
-Using the other chipboard circle (the one without the paper and glitter) as a back base for the wreath use regular tape to tape the pointed tips of the thinner cones all around the circle, spacing them out evenly. The tips will be slightly flattened, that’s ok. Next fill in around the wreath with the wider cones, also taping them into place.
-Using double sided tape adhere the glittered circle in the center of the wreath.
-Add double sided tape or liquid glue to the inside rims of the paper cones and pour on glitter, put the excess back in the bottle.
-Adhere a hanger or velcro to the back of the wreath for hanging.


Used to make wreath out of old IBM punch cards Very simular
Can’t wait to try this. Thank you for this project
I love the wreath and would love to see more projecs
Couldn’t you use the cover of the book instead of chipboard?
Probably if the cover were thin enough, most book covers might be too thick to go through a die cut machine though but you could always hand cut it.