
Scraps of black and purple fabric become the doll’s layered clothing, while buttons, beads or fabric shapes can be used to create its face. Add a humorous witch-doctor tag and one or two coloured sewing pins to complete the design.
Although it looks like a miniature wrapped doll, the lower barrel and writing tip remain exposed so the finished project can still be used as a pen. Make one for your desk or create several as Halloween party favors.
Get more details about this project
What you need
1 pen
Twig 3 inches long,
Inch wide masking tape
Scissors
Glue gun
Twine (or Spanish moss, raffia or plastic wrap)
Black fabric strip
Colored fabric strip 15″ x 1/2″
Sewing pins with colored tops
Instructions
Choose a simple disposable pen with a straight barrel. The pen will form the doll’s torso, so avoid pens with wide rubber grips or complicated retractable mechanisms.
The twig should be dry, clean and sturdy. Trim away sharp projections before using it.
This project is designed as a playful Halloween novelty. If you add sewing pins, keep the finished pen away from children and remove the pins before placing it in a handbag, pencil case or other area where someone could accidentally touch them.
Use the original doll as inspiration, but personalise the fabric colours, facial features and tag wording to create your own character.
Instructions
Step 1: Prepare the pen
Remove the pen cap and set it aside.
Decide how much of the lower pen barrel needs to remain exposed. Leave approximately 2 inches near the writing tip uncovered so the pen is comfortable to hold and use.
Step 2: Position the twig
Lay the pen vertically on your work surface.
Position the 3-inch twig horizontally across the pen approximately 1 inch below its non-writing end. The twig should form a cross with roughly equal arm lengths extending from each side.
The short section of pen above the twig will become the doll’s head.
Step 3: Secure the cross
Wrap masking tape diagonally around the point where the pen and twig intersect.
Alternate the direction of the tape as you work so the twig cannot twist or slide. Press the tape down firmly, but avoid creating an unnecessarily bulky centre.
Check that both arms remain level before continuing.
Step 4: Begin wrapping the doll
Apply a small dot of hot glue near the taped intersection and press the end of the twine into it.
Wrap the twine around the centre several times to conceal the masking tape and strengthen the joint.
Step 5: Form the head
Continue wrapping twine around the short section of pen above the arms.
Build up several layers to create a rounded or slightly oval head. Keep the top covered so the end of the pen does not show.
Add occasional dots of hot glue beneath the twine to prevent the layers from slipping.
Step 6: Wrap the arms
Carry the twine from the body along one side of the twig.
Wrap toward the end of the arm and then work back toward the centre. Cover the twig evenly while leaving a slightly thicker rounded section at the end to suggest a hand.
Repeat on the opposite arm.
Step 7: Wrap the torso
Continue winding twine around the pen beneath the arms.
Work down the barrel until you are approximately 2 inches from the writing tip. Keep this lower section of the pen exposed so it remains functional.
Secure the twine with a knot or a small dot of hot glue. Trim away the excess.
Step 8: Add the black fabric
Wrap the black fabric around the doll’s twine-covered torso.
Leave a fabric tail approximately 3 inches long at the beginning. Continue wrapping until most of the centre body is covered, keeping the twine visible on the head, arms and lower body.
Tie the finishing end to the beginning tail. Allow the ends to hang loosely or trim them for a neater appearance.
Step 9: Add the coloured clothing
Drape the coloured fabric across the shoulders and wrap it around the middle of the doll.
Cross the fabric over the front to create a small shawl, shirt or robe. Leave some of the black fabric showing above and below the coloured layer.
Tie or glue the ends securely at the back.
Purple fabric creates a classic mystical Halloween look, while orange, red or green can be used for a brighter variation.
Step 10: Create the face
Glue two small black buttons, beads or fabric circles onto the wrapped head to form the eyes.
Add a stitched or painted mouth if desired. You can also attach a small amount of yarn, raffia or teased twine to create hair.
Keep the facial features simple so they remain visible against the textured twine.
Step 11: Make the tag
Cut a small rectangle from black cardstock.
Write or print a humorous Halloween message such as:
“My Friend the Witch Doctor”
“He Told Me What to Do”
“Official Potion Notes”
“Write Your Own Spells”
Use a white gel pen or paint marker so the wording stands out. Add a coloured border if desired.
Punch a small hole in one corner of the tag.
Step 12: Attach the tag
Thread a short piece of twine through the hole in the tag.
Tie it around one arm or across the doll’s shoulder. Position the tag so it hangs beside the doll without covering the face.
Step 13: Add a coloured pin
Push one coloured-head sewing pin through a thick section of the fabric clothing. Do not push it into the pen barrel.
The original project associates the colours with different positive intentions:
Black for repelling negative energy
Blue for love
White for positivity
Green for money or prosperity
Orange for emotional healing
Pink for relationship matters
Yellow for success
Red for power
Purple for spirituality
The pin is optional and should be treated only as a decorative element.
Step 14: Check the finished pen
Make sure all the twine and fabric ends are securely tied or glued.
Check that the twig is firmly attached and that the writing tip remains completely clear.
Test the pen on a piece of scrap paper before displaying or gifting it.
Design Variations
Use torn cheesecloth instead of coloured cotton for a distressed mummy-style doll.
Replace the twine with crochet thread or thin yarn for a smoother finish.
Add mismatched button eyes for a whimsical folk-art appearance.
Use tiny fabric patches and visible stitches to create a more traditional rag-doll look.
Make several pens with different clothing colours and facial expressions.
Replace the witch-doctor tag with a guest’s name and use the pens as Halloween place cards.
Display and Gift Ideas
Stand several finished pens in a miniature black cauldron.
Add one to each Halloween party place setting.
Give them to coworkers as seasonal desk accessories.
Attach them to notebooks for a Halloween-themed stationery gift.
Use them as favors for a witch, potion or spooky laboratory party.
Safety Information
An adult should handle the hot-glue gun and supervise children during this project.
Trim or sand any sharp points from the twig before attaching it to the pen.
Sewing pins are sharp and should be omitted when making this project for children. Remove decorative pins before carrying or storing the pen.
Keep glue, twine and fabric away from the writing mechanism.
This project is a decorative writing tool rather than a toy. Keep it away from babies, young children and pets.
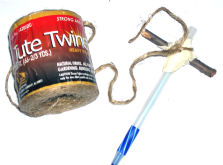
Wrap twine around cross sections of pen and twig, continuing to wrap entire twig and pen fully to within 2 inches of tip of pen. Be sure to cover entire arms and head of doll with twine.
Tie twine to doll to secure.
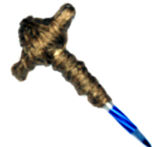
Wrap black fabric around twine, leaving a 3 inch tail of fabric exposed for finishing. Wrap to cover most of the body, keeping the twine exposed on the top, bottom and arms.
Tie end of black fabric to tail from where you began.
Repeat with colored fabric, covering the shoulders and middle of the doll, exposing the black fabric at the ends.
Knot colored fabric to secure. Embellish with eyes made from fabric, beads or buttons.
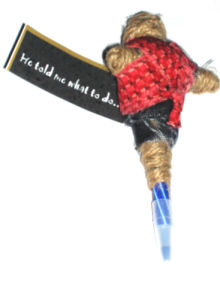
Be creative and make a mouth and hair if you’d like.
Print labels and attach to doll with twine.
Finish with a colored pin of your choice, casting positive energy, never negative energy.
Black: for repelling negative energy
Blue: for love
White: for positive
Green: for money
Orange: for emotional problems
Pink: for love problems
Yellow: for success
Red: for power
Purple: for spirituality



super cute!
UGLY & CREEPY
I love this, am going to make loads for my party favours. so cool.
How odd and uninformed to call a voodoo doll pen (meant, I am quite sure, in jest) to satanism. Voodoo is actually a religion itself and doesn’t, regardless of what some insist on thinking, have anything to do with satanism.
I think it’s a clever idea for a Halloween party. (Halloween doesn’t celebrate satan either, in case you were wondering.)
Very poor choice. All we need is more satan crafts.
this is too funny. I’m going to make and give out as party favors at my Halloween party.
love it
hmmm…too creepy…
I love the idea but I would think wrapping with yarn, crochet thread or ribbon would produce better looking results.
Fab idea, I love it!
kinda ugly..
This is a really cute idea!
I LOVE THIS!