
Get more details about this project
What you need
Cotton fabric for the hat (pink, red, green, or other Christmas colors)
Striped cotton fabric for the lower body
Cream or white cotton fabric for the face
Polyester toy filling or stuffing
Sewing machine
Matching sewing thread
Hand sewing needle
Fabric scissors or rotary cutter
Pins or sewing clips
Iron
Fine black fabric marker or permanent marker
Pink blush, pastel, or fabric-safe coloring for cheeks
Small makeup brush or cotton bud
Narrow ribbon or fabric strip for bow
Mini bells
Twine, string, or cord for hanging loop
Turning tool, chopstick, or blunt knitting needle
Optional fabric glue
Instructions
These long pointed Christmas gnomes are a lovely scrap fabric sewing project, especially if you have narrow strips of fabric left over from quilting or Christmas sewing.
Their shape is very simple. Each gnome is made from a long, narrow fabric tube with a pencil-like pointed hat, a plain cream face, and a striped lower body. Once sewn, the tube is lightly stuffed and decorated with a tiny face, rosy cheeks, green ribbon bow, and little bells.
They look charming hanging from a Christmas tree, grouped together on a hook, added to a wreath, or tied onto wrapped gifts. They are also an easy handmade Christmas craft to make in batches for teacher gifts, craft fairs, or stocking fillers.
The best part is that the faces do not need to be perfect. In fact, slightly different eyes and cheeks make each gnome look like it has its own little personality.
Finished Size
Each finished gnome will measure approximately:
- 12 to 14 inches long
- 2 to 2½ inches wide
- Around 15 inches long including the hanging cord
The exact size will depend on how firmly the gnome is stuffed and how long you make the pointed hat.
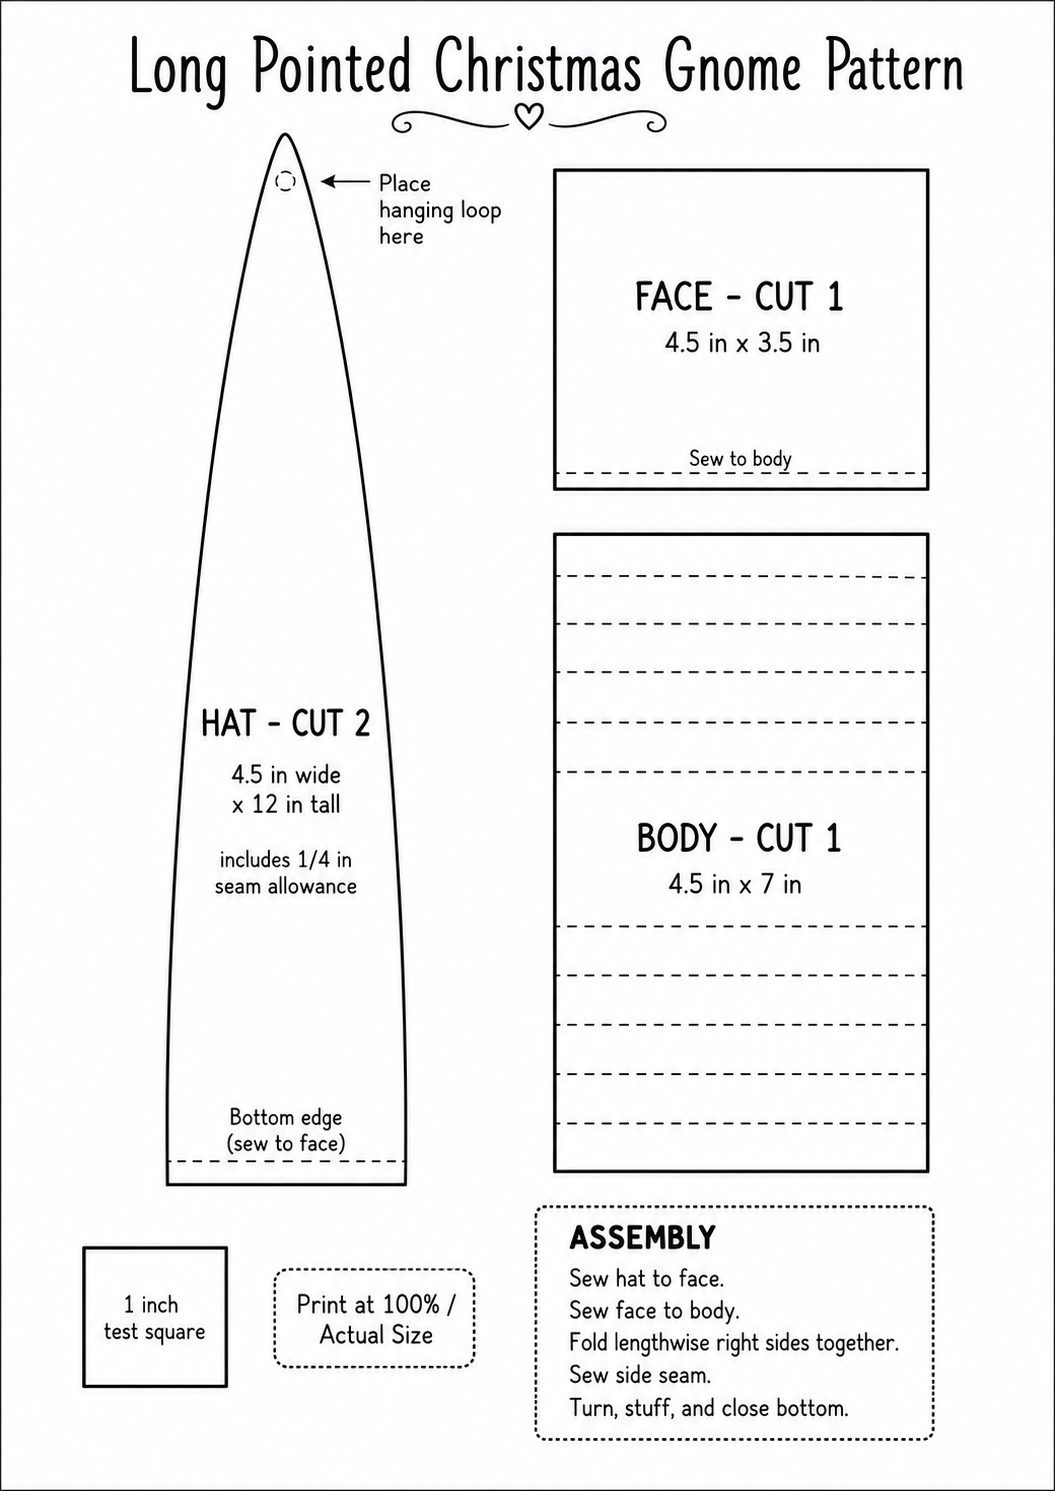
Cutting Measurements
For each gnome, cut:
Hat
- One piece measuring 4½ inches wide by 12 inches long
The hat should taper into a very long narrow point rather than a wide triangle.
Face
- One rectangle measuring 4½ inches wide by 3½ inches high
Body
- One rectangle measuring 4½ inches wide by 7 inches high
Hanging Loop
- One piece of twine or cord measuring approximately 12 inches
These measurements include approximately ¼-inch seam allowances.
Instructions
Step 1: Cut the Hat Into a Long Point
Take the hat fabric and mark the centre of one short edge.
Draw a line from the centre point down to the bottom left corner, then draw another line from the centre point down to the bottom right corner.
The finished shape should be long and slim, almost like a sharpened pencil.
Avoid making the hat too wide at the top. The narrow shape is what gives these gnomes their whimsical appearance.
Cut along the marked lines.
Step 2: Sew the Hat to the Face
Place the bottom edge of the hat against one long edge of the cream face fabric, right sides together.
Pin and sew using a ¼-inch seam allowance.
Press the seam toward the hat fabric.
Step 3: Sew the Face to the Body
Place the lower edge of the face fabric against the top edge of the striped body fabric, right sides together.
Pin and sew using a ¼-inch seam allowance.
Press the seam toward the striped fabric.
You should now have one long joined fabric piece made up of the pointed hat, cream face, and striped body.
Step 4: Add the Hanging Loop
Fold the twine or cord in half to make a loop.
Place the loop inside the fabric at the pointed top of the hat. The folded loop should hang down inside the fabric, with the two raw ends extending slightly beyond the top point.
Pin or tack the cord securely in place.
When the gnome is sewn and turned right side out, the loop will come out through the top.
Step 5: Fold the Fabric Into a Tube
Fold the joined fabric piece in half lengthways with right sides together.
Match the seams carefully where the hat, face, and body sections meet.
Pin or clip along the long open edge.
Step 6: Sew the Side Seam
Starting at the top point, sew down the long side of the gnome using a ¼-inch seam allowance.
Backstitch at the beginning and end.
Leave the bottom edge open for turning and stuffing.
Trim away a small amount of excess fabric at the pointed tip, taking care not to cut through the stitching or hanging cord.
Step 7: Turn the Gnome Right Side Out
Turn the fabric tube right side out through the open bottom.
Use a turning tool, chopstick, or blunt knitting needle to gently push out the hat point.
Work slowly at the tip. It is easy to poke through the seam if you push too firmly.
Step 8: Stuff the Gnome
Add polyester filling through the open bottom.
Begin with small pieces of filling and push them into the pointed hat.
Continue stuffing the face and body.
The gnome should be softly stuffed rather than packed firmly. A slightly flexible shape suits this style much better and helps the gnomes hang neatly.
Step 9: Close the Bottom
Fold the raw bottom edge inward by approximately ¼ inch.
Close the opening using either:
- Ladder stitch for an invisible hand-sewn finish
- A straight machine stitch across the bottom edge
Hand stitching gives the neatest finish, especially when the gnomes are intended as gifts.
Step 10: Draw the Face
Use a fine black fabric marker to draw two small dot eyes on the cream face section.
Keep the face very simple.
You can add a tiny curved mouth if you like, but the dot eyes and pink cheeks are often enough.
Always test the marker on a fabric scrap first, as some pens can bleed into the fibres.
Step 11: Add Rosy Cheeks
Use pink fabric chalk, pastel, or cosmetic blush to add soft cheeks beneath the eyes.
Apply the colour with a small makeup brush or cotton bud.
Start lightly and slowly build the colour.
Too much blush can be difficult to remove, so this is definitely one of those “less is more” moments.
Step 12: Add the Green Bow
Wrap a narrow piece of green ribbon around the seam between the face and striped body.
Tie the ribbon into a small bow at the front.
Secure the bow with a few hand stitches or a tiny dab of fabric glue.
Dark olive, forest green, or sage ribbon all look lovely with the red and cream fabric.
Step 13: Sew on the Mini Bells
Arrange the mini bells across the lower section of the pointed hat.
Use a hand-sewing needle and strong matching thread to stitch each bell in place.
Five to eight bells per gnome is usually enough.
Do not overcrowd the hat, as too many bells can make the gnome heavy and pull the fabric out of shape.
Gold bells give a traditional Christmas finish, while silver bells work well with pink, grey, or pale green fabric.
Tips for Making the Gnomes
Keep the Hat Narrow
The hat should be tall and pencil-shaped rather than wide and triangular. A narrow hat gives the finished gnome a much more whimsical appearance.
Use Small Amounts of Stuffing
Add filling in little pieces to prevent lumps.
Match the Fabric Seams
Take time to line up the joins between the hat, face, and body before sewing the side seam.
Test the Face First
Draw a practice face on a fabric scrap before working on the finished gnome.
Sew the Bells Securely
Pass the thread through each bell loop several times and knot it firmly.
Fabric Ideas
These gnomes are ideal for using:
- Christmas quilting cotton
- Striped pillowcases
- Old shirts
- Vintage ticking fabric
- Linen scraps
- Calico remnants
- Leftover fat quarters
- Fabric sample pieces
Medium-weight cotton fabric is easiest to sew and turn.
Avoid thick upholstery fabric, as it can become bulky around the seams.
Christmas Gnome Variations
Traditional Red Gnomes
Use red hats, cream faces, red striped bodies, green bows, and gold bells.
Pink Christmas Gnomes
Use dusty pink hats, pink-and-cream stripes, sage green ribbon, and rose-gold bells.
Rustic Farmhouse Gnomes
Use linen, ticking stripe fabric, natural twine, and antique-style bells.
Scandinavian Gnomes
Choose muted red, grey, cream, and oatmeal fabrics with simple dark green bows.
Candy Cane Gnomes
Use bright red fabric with bold red-and-white striped bodies and shiny silver bells.
Ways to Use the Finished Gnomes
Hang them from:
- Christmas trees
- Wreaths
- Cabinet handles
- Door knobs
- Garlands
- Gift bags
- Wrapped presents
- Market stall displays
They also look lovely grouped together in a decorative basket or hanging in a bunch from a wooden peg.
Batch Sewing Tip
These gnomes are much faster to make when sewn in batches.
Cut all the fabric pieces first, then sew each stage across the entire group:
- Sew all the hats to the faces
- Sew all the faces to the bodies
- Add all the hanging loops
- Sew all the side seams
- Turn and stuff
- Close the bottoms
- Add faces, bows, and bells
A small production line saves time and makes it much easier to create enough gnomes for gifts or a Christmas market stall.
Safety Note
These ornaments contain small bells and are intended for decoration only.
Keep them away from babies, young children, and pets, as loose bells or embellishments may become a choking hazard.
These long pointed Christmas gnomes are simple to sew, inexpensive to make, and full of handmade charm. Use matching fabrics for a coordinated set or raid the scrap basket and let every gnome be completely different.





What do you think of this project? Let us know!