
Get more details about this project
What you need
- Velvet ribbon approximately 1 inch (2.5 cm) wide or Larger
- Approximately 5.5 metres of ribbon for a roughly 1-metre garland, including a testing allowance
- Craft glue suitable for fabric, or a hot-melt glue gun and glue sticks
- Sharp scissors
- Ruler or measuring tape
- Scrap cardboard for a cutting template
- Pencil
- Protective work mat
- Small craft clips if using craft glue
- Silicone pressing tool if using hot glue
- Optional narrow ribbon for hanging ties
Instructions
Christmas paper chains have always had a special place in my decorating heart. They remind me of kitchen-table crafting, colourful paper scraps and the sort of decorations that looked wonderful even when the loops were a little wonky.
These velvet ribbon paper chains for Christmas keep that familiar interlocking shape, with a softer, richer finish. The velvet catches the light beautifully and looks lovely nestled among Christmas tree branches.
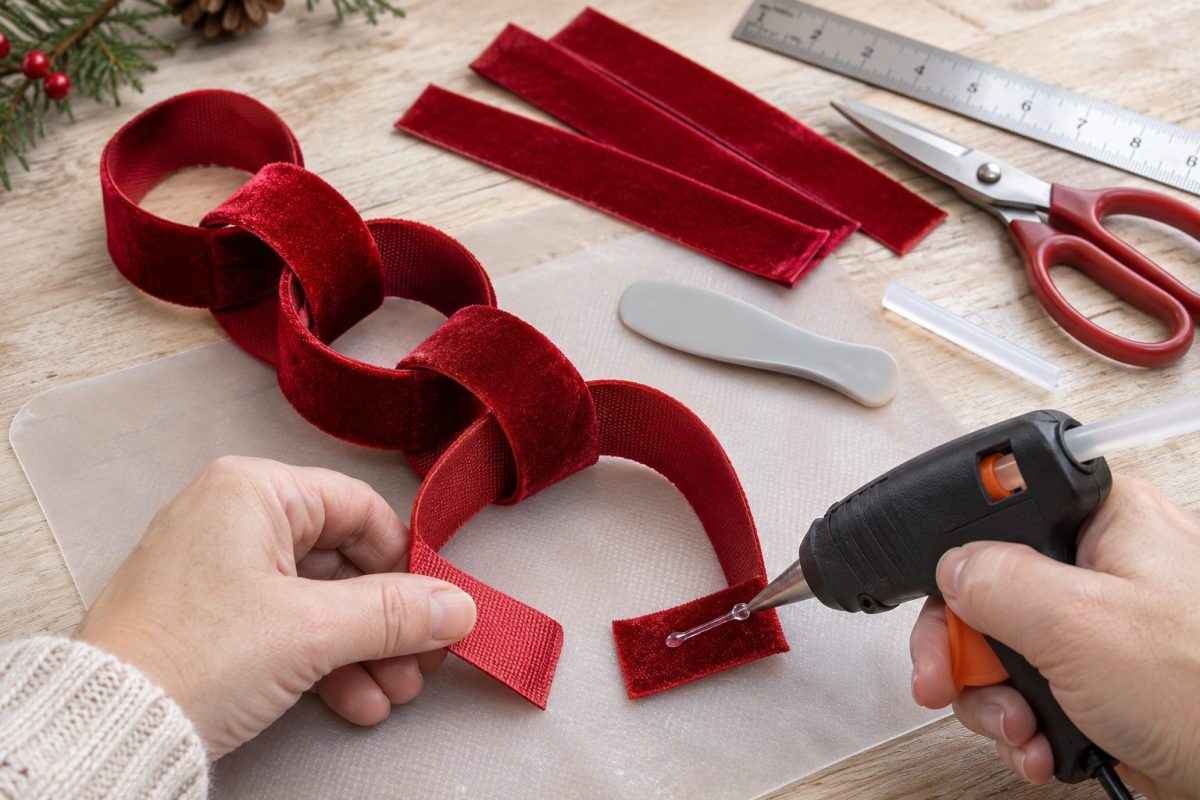
Despite the name, there is no paper inside these links. Each loop is made entirely from ribbon, with the ends secured using craft glue or a hot glue gun.
An all-red velvet garland is particularly lovely with green branches, simple ornaments and warm white lights. You can also mix colours, which is excellent news for anyone whose ribbon collection has quietly taken over a drawer. Or three.
If you enjoy decorating with ribbon, our ribbon Christmas tree tutorial makes a lovely companion project for a festive shelf or table.
How Much Velvet Ribbon Do I Need to Make a Garland?
For approximately 1 metre of finished velvet ribbon chain garland, allow 20–25 loops, each made from an 8-inch (20.3 cm) ribbon strip.
Each strip includes a 2 cm overlap for gluing the ends together.
As a practical shopping guide, buy approximately 5.5 metres of velvet ribbon for a 1-metre garland. This provides enough for 25 links, with a little extra for testing and trimming.
| Number of velvet ribbon loops | Ribbon required before extra allowance |
|---|---|
| 10 loops | 2.03 metres |
| 20 loops | 4.06 metres |
| 25 loops | 5.08 metres |
| 30 loops | 6.10 metres |
| 40 loops | 8.13 metres |
| 50 loops | 10.16 metres |
Why does a short garland use so much ribbon? Each strip curves around to make a complete loop, and the loops interlock. An 8-inch ribbon strip does not add 8 inches to the finished chain.
The 20–25 links per metre is an approximate planning guide. Firmer, rounder loops and softer, more elongated loops will produce different finished lengths. Make a short sample before cutting your entire supply.
Also allow extra length for swags. If you are decorating a shelf that measures 1 metre across, you will need more than 1 metre of garland to create a generous curve. Use a piece of string to measure your intended arrangement first.
Instructions
1. Choose Your Velvet Ribbon
Choose non-stretch velvet ribbon with finished edges and a reasonably firm backing.
Very soft ribbon makes relaxed loops, while firmer-backed ribbon holds a more rounded paper-chain shape.
Ribbon approximately 1 inch (2.5 cm) wide is a useful starting point. Single-sided velvet works well, although the backing will show inside each link. Double-sided velvet gives a plush finish on both surfaces.
For an all-red Christmas garland, use ribbon from the same roll or batch to keep the colour consistent.
2. Make an 8-Inch Cutting Template
Measure and cut a piece of cardboard 8 inches (20.3 cm) long.
Use the template to measure each ribbon strip, cutting straight across with sharp scissors.
Start with enough strips for a short sample. Once you are happy with the size and how the links hang, cut the rest.
Keep the strip lengths consistent so your finished velvet ribbon chain looks reasonably even. A little handmade character is lovely; wildly different loop sizes are harder to disguise.
3. Test Your Glue
Protect your table with a work mat.
If using craft glue, check that it is suitable for fabric and your ribbon’s fibre. Make a test overlap on a spare piece and allow it to dry according to the manufacturer’s instructions.
Velvet has a raised pile, so check that the glue grips securely without soaking through or leaving a visible mark.
If using a hot-melt glue gun, test a small amount on spare ribbon. Check that the ribbon tolerates the heat and that the cooled join holds when gently pulled.
Whichever adhesive you choose, avoid thick lumps that make the overlap bulky.
4. Glue the First Velvet Loop
Curve one ribbon strip into a ring with the velvet facing outwards.
Overlap the short ends by 2 cm. The backing of the outer end should sit against the velvet face of the inner end.
Check that the loop has no twist.
Using craft glue: Apply a thin, even layer within the overlap. Press the ends together and hold with a small craft clip if needed. Avoid crushing the velvet pile, and let the join dry as directed.
Using hot glue: Apply a small amount within the overlap. Bring the ends together and press with a silicone tool, keeping your fingers away from the hot adhesive. Allow the glue to cool completely.
You now have your first closed link.
5. Add the Second Link
Pass the next ribbon strip through the first completed loop.
Bring its short ends together, keeping the velvet facing outwards. Overlap by 2 cm and glue as before.
Allow the join to dry or cool before putting tension on it.
The threading part matters. Close the ring first and you will have two separate loops instead of a chain, which is a rather different Christmas decoration.
6. Check Your Sample Length
Continue until you have 10 connected loops.
Arrange the sample as you intend to hang the finished garland and measure it without pulling tight. This lets you check your ribbon’s behaviour against the approximate allowance of 20–25 links per metre.
If you want a more precise quantity, use:
Desired garland length ÷ sample length × number of sample loops = approximate total loops
Use the same units for both lengths and round up to the next whole loop.
7. Continue Building the Garland
Cut the remaining ribbon strips and keep adding links.
For every new link:
- Thread the strip through the last completed loop.
- Check that the velvet faces outwards.
- Overlap the ends by 2 cm.
- Glue the overlap.
- Allow the join to set before adding tension.
Keep the completed chain resting on the table while you work. This prevents its weight from pulling on fresh glue joins.
If you are alternating colours, lay out a few strips in advance to keep the sequence consistent.
8. Hang Your Christmas Garland
Drape the chain loosely through Christmas tree branches, along a shelf or across a dresser.
Use narrow ribbon ties through the end links to attach it to suitable supports. Support longer chains at intervals rather than leaving the whole weight hanging from the end joins.
Keep ribbon decorations away from candles, heaters and working fireplaces, and beyond the reach of pets and small children.
For a coordinated tree, pair your chain with our ribbon weave ornaments, repeating the same red or complementary colours.
Velvet Ribbon Garland Colour Ideas
Traditional Christmas red: Use one rich red velvet throughout for a classic decoration that stands out against green branches.
Pink and green: Alternate dusty pink and olive for a softer festive palette.
Jewel tones: Combine emerald, plum, raspberry and navy.
Ribbon-stash mix: Use leftover colours while keeping ribbon widths and strip lengths consistent.
Save any suitable wired ribbon for our little ribbon gift bags, another lovely way to turn ribbon into festive decorations.
Troubleshooting Your Velvet Ribbon Chain
My Loops Look Floppy
Try ribbon with a firmer backing. You can also nestle the garland among tree branches so the loops have more support.
The Glued Ends Keep Opening
Check that the adhesive suits the ribbon and has fully dried or cooled. Keep the overlap at 2 cm and test a replacement join before continuing.
Glue Is Showing Around the Join
Use less adhesive and keep it slightly back from the overlap edges. Press gently so it does not squeeze onto the velvet face.
My Links Are Twisted
Before gluing, check that the velvet faces outwards all the way around each ring. Correct twists while the strip is still open.
Storing Your Handmade Christmas Garland
Lay the chain loosely in a shallow box, using tissue paper between layers if needed.
Avoid putting heavy ornaments on top, as they can flatten the loops and crush the velvet pile. Store the garland clean and dry, with hanging ties tucked alongside it.
Whether you choose classic red or a colourful mix, these velvet ribbon Christmas chains bring a lovely touch of nostalgia to your decorating. It is a familiar childhood craft with a softer finish, and a very good excuse to spend an afternoon playing with ribbon.




What do you think of this project? Let us know!