
Get more details about this project
What you need
Three coordinating Halloween paper plates
Wide black ribbon, fabric, sturdy cord or a strip of cardstock
Small plastic skulls or lightweight Halloween embellishments
Hot-glue gun and glue sticks
Strong craft glue for children, if preferred
Scissors
Ruler or measuring tape
Pencil or removable marker
Baking paper or another protected work surface
Picture hook, removable wall hook or drawing pin for hanging
Instructions
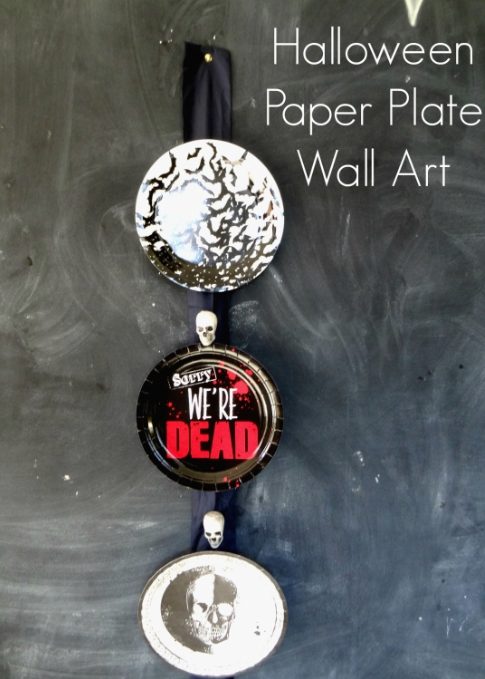
Decorative Halloween paper plates are far too much fun to save only for the party table. With a length of black ribbon and a few lightweight embellishments, you can transform three coordinating plates into an easy Halloween wall decoration.
This project works particularly well with plates featuring skulls, bats, haunted houses, pumpkins or black-and-red Halloween designs. The plates do not need to match exactly, but they should share one or two colours so the finished hanging looks coordinated.
Hang the completed paper plate decoration on a door, narrow wall, classroom display board or above a Halloween party table. It is lightweight, inexpensive and easy to store flat once Halloween is over.
Instructions
Step 1: Choose the paper plates
Select three Halloween paper plates that look good together.
You can use three matching plates or combine different designs that share similar colours. Black, white, orange, purple and deep red work particularly well for Halloween wall art.
Arrange the plates on your work surface and decide which design will go at the top, centre and bottom.
Step 2: Prepare the backing
Cut a length of wide black ribbon long enough to hold all three plates with small spaces between them.
Place the ribbon vertically on a protected work surface. Leave approximately 15–20 cm of extra ribbon above the first plate so you can create a hanging loop.
If your ribbon is thin or flexible, use two layers or reinforce it with a strip of cardstock. This will help prevent the finished wall hanging from twisting.
Step 3: Plan the arrangement
Place the three plates face down over the ribbon.
Position them in a straight vertical row, leaving an even gap between each plate. Use a ruler to check the spacing before gluing anything in place.
Mark the position of each plate lightly on the ribbon if necessary.
Step 4: Attach the plates
Apply hot glue to the section of ribbon that will sit against the back of the first plate.
Press the ribbon firmly onto the plate and hold it in place until the glue begins to set.
Repeat this process with the remaining two plates, checking that they stay centred and evenly spaced.
For extra strength, glue a small square of cardstock over the ribbon on the back of each plate. This sandwiches the ribbon between the plate and cardstock and helps distribute the weight.
Adult supervision is required when using a hot-glue gun. Children can use a strong craft glue, but the project will need to remain flat until the glue dries completely.
Step 5: Add the embellishments
Glue small plastic skulls, spiders, bats, bows or other lightweight Halloween embellishments onto the visible ribbon between the plates.
Avoid using heavy decorations because they may cause the ribbon to twist or pull away from the paper plates.
Allow all the glue to dry thoroughly before lifting the wall hanging.
Step 6: Create the hanging loop
Fold the extra ribbon at the top backwards to create a loop.
Glue or staple the end of the ribbon securely behind the top plate. If using staples, make sure the sharp ends remain covered at the back.
Alternatively, leave the ribbon flat and hang it directly from a drawing pin or removable wall hook.
Step 7: Check the finished wall art
Carefully lift the decoration by its hanging loop.
Check that the plates remain straight and that all the embellishments are secure. Add more glue or cardstock reinforcement to the back if any plate feels loose.
Hang the finished Halloween paper plate wall art on an indoor wall, door or covered display area.
Keep it away from rain, moisture, candles and other open flames. The paper plates and ribbon are intended for indoor decorative use.




What do you think of this project? Let us know!