
Make a bird for your Christmas tree, attach one to a wrapped present, or add an embroidered initial to create a keepsake gift tag.
Get more details about this project
What you need
Smooth DK / 8-ply yarn in your chosen colour, approximately 15–20 g as a starting allowance
3 mm crochet hook, or a size that produces firm but flexible fabric
Small amount of brown yarn or embroidery thread for the beak and eyes
Contrasting embroidery thread for an optional initial
Tapestry needle
Embroidery needle suitable for your thread
Scissors
Ruler or tape measure
Removable stitch markers
Cotton cord, narrow ribbon or baker’s twine for hanging
Smooth cotton or a cotton blend will make the stitch texture and folded layers easier to see. Avoid very bulky or fluffy yarn for your first sample, as the overlapping fabric can become thick.
Instructions
A handmade ornament that can also do duty as a gift tag is rather handy at Christmas. Tie it onto a present this year, and the recipient has a little decoration to hang on the tree next year.
These crochet birds are inspired by the way a simple strip can be folded into a bird shape. The crochet itself is straightforward, with a rounded head at one end and a forked tail at the other. The shaping is the part to take slowly, keeping the fabric broad and flat as you arrange it.
I like the idea of making a small flock in cranberry, sage, cream and dusty blue. They are lovely colours for Christmas without leaving you with a basket of yarn that only comes out in December.
For a mixed handmade tree, pair your birds with a crochet button angel ornament. Both projects make use of those small yarn leftovers that are apparently too useful to throw away.
Instructions
Before You Begin
This is an origami-inspired yarn project, so the fabric behaves differently from paper. It will need small securing stitches to hold its shape.
The suggested strip length is a starting point. Trial-fit the knot before completing the tail, adding or removing rows as needed.
The example photographs show the intended appearance. They do not demonstrate a tested result of these instructions.
Abbreviations
- ch: chain
- sc: single crochet
- sc2tog: single crochet two stitches together
- st / sts: stitch / stitches
Increase: Work 2 sc into the same stitch.
Sc2tog: Insert the hook into the next stitch and pull up a loop. Insert the hook into the following stitch and pull up a loop. Yarn over and pull through all 3 loops.
Turning chains do not count as stitches. Work through both loops throughout.
1. Crochet the Curved Head Cap
The head begins as a small semicircle worked backwards and forwards.
Do not join the rows into a circle.
Row 1: Make a magic ring. Ch 1, work 3 sc into the ring. Turn. 3 sts
Row 2: Ch 1, work 2 sc in each stitch across. Turn. 6 sts
Row 3: Ch 1, work (2 sc in the next stitch, sc in the next stitch) 3 times. Turn. 9 sts
Gently tighten the magic ring to close the central opening. Arrange the fabric into a flat curved cap without gathering the outer edge.
Row 4, neck: Ch 1, sc2tog, sc in each of the next 5 stitches, sc2tog. Turn. 7 sts
Row 5: Ch 1, sc in each stitch across. Turn. 7 sts
The curved starting edge becomes the top of the head. The narrower section leads into the main strip.
2. Crochet the Main Strip
Repeat Row 5, keeping 7 stitches in every row, until the piece measures approximately 30 cm from the outermost curved edge of the head.
Aim for a main strip approximately 3.5–4 cm wide. This is a suggested working width rather than a tested gauge.
Keep the edges straight and the fabric flexible. If the strip feels stiff, try a slightly larger hook.
Do not fasten off. Secure the working loop with a removable marker.
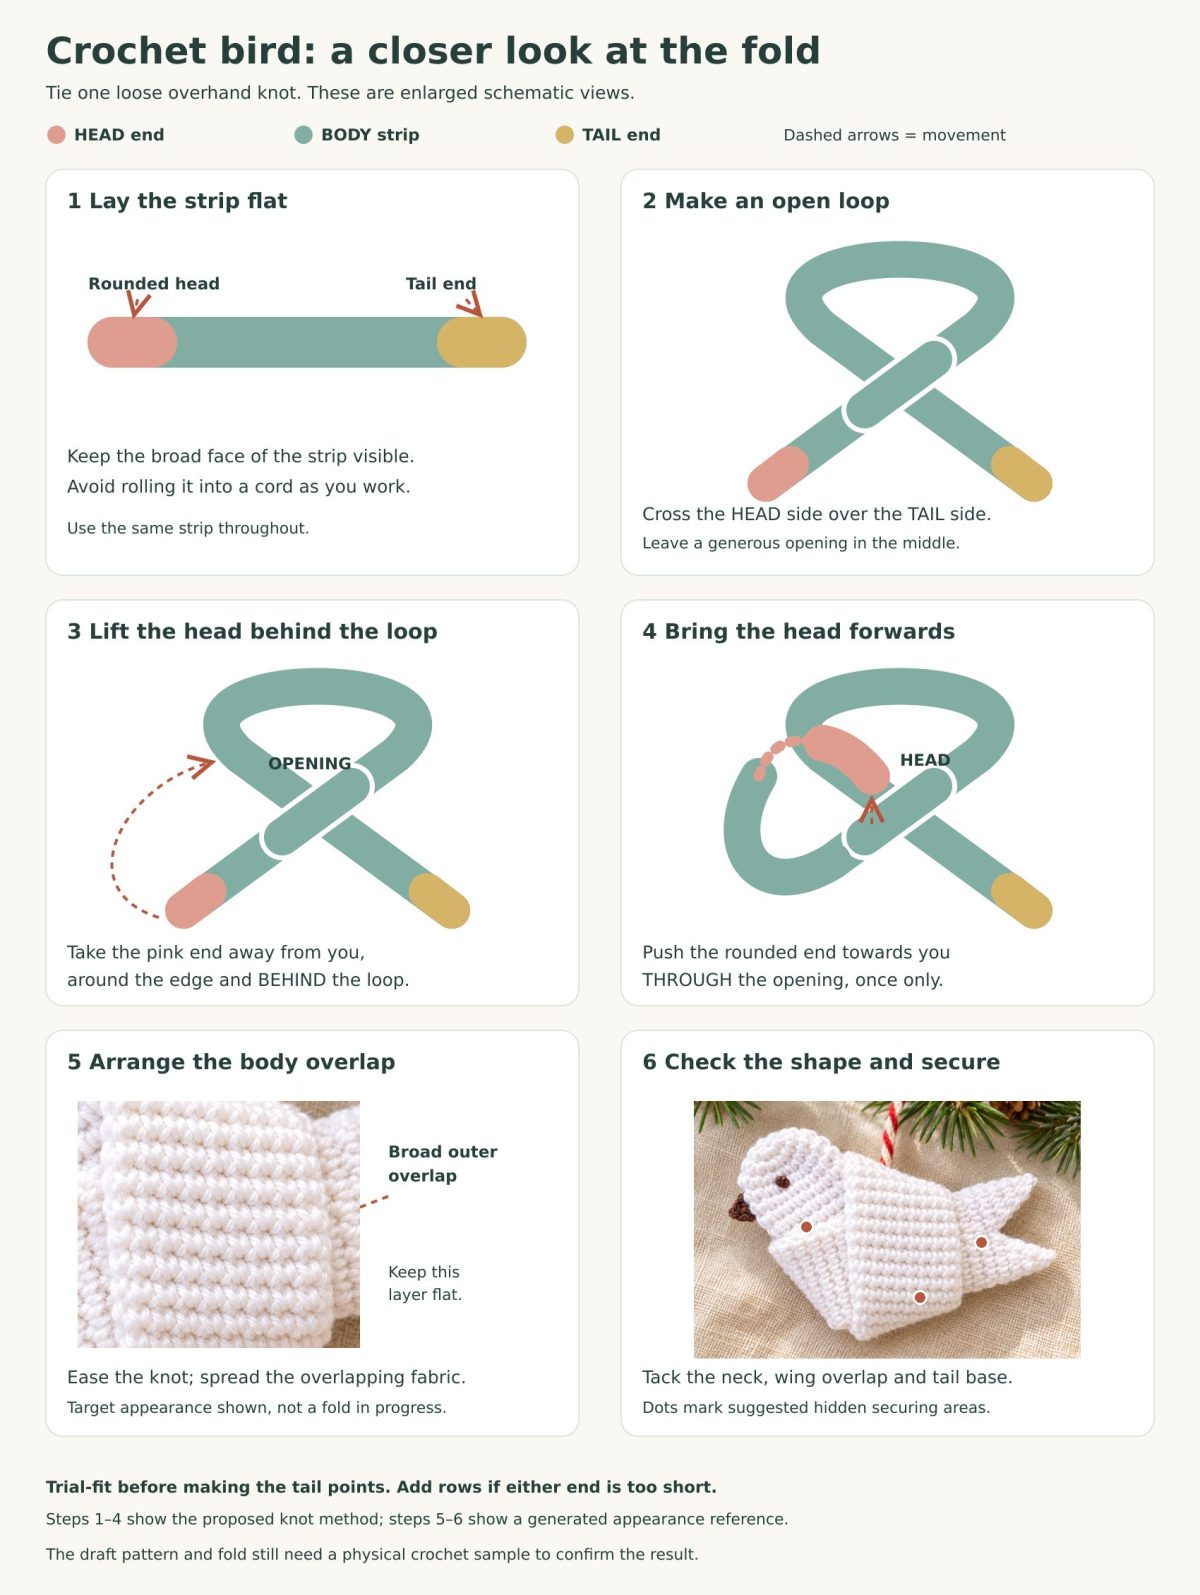
3. Trial-Fit the Body Knot
Before crocheting the tail points, check whether the strip gives you enough length.
- Lay the strip flat.
- Cross the rounded head end over the other end to form a generous loop.
- Take the head end behind the loop.
- Bring the rounded head forwards through the opening once.
- Gently ease the ends apart to form a loose overhand knot.
Keep the broad faces of the crochet visible. Avoid twisting the strip into a cord or pulling the knot tightly.
Adjust the knot so the curved head remains exposed, with a section of strip extending from the opposite side for the tail.
As a starting guide, allow approximately:
- 3–4 cm for the exposed head and neck
- 4–5 cm for the exposed tail section before adding the points
If either end is too short, undo the knot and add more rows. If there is excessive loose length, remove a few rows and try again.
Once you are satisfied with the available length, undo the knot so you can crochet the tail.
4. Crochet the First Tail Point
The 7 stitches divide into 3 stitches for the first point, 1 unused centre stitch, and 3 stitches for the second point.
Tail Row 1: Ch 1, sc in the first 3 stitches only. Leave the remaining 4 stitches unworked. Turn. 3 sts
Tail Row 2: Ch 1, sc2tog, sc in the last stitch. Turn. 2 sts
Tail Row 3: Ch 1, sc2tog. 1 st
Fasten off.
5. Crochet the Second Tail Point
Return to the 4 unworked stitches at the end of the main strip.
Skip the stitch immediately beside the first tail point. Join the yarn in the next stitch.
Tail Row 1: Ch 1, sc in the joining stitch and each of the remaining 2 stitches. Turn. 3 sts
Tail Row 2: Ch 1, sc2tog, sc in the last stitch. Turn. 2 sts
Tail Row 3: Ch 1, sc2tog. 1 st
Fasten off and weave in the ends.
The unused centre stitch separates the two points. Do not cut the crochet to make the fork.
6. Arrange and Secure the Bird
Re-form the same loose overhand knot used for the trial fit.
Place the bird flat with the rounded head at one side and the forked tail at the other. Gently spread the overlapping fabric at the centre.
Arrange the broad visible overlap as the wing. Leave the curved head outside the knot and separate the tail points.
Hold the shape with removable markers before sewing.
Using matching yarn, add small hidden tacking stitches where needed:
- At the neck, to hold the head angle
- Beneath the overlapping wing section
- At the base of the tail
Catch only the layers that need securing. Keep the stitches relaxed so they do not pucker the crochet.
The aim is a flat, layered ornament with visible folds. If the centre remains bulky or the shape does not settle into a bird silhouette, undo it and reassess the strip length and fabric thickness before sewing.
7. Embroider the Eyes
Using brown yarn or embroidery thread, make a small eye on each side of the head.
A few short stitches worked into the same small area will create a simple dot. Position the eyes behind the front edge, leaving room for the beak.
Secure the thread ends within the crochet.
8. Add the Beak
At the front edge of the head, use brown thread to make a small projecting beak.
Bring the needle out at the upper beak position. Make a short loop extending beyond the edge, then anchor it at the lower beak position.
Work a few stitches around the loop to form a small triangular point. Secure the thread and hide the ends.
Keep the beak modest in size so the rounded head remains the main feature.
9. Add an Optional Embroidered Initial
Leave the wing plain for an understated ornament, or add an initial to make a personalised crochet gift tag.
For a capital A:
- Mark three points on the wing with removable thread: the top point and the two lower ends.
- Backstitch from the lower left point to the top.
- Backstitch down to the lower right point.
- Add a short horizontal crossbar between the sloping sides.
Use several small stitches rather than long loose strands. Keep the tension gentle so the letter sits neatly without pulling the wing out of shape.
Catch only the outer wing layer where possible. If access is awkward, temporarily remove the wing’s tacking stitches and lift the flap while you embroider.
10. Make a Tree Ornament or Gift Topper
For a tree ornament: Pass a hanging cord through a firm section at the top of the body. Tie the ends together, then check the balance before securing the loop permanently.
For a gift topper: Thread a short length of cord through the bird’s upper body and tie it onto the parcel ribbon. Keep the attachment removable so the bird can be used again.
For an initial gift tag: Position the embroidered wing facing upwards so the letter is easy to read. Add a small paper message tag behind the bird if you want to include a longer greeting.
Colour Ideas and Finishing Tips
Cream with a cranberry initial looks lovely against brown kraft paper. Sage pairs well with natural ribbon, while dusty blue gives the birds a softer winter look.
Use the same yarn weight and hook size for a coordinated set. Different yarns can produce noticeably different widths, even when the label describes them all as DK.
If you enjoy bird-themed decorations, our shabby chic bird tree ornament offers a paper-and-chipboard version to mix into your display.
Troubleshooting
The centre looks too bulky
Loosen the knot and spread the layers. If that does not help, use thinner yarn or a more flexible crochet fabric.
The head gets pulled into the body
Undo the securing stitches and ease more of the head end out of the knot. Keep the curved cap completely exposed.
The tail points curl
Lightly dampen and shape them flat, following the yarn label’s care instructions. Let them dry fully before arranging the bird again.
The embroidery puckers
Remove the tight stitches and rework them with less tension. The thread should rest on the surface rather than squeeze the crochet.
These little birds are intended as decorative ornaments and gift embellishments, rather than toys.
A personalised bird makes a sweet extra on a parcel, especially for someone who keeps the ribbon, saves the wrapping paper and appreciates the time tucked into a handmade gift. There are quite a few of us in that club.


What do you think of this project? Let us know!