
Get more details about this project
What you need
Playing cards or novelty cards
Clear duct tape
Scissors
Ruler, optional but helpful
Chain, cord, ribbon, or bag strap for the handle
Flat work surface
Bone folder, craft scraper, or old credit card for smoothing bubbles
Instructions
1. Plan Your Card Layout
Before adding any tape, lay your cards out on a flat surface and decide which cards you want visible on the outside of the purse.
You will be making 5 separate sections:
- 2 side panels
- 1 front panel
- 1 back panel
- 1 bottom panel
For the side panels, lay out your cards like this:
0000Make 2 of these card strips. These will become the two narrow sides of the purse.
For the front and back panels, lay your cards out like this:
000000
000000
000000
000000
Make 2 of these larger panels. These will become the front and back of your purse.
For the bottom panel, lay your cards out like this:
000000Make 1 of these. This will form the base of the purse.
You should now have five separate card sections ready to tape.
2. Tape the Back of Each Card Section
Carefully apply clear duct tape across the back of each card layout.
Work slowly and try to keep the cards as straight as possible. Slightly overlap the strips of tape so there are no gaps between them.
Once the back is covered, gently press down over the whole panel to secure the cards in place.
A ruler, bone folder, craft scraper, or even an old plastic card works well for smoothing the tape.
3. Tape the Front of Each Section
Turn each section over and apply clear duct tape to the front side as well.
This step gives the purse extra strength and protects the cards from bending, peeling, or getting dirty.
Again, slightly overlap the tape strips and smooth out the surface as you go.
Try to remove any air bubbles before moving on. Small bubbles are normal, but smoothing as you work will give the finished purse a cleaner look.
4. Trim the Edges
Once each section has been taped on both sides, trim away any excess tape from the edges.
Leave a very small sealed border if possible, as this helps keep the cards protected inside the tape layer.
Make sure all five sections are neat and easy to handle before you start joining them together.
5. Join the Front Panel to the Bottom Panel
Place the front panel and bottom panel next to each other, with the edges touching.
Run a strip of clear duct tape along the seam to join them together.
Flip the pieces over and add another strip of tape along the same seam on the opposite side.
This creates a stronger hinge-style join.
6. Attach the Back Panel
Now attach the back panel to the other long edge of the bottom panel.
Use clear duct tape along the inside and outside seam, just as you did with the front panel.
At this point, your purse should start to look like an open box shape.
7. Add the Side Panels
Take one side panel and line it up with one open side of the purse.
Tape it securely along the bottom edge first, then tape the side edges to the front and back panels.
Repeat with the second side panel on the other side.
Use extra tape on the inside corners if needed. This will help the purse hold its shape and make it much stronger.
8. Reinforce the Seams
Once all the panels are joined, go over the seams again with extra strips of clear duct tape.
Pay special attention to:
- Bottom corners
- Side seams
- Top edges
- Areas where the handle will attach
The more carefully you reinforce the structure, the better the purse will hold up.
Do not rush this part. Duct tape is what gives the purse its strength.
9. Attach the Chain or Strap
Decide where you want your handle or chain to sit.
You can use a small chain, ribbon, cord, braided yarn, old bag strap, or even a duct tape strap.
Attach each end of the chain to the inside side panels using several layers of clear duct tape.
Press firmly and add extra tape over the attachment points so the handle is secure.
For a stronger purse, tape the chain down both inside and outside the side panels.
10. Finish and Shape the Purse
Gently press the purse into shape with your hands.
Check that all seams are secure and that there are no loose tape edges.
If you want a cleaner top edge, run one final strip of clear duct tape around the top opening of the purse.
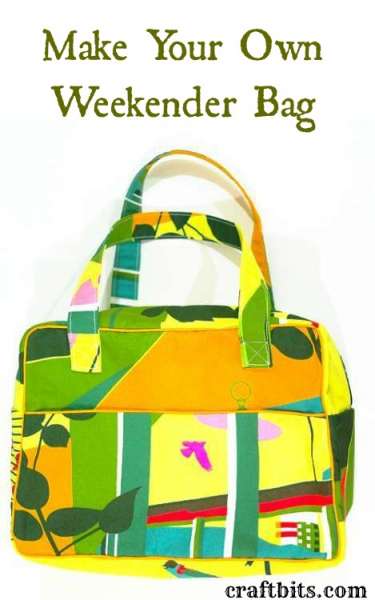
Your clear duct tape card purse is now ready to use as a fun novelty accessory.
Helpful Tips
Use cards you do not mind permanently taping. Once the duct tape is applied, the cards cannot be removed cleanly.
Work on a non-stick surface or a clean table so the duct tape does not pick up dust and lint.
Clear duct tape can wrinkle if it is pulled too tightly, so apply it gently and smooth it down as you go.
For younger crafters, an adult may need to help with cutting the tape and attaching the chain.
If you want the purse to be more durable, add an extra layer of clear tape over the outside once the purse is assembled.
Fun Variations
You could make this project using:
- Playing cards
- Pokémon-style collectible cards
- Baseball cards
- Tarot cards
- Vintage flash cards
- Old board game cards
- Decorative scrapbook cards
- Uno-style game cards
- Printed photos mounted onto cardstock
You can also change the handle by using ribbon, beads, chain, paracord, or braided fabric strips.
For a party craft, let each person choose a different card theme so every purse turns out completely different.


I think you could maybe use something more attractive like pictures of your favorite things or patterns!!! That’s what I did!
not very pretty….
this completely horrible good idea but all people can do that challenge us!!!!!!!
Cool idea but not very attractive.
A friend of mine made these at Girl Scout camp with her girls. I’m pretty sure she got the idea here. She bought Disney cards from the dollar store. There weren’t enough cards so she also did this with puzzles.
THis is awesome!!! but how much tape do I use so the bag is stable enough to carry certain amount of wait??
you could also use flower packets that seeds come in, that would be awesome or picture postcards close to same size say from same state or different ones cool ideas, just brainstormin here good luck!!t marrs
duct tape is cloth backed, so any transparent, strong, waterproof tape would probably work.
Is there such a thing as clear duct tape? Do you mean paking tape?!?
thats cool but if i made it i would never wear it sorry..
It would be cool if you added different patterns, too. My friend did it with different colors in a checkerboard pattern and it looked really cool!
This is brilliant!
hi! Just tried it out! I cut squares out of cardboard, and decorated them.. it looks great!! Thanks for the tip!!
really niceeeee
So simple, yet so creative!
If you don’t have tape, you could always use the sticky backed plastic coating that children use to cover their exercise books with?
This is brilliant. Mt daughter wants to use a Victoria’s Secret bag as a purse and I keep saying if I just had clear duct tape! Where on earth did you find it? [email protected]
This purse is cute!
I love duck tape! U can make anything if you put your mind to it!
whoa!! totally kewl! i’m gonna start high school this year and this can be my purse for personal items and whatnot! this is really funky… i’m sure my friends will ask me where i got it. 🙂 i’ll tell them about this site! by the way this site rocks!!
I used mini cards spaced very close together to make it look even better!
its so cute
I made this with some plastic cards I had from Disneyland and used purple duct tape to trim it with. I added a chain through some grommets for the handle, made a wallet, checkbook cover & cell phone cover to match and gave it all to my friend. A big hit!
Hi,
I found your directions for making duct taoe creations and added the link to my new site http://www.ductapegirls.com
I’m just checking to make sure that’s okay with you.
Sally