
Get more details about this project
What you need
1 round can with lid – Can made from cardboard, hot beverage cans for things like coffee or cocoa work well. You can also use cans from items like raisins or nuts.
4 pieces – Medium or Large Construction Paper (2 blue, 1 red, 1 white)
Star Confetti (any firework like decoration kids can paste onto the paper, like confetti, stickers, buttons, beads, or cutouts)
Star Tinsel (any kind of shiny, colored, wire tinsel)
Star button/bead (any medium sized, single star decoration)
Glue
Scissors
Ruler
Pencil (for tracing and rolling paper)
Instructions
Step 1: Take your clean, round can and remove the lid. You need to cover the can with paper, but the size of paper will depend on the exact size of the can used.
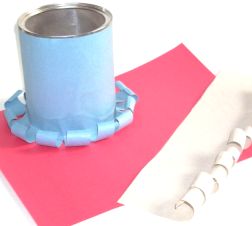
Measure out your can and add about 2-inches extra to the length. This will give you enough paper to cover the can and create those neat “firecracker” rolls.
So, cut blue paper (2 inches longer than can) rectangle out. Have children cut into paper at the bottom, making 2 and 1/2 inch cuts in, spaced about 2 inches apart, all the way along the bottom of the paper. Then take a pencil and roll each paper strip around it, then release. Now the ends of the paper are curled.
Cut out a white piece of paper, the exact same size as the blue, only two inches shorter. Repeat the cutting and curling process.
Take the red piece of paper and make it two inches short than the white paper, or four inches shorter than the blue. Repeat cutting and curling.
Step 2: Take the curled, blue piece of paper and wrap it around the can tightly, letting the curls fall to the table. Make sure the paper starts right below the opening rim on the can, and glue on.
Take the curled, white paper and glue it around the can. Start right below the opening rim on the can. Let the curls fall down onto the blue paper. Repeat with red paper, starting it right below the rim and letting the curls fall onto the white paper.
Step 3: Take star confetti, or other decorative items, and glue them onto the can. Remind children to get both on top and under the curls of paper around the can.
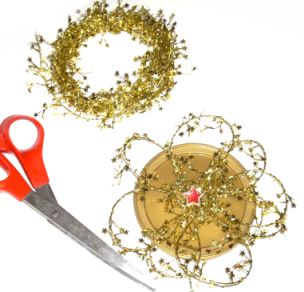
Step 4: Take some decorative star tinsel, garland, or other shiny and linked decorations to twist around can body. Glue ends to can once wrapped, making sure the lid will still fit.
Step 5: Take a pen, pencil or pair of scissors and poke a large hole in the middle of the can lid. Have children cut 5-8 strands of tinsel, each about 5 inches long. Twist each strand of tinsel into a loop, twisting the ends together.
Step 6: Push ends of tinsel loop into hole in lid and glue into place. Create a firework flower pattern on top of the can with the loops. Glue a single star button/bead in the middle of the lid.
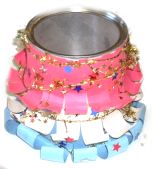
Step 7: Let can dry, then use to store trinkets or treats! Makes a cute “exploding firework” can for any child to enjoy.
This craft lets kids use the firecracker/fireworks theme without being tangled into problems of safety or policy. At my summer school (and most schools in my area) we are not allowed to make rockets, or real looking fireworks, because of safety issues. Therefore, instead of a rocket, we made colorful firecrackers that were already
“exploding.”
I used some “Star Spangle Banner” saltwater taffy to fill the cans with, making a cute gift for kids to give their parents. Some of my students decided they liked storing crayons and markers in the can instead. One family made a bunch more “exploding firecracker cans” and a huge mountain of homemade fudge. They filled the tins with fudge and gave one to each teacher with an adorable card that read “For my teacher, a firecracker exploding with sugar!”
I have to admit that I just loved that gift, and that fudge!


What do you think of this project? Let us know!