
What you need
Double Worsted Weight (8 ply) Wool
size 7 (4.5 mm) needles
Fits a 14 inch bear
Instructions
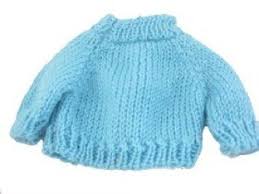
This free knitted pattern for a teddy bear jumper is the perfect project for knitters who love to create cute and cozy clothing for their stuffed animals. The jumper is designed to fit the classic teddy bear, with a snug and comfortable fit that will keep your bear warm and cozy.
This pattern is perfect for knitters of all skill levels, including beginners. The instructions tell you how to knit the jumper, including the body, sleeves and the collar. This pattern also includes a list of materials you’ll need (which hopefully you have seen above).
The finished jumper is perfect for both children and adult bears. It’s perfect for playtime, for use as a decorative piece or as a gift. You can customize the jumper with different colors and patterns to suit your preferences.
Grab your yarn and needles and get ready to create your own cute and cozy teddy bear jumper. With this pattern, you’ll be able to give your teddy bear a stylish and warm outfit that will make him stand out.
By the way, we think that this pattern is a great way to learn how to knit, or to make a fun and unique gift for a loved one.
Back
Cast on 28sts and Rib (k1,p1) for 6 rows.st-st 12 rows
Decrease for sleeves
K2 tog at the beginning and end of the next and every alternate row until 14 sts remain. Leave sts on a spare needle.
Sleeves (make 2)
Cast on 22 sts and rib (k1,p1) for 6 rwos
st-st 10 rows.
Decrease for sleeves
K2 tog at the beginning and end of every alternate row until 8 sts remain. Leave sts on spare needle.
Front
Cast on 28 sts and rib (k1,p1) for 6 rows
st0st 12 rows
Decrease for sleeves
K2 tog at the begining and the end of the next and every alternate row until 14 sts remain. Pick up each piece of sleeve then back, then sleeve. Work 6 rows in Rib (k1,p1)
All done!


Details are not clear
How do you sew it together
I wanted a jumper knitting pattern for Teddy. I came across this. And was very happy with the instructions. I knitted blue. Teddy will have many more colours in the near future. Thank you
The pattern does not have very detailed instructions. These instructions are not FOR a beginner.
Can someone tell me how to put this jumper together do you sew or knit it together .
When it says leave stitches on spare needle, do you cut the yarn, or do you just start using the same yarn to string to cast onto a new needle?
Looks great and very easy! Made mine stripey and gave him a matching hat
Turned out great
I would like instructions for a smaller bear!
I just scaled down the number of stitches and rows for my smaller bear.
What does st 0 st 12 rows mean?
Stocking stitch 12 rows?
Id also like to know what this means
Grest easy pattern easy directions turned out really well
Are the sleves done seperate or do you knit across the 14 stitches to do the other sleve
Where is says Sleves(make2) do you cast on 22 on each side of your 14 stitches or do each Sleve individually
on the sleeve row it says cast on 22 sts and rib (k1-p1) for 6 rows st-st 10 rows. what does st-st mean?
st-st Stocking stitch
Well that makes sense. What about the front st0st 12 rows?
I think that’s a typo and should be st-st, ie stocking stitch
What about the pattern for the back???
This sweater could probably be easier knitted on double point needles from the neck down, but I’m not saavy enough to know how, just that it is done that way on many adult sweaters that my knitting friends have made. On the directions given, they say after working the 6 rows in Rib (k1,p1) you’re all done, but what about connecting the raglan sleeve parts – they need to be done too!
I have just completed this sweater, it was very quick and easy to do. I added a cable on the front, just to change it a little. :o)
Yes, thank you very much! It took me a while to figure out what to seam together, but it worked out very well. Thanks again!
Hi, I don’t know how long ago that question (about the last paragraph in the pattern) was posted, so I might be very late in answering, but anyway: to the best of my knowledge it means that you should slip all the stitches that you have saved on spare needles, back onto your “working” needle, in the following order – sleeve, back, sleeve, front – and then work 6 rows in rib, which will join all the pieces together at the top, whilst simultaneously forming the neck band. You will then need to seam it all together, joining the sleeve and side seams, plus the neckband seam, unless of course you work the neckband in the round (on a circular needle or dpns) in which case you will get a circular neck band with no need to seam, but you would still have to seam up the rest of the sweater. I don’t know if I’ve explained that clearly or not… hope it was some help! -x-
Very good explanation, however always knit straight and use a small button on last sleeve. Seam so it goes over teddy’s head I found this pattern simple and easy to complete
Thank you I was wondering how to attach the sleeves etc back on
I’m perplexed by the last paragraph. Could someone explain?
I really enjoyed this project. I made five! I did some of them with stripes that look great. They were a perfect fit for my son’s favourite bears . I am not an experienced knitter so I found the comments posted by others useful for more a detailed explanation.