
Get more details about this project
What you need
- DK or light aran weight yarn in white or cream
- Small amounts of coordinating yarn for edging if desired
- 4.5 mm crochet hook for the main cardigan
- 3.5 mm crochet hook for cuffs and edging
- Tapestry needle
- Stitch markers
- Scissors
Optional buttons
Instructions
If you’ve ever looked at a hexagon cardigan and thought, “There is no way that odd shape turns into a wearable cardigan,” you are very much not alone. It starts off looking a little wonky, sometimes a bit wavy, and then somehow folds into the sweetest little cardigan shape. Crochet can be a bit dramatic like that.
This version keeps things much simpler with a plain white hexagon cardigan base and no hood, no ears, and no extra character shaping on the body. The fun comes from adding the Bluey-inspired granny square pockets to the finished cardigan, which gives it that playful look without making the cardigan construction itself overly complicated.
It’s a lovely option if you want the character feel but still want a wearable everyday cardigan that goes with everything. And let’s be honest, a plain white handmade cardigan is the sort of thing that looks beautifully classic right up until a child wears it near spaghetti.
What Size Is This Cardigan?
This pattern is written as an adjustable toddler-to-young-kids cardigan rather than a tightly graded commercial pattern. The easiest way to size it is to make the two hexagons, fold them into shape, and check the width and sleeve opening before seaming.
The sample is best thought of as roughly toddler or preschool size, but you can make it slightly larger or smaller by adjusting the number of rounds worked on each hexagon.
Where to Find the Pocket Squares
The Bluey-inspired granny square pockets for this cardigan can be found here:
Bluey and Rusty Inspired Granny Square Free Crochet Pattern
Those squares are added after the cardigan is finished, so you can make the base cardigan first and then decide whether to add one or both pockets.
Materials
- DK or light aran weight yarn in white or cream
- Small amounts of coordinating yarn for edging if desired
- 4.5 mm crochet hook for the main cardigan
- 3.5 mm crochet hook for cuffs and edging
- Tapestry needle
- Stitch markers
- Scissors
- Optional buttons
Crochet Terms
US terms
Abbreviations
- ch = chain
- sl st = slip stitch
- sc = single crochet
- dc = double crochet
- sdc = spike double crochet
- blo = back loop only
- sp = space
Pattern Notes
- Ch 3 counts as a dc unless stated otherwise.
- Each hexagon has 6 corners.
- The center stitch of each side group is worked as a spike dc into the corresponding stitch two rounds below.
- The hexagons may look slightly ruffled or wavy as they grow. That is normal for this style.
- Always check sizing after the hexagon is folded into an L-shape, not while it is lying flat.
- This version is written as a no-hood cardigan.
Construction Overview
You will:
- Crochet 2 white hexagons
- Fold each hexagon into an L-shape
- Seam the shoulder and sleeve edge on each one
- Join the two halves at center back
- Add body length
- Add sleeves
- Add cuffs
- Add neckline edging
- Sew on the Bluey-inspired granny square pockets
Hexagon Panels
Make 2
Round 1
Make a magic ring.
Ch 3, 2 dc, ch 1, 3 dc, ch 1 five more times.
Join with a sl st to the top of the beginning ch 3.
Round 2
Sl st into the first corner space.
In that corner work:
3 dc, ch 1, 3 dc
Repeat 3 dc, ch 1, 3 dc in each corner around.
Join with sl st and move into the next corner.
Round 3
In the first corner work:
3 dc, ch 1, 3 dc
In the side gap between corners work:
dc, sdc, dc
Repeat around, placing:
- 3 dc, ch 1, 3 dc in each corner
- dc, sdc, dc in each side gap
Join with sl st.
Round 4 and Beyond
Repeat Round 3.
Each new round adds another side group between the corners.
Continue until the folded hexagon is the right size for the child.
Sizing the Hexagons Properly
This is the part that makes the biggest difference to how the cardigan fits. Don’t just measure the flat hexagon and hope for the best.
To size your hexagon:
- fold the panel into an L-shape
- check the body width across the folded section
- check the sleeve opening
- hold it against the child or compare it with a cardigan that already fits well
If the hexagon gets too large, the armhole can become too roomy, so it is often better to stop once the shoulder and underarm look right and then add body length afterward.
How to Fold the Hexagons
Lay one hexagon flat.
Fold it so two sides meet and the shape becomes an L.
This folded shape creates the sleeve, shoulder, and body sections.
Repeat with the second hexagon.
This is the step that makes the whole cardigan suddenly make sense.
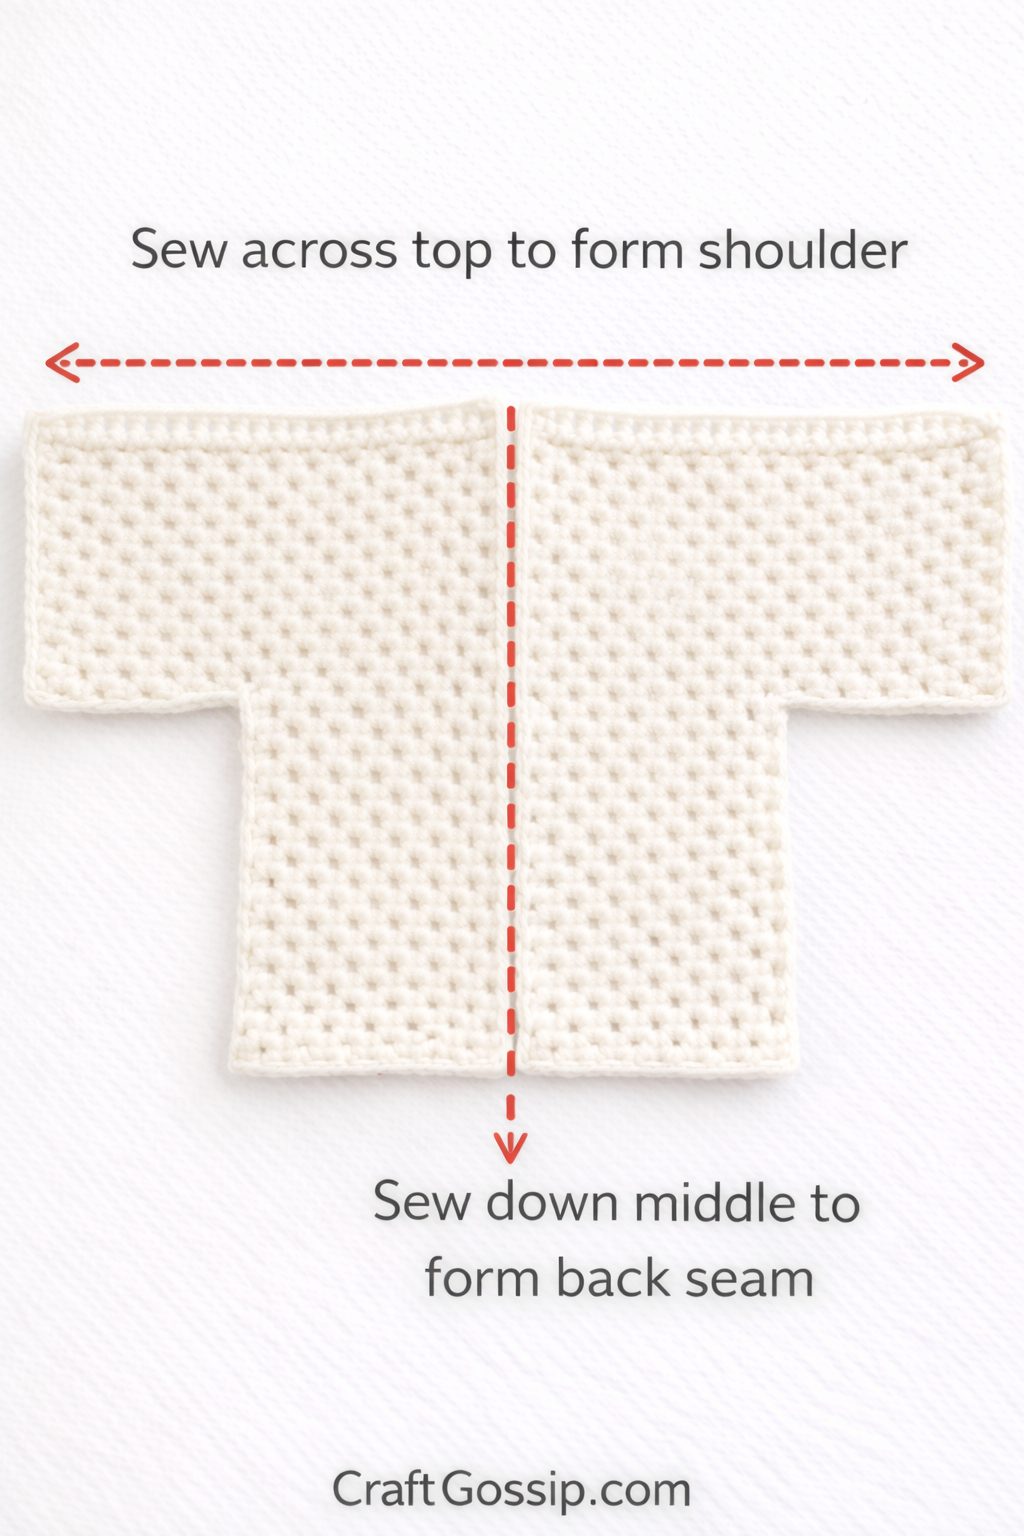
Shoulder and Sleeve Seam
With each hexagon folded into an L-shape, seam the upper sleeve and shoulder edge on each piece.
Use slip stitch, whip stitch, or mattress stitch.
Only seam the edge that forms the upper sleeve and shoulder. Leave the front opening and lower body edges unjoined.
Join the Cardigan Halves
Place the two folded pieces side by side with the fronts facing outward.
Line up the back edges and seam them together to form the center back.
Leave enough opening at the neckline for a comfortable fit.
Add Body Length
Attach yarn at one lower front edge.
Work back and forth in rows across the lower body edge using the same side pattern:
dc, sdc, dc in each side gap across
Continue until the cardigan reaches the desired body length.
This helps keep the cardigan looking balanced without making the armholes too deep.
Add Sleeves
Join yarn at the sleeve opening.
Work in rounds using:
dc, sdc, dc in each gap around
If the underarm area needs smoothing, add one extra group there.
Continue until the sleeve is the desired length.
Ribbed Cuffs
Switch to the smaller hook.
Ch 7.
Row 1
Sc in 2nd ch from hook and across.
Sl st into the next 2 sts on the sleeve edge.
Row 2
Ch 1, turn, sc in blo across.
Row 3
Ch 1, turn, sc in blo across, sl st into next 2 sleeve-edge sts.
Repeat Rows 2 and 3 until the cuff fits around the wrist, then seam the cuff closed.
No-Hood Neckline Finish
Since this version has no hood, you will finish the neckline with a simple edging.
With right side facing, join yarn at one lower front edge.
Work an even round of sc up the front band, around the neckline, and back down the other front band.
If you want a slightly more polished finish, work 2 to 3 rows of sc or hdc around the fronts and neckline instead of just one round.
This gives the cardigan a neat, wearable edge and keeps the focus on the pockets.
Button Band Option
If you want to add buttons, work 2 to 3 extra rows along the front edges.
On one side, add evenly spaced buttonholes by chaining 1 or 2 and skipping the same number of stitches below.
Sew the buttons to the opposite front edge.
Add the Bluey-Inspired Granny Square Pockets
Once the cardigan is fully assembled, block it lightly or lay it flat to smooth the shape before attaching the pockets.
Make the pocket squares from the linked pocket pattern and decide on placement before sewing.
A good general placement is:
- one pocket on each lower front panel
- centered nicely on each front side
- high enough to be practical, but low enough to still look balanced with the cardigan length
Pin the squares in place first and step back to check them before sewing. Even moving them half an inch can make a difference to how balanced the finished cardigan looks.
Sew the sides and bottom of each pocket square onto the cardigan, leaving the top edge open.
Pocket Placement Tips
Because this cardigan is plain white, the pockets really become the star of the design, so placement matters.
Try to:
- keep both pockets level with each other
- leave enough space from the front opening so they do not crowd the center
- avoid placing them too low near the hem
If your cardigan is on the smaller side, slightly smaller pockets or slightly higher placement may look better.
Final Edging
If needed, work one final even round of sc around the hem and fronts to tidy everything up after the pockets are attached.
A crisp white edging keeps the cardigan looking clean and simple and lets the colorful pockets stand out.
A Few Helpful Notes Before You Start
This version is a good choice if you love the character pockets but don’t want the whole cardigan to feel overly themed.
Take the time to:
- fold the hexagons before judging the fit
- check both fronts are even before seaming
- finish the cardigan fully before attaching the pockets
- pin the pockets in place before sewing them down permanently
That last part is worth mentioning twice, because sewing on crochet pockets slightly crooked has a special talent for looking fine until the very moment you step back and actually look at it properly.
A plain white cardigan gives you a really versatile base. It feels classic, handmade, and easy to wear, while the Bluey-inspired granny square pockets add the fun. It is a nice balance between playful and practical, which is probably why this version has so much appeal.
It also means you can make the cardigan base once and change up the pocket style later if you want to make another version. And that, honestly, is the sort of crochet shortcut I can get behind.


What do you think of this project? Let us know!