
Get more details about this project
What you need
2 index cards (or poster board and one index card, if you would like a sturdier bird body)
Blue craft paint, (or make the bird all white)
Scissors
pencil or marker
Paint brush
Needle and thread for hanging
White glue or clear tape
Instructions
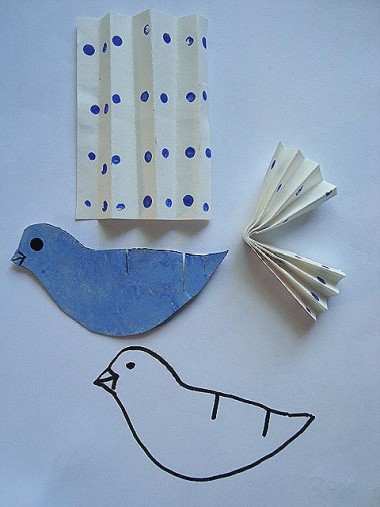
1. Trace out the bird shape, or just wing it (pardon the pun), and draw a bird shape of your own style.
2. Cut an index card in half.
3. Fold both pieces, accordion style.
4. Fold one of the accordion folded pieces in half for the tail.
5. Cut slits as indicated in the bird.
6. Paint the bird blue, and with the handle of the brush, dot on some polka dots on the wings and tail.
7. Slide the wings and the tail into the slits, and either tape in place, or add a dot of glue to hold the pieces on.
8. Pierce the needle through the bird, between the wings and the tail.
Voila! Why not make a bunch of them, and turn them into a cute little mobile to brighten up your day!
This project was submitted by Emilda Harrington from Hectanooga.etsy.com


Cool 🙂 Love this Website <3
Very cute and simple to do!
Tinta TiP: Try googly eyes or cut little (little!) shapes around the accordion tail and wings to make em look more delicate or detailed. 😉
very cute!!!
im ten too, and i did it, i love it!
Carly
it was really simple to make and im only 10yrs old
Bianca
simple and good. do in lots of different colours, and decorate your classroom (If you’re a teacher like me whose room definately needs a brighten up!)
thanks