
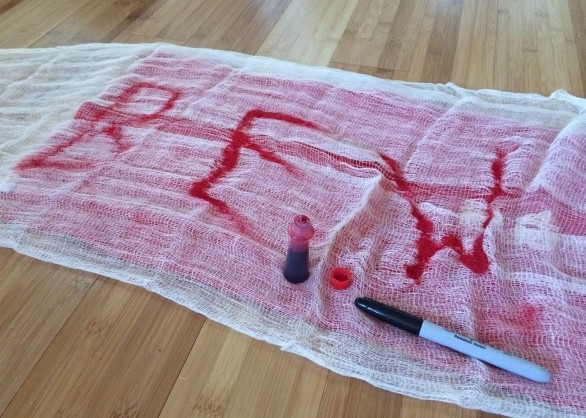
Once stained and completely dried, the fabric is cut into long pieces, distressed with torn edges and stretched holes, then draped around suitable light fixtures. An optional length of cheesecloth can be decorated with red food-colouring letters to create a creepy “BEWARE” banner.
Always use cool-running LED bulbs and keep the cheesecloth securely separated from the bulb, socket, wiring and other heat-producing parts.
Get more details about this project
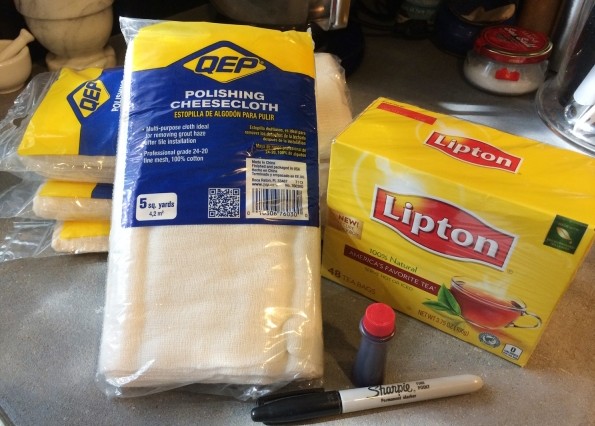
What you need
Industrial cheesecloth
Approximately 10 black tea bags
Large stockpot
Water
Red food colouring
Scissors
Protective gloves, optional
Old towel or waterproof work covering
Hair dryer, optional
Removable tape or glue dots
Cool-running LED bulbs
Dark red artificial flowers, optional
Green apples, pumpkins or other Halloween decorations, optional
Instructions
Lighting can completely change the mood of a Halloween display, but decorative fixtures can be expensive. This project gives ordinary lampshades, sconces and display pieces a spooky makeover using little more than inexpensive cheesecloth and black tea.
Tea staining turns bright white fabric into aged, decaying-looking material. Torn ends, stretched holes and optional red food colouring make it suitable for anything from a sophisticated Halloween dinner table to a more theatrical haunted-house display.
The original project used the cheesecloth over a drum pendant shade and sconces, with dark red roses, green “poison” apples and a ghostly dress form completing the room.
Instructions
Step 1: Check the fixtures
Examine every light fixture before beginning.
Only decorate fixtures that allow the cheesecloth to remain well away from the bulb, socket, wiring and ventilation openings. Do not place fabric inside a shade or directly over an exposed bulb.
Replace incandescent and halogen bulbs with compatible, cool-running LED bulbs before adding decorations. Follow the fixture and bulb manufacturers’ wattage and clearance instructions.
If you cannot secure the cheesecloth away from every heat-producing component, decorate an unlit fixture or use battery-operated LED lighting instead.
Step 2: Brew the tea stain
Fill a large stockpot with enough water to submerge the cheesecloth.
Bring the water to a boil and remove the pot from the heat. Add approximately 10 black tea bags and allow them to steep for about 10 minutes.
Remove the tea bags before adding the fabric.
Step 3: Soak the cheesecloth
Submerge the cheesecloth in the tea.
Swish and gently squeeze the fabric beneath the surface to release trapped air and distribute the stain. Take care around the hot liquid.
Leave the cheesecloth in the tea for at least three hours. For a darker, older appearance, leave it overnight.
The same tea bath can generally be used for several batches, although each later batch may be slightly lighter.
Step 4: Remove the excess liquid
Take the cheesecloth out of the stockpot after it reaches the desired colour.
Wring it gently to remove as much tea as possible. Wear gloves if you want to avoid staining your hands.
Be aware that tea may stain sinks, benches, towels and other porous surfaces.
Step 5: Dry the cheesecloth completely
Hang the cheesecloth outdoors on a washing line or over a shower-curtain rod.
Allow it to dry for at least five hours or until no damp areas remain. Drying time will vary with the weather and the amount of fabric.
The cheesecloth must be completely dry before it is brought near a light fixture. Damp fabric may stain the shade, wall or surrounding furniture.
Step 6: Measure the fixtures
Measure the length and circumference of each shade or fixture section you intend to decorate.
For the hanging effect shown on the drum shade, begin with cheesecloth approximately twice the visible length of the shade.
Cut enough width to drape around the exterior without covering the upper ventilation opening. Use several separate pieces if that makes the fabric easier to position safely.
Step 7: Create the distressed ends
Cut or tear vertical lines into the lower end of each piece.
Vary the length and spacing of the cuts. Pull the strips gently to create uneven, dangling ends.
Fray selected edges with your fingers so the cheesecloth looks old and decayed rather than neatly cut.
Step 8: Make cobweb-like holes
Poke a fingertip carefully through the cheesecloth at several random points.
Pull gently along the fabric’s horizontal and vertical threads to stretch each opening. Create a mixture of small holes and longer irregular gaps.
Do not weaken the entire piece or it may tear while being positioned.
Step 9: Test the draping
Turn off the light and allow the bulb and fixture to cool completely.
Drape the prepared cheesecloth around the outside of the shade or decorative fixture. Check the length, coverage and appearance before attaching anything.
Make certain that no fabric enters the shade, touches the bulb or socket, covers ventilation openings or hangs near another heat source.
Step 10: Secure the cheesecloth
Attach the cheesecloth to the cool outer edge of the lampshade with small pieces of removable tape or glue dots.
Use enough attachment points to prevent the lightweight fabric from shifting or being drawn toward the bulb by air movement.
Do not attach anything to electrical cords, sockets, wiring or hot metal components.
Step 11: Test the finished light
Turn on the LED light and supervise it continuously during the first test.
Check the fixture and fabric after a few minutes. The cheesecloth should remain cool, secure and well separated from all electrical and heat-producing components.
Turn the light off immediately if the fabric moves, becomes warm, develops an odour or discolours.
Optional BEWARE Bunting
Step 12: Measure the banner
Measure the space where the bunting will hang.
Add approximately 18 inches or 45 cm at each end if you want the fabric to drape loosely.
Cut the cheesecloth to length and open it to double thickness if a stronger banner is needed.
Step 13: Protect the work surface
Lay an old towel over a waterproof work surface.
Place a piece of cardboard beneath the cheesecloth. The cardboard helps prevent the food colouring from soaking through onto the surface below.
Wear protective gloves and old clothing because concentrated food colouring can stain.
Step 14: Add the lettering
Use red food colouring to outline the word “BEWARE” or another Halloween message.
Smear the colouring gently with a fingertip or small brush. Set the letters slightly askew to create a rough handmade appearance.
For additional effects, flick or dab small amounts of colouring around the letters. Avoid oversaturating the fabric.
Step 15: Dry and distort the letters
Dry the coloured fabric completely.
A hair dryer can speed up the process, but use a low or cool setting and keep it moving. Alternatively, leave the banner flat until it is fully dry.
Pull the cheesecloth gently around the letters to give them a stretched, wispy appearance.
Step 16: Hang the bunting
Centre the message within the display and drape the ends loosely.
Secure the banner with removable tape or glue dots. Keep it away from bulbs, candles, fireplaces, heaters and cooking surfaces.
More Cheesecloth Decorating Ideas
Dip the dried ends into diluted red food colouring to create a stained effect.
Press food-colouring handprints onto large cheesecloth panels.
Wrap tea-stained cheesecloth around a door, column or battery-operated LED lantern.
Cover the outside of a Mason jar containing a flameless LED candle and add large googly eyes to create a mummy.
Reuse the decorations each year after checking that the fabric and attachment points remain in good condition.
Important Lighting Safety
Use cool-running LED bulbs and follow all clearances and wattage limits supplied with the fixture.
Never allow cheesecloth to touch a bulb, socket, electrical connection or hot fixture surface. Do not cover the top ventilation opening of a shade.
Do not use this decoration with candles, gas flames, halogen bulbs or other high-temperature lighting.
Keep the fabric away from children, pets, fans, open windows and anything that could move it toward the bulb.
Never leave decorated lighting switched on unattended. Remove all cheesecloth before replacing a bulb or servicing the fixture.
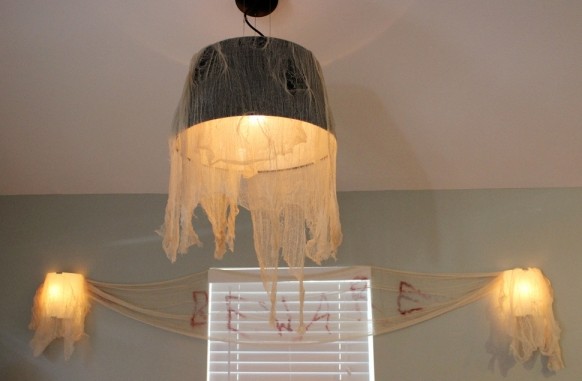
5. Tear or cut vertical lines in each end of the fabric, and pull to create dangling “decayed” ends of varying lengths. Poke a fingertip into the fabric at various random spots, pulling along both warp & weft to create weathered, spider web-like holes.
A creative crafter and DIYer, Melissa Massello writes about how-to’s for The Home Depot and her site Shoestringmag.com. With Halloween just around the corner, Melissa enjoys sharing creative budget-friendly ways to decorate your home.




What do you think of this project? Let us know!