
Get more details about this project
What you need
One working wooden clamp trouser hanger, approximately 30–35 cm wide, with two wooden jaws that open and close together
Four burgundy plaid fabric strips, approximately 4–5 cm wide and 55–65 cm long
Four cream cotton or calico strips, approximately 4–5 cm wide and 55–65 cm long
Four dark green gingham or checked fabric strips, approximately 4–5 cm wide and 50–60 cm long
One burgundy plaid fabric strip, approximately 6 cm wide and 100–120 cm long, for the bow
Three lightweight antique-style craft bells, approximately 3–5 cm tall, each with an attachment loop
Three lengths of strong jute twine, approximately 40 cm, 50 cm and 60 cm long
Four to six faux cedar or pine sprigs, approximately 20–30 cm long
Two or three faux red berry picks
Paper-covered floral wire, approximately 0.5–0.7 mm thick
Fabric scissors
Ruler or measuring tape
Wire cutters and small pliers
Optional hot glue gun and glue sticks
Optional felt scraps or furniture pads to protect the door
A suitable hook for displaying the finished decoration
Fabric tip: You need pieces long enough to make continuous hanging strips. Old cotton shirts, lightweight flannel and leftover curtain fabric can work beautifully. Avoid very thick fabric, which may stop the hanger from closing securely.
Instructions
There is something about checked fabric, soft cream cotton and a few old-fashioned bells that makes Christmas decorating feel wonderfully cosy. Add a wooden hanger and you have the beginnings of a decoration that looks right at home on a cottage door, beside a fireplace or hanging from a hallway peg.
This rustic Christmas door hanger is also an excellent excuse to open the fabric scrap basket. You know the one. It contains pieces we have been keeping because they are “too useful to throw away”, despite having no particular plan for them.
Well, here is their moment.
The design uses long fabric strips held inside a wooden clamp trouser hanger. Faux greenery spreads across the top, a plaid bow covers the centre, and three bells hang at different heights.
If you enjoy this relaxed, scrappy style, our fabric scrap rag wreath tutorial is another lovely way to turn leftover material into a Christmas decoration.
Instructions
1. Check Your Wooden Hanger
Choose a wooden trouser hanger with two long wooden jaws that clamp together. This is different from a standard coat hanger with a fixed lower rail.
Open and close it a few times. The mechanism should hold firmly, and the metal hook should be securely attached.
Wipe the wood clean and let it dry. Check for splinters or rough edges that could snag your fabric.
The aged timber suits this project beautifully, so there is no need to paint it unless you want a different finish.
2. Cut the Fabric Strips
Cut twelve fabric strips using the measurements in the materials list.
For a similar look to the pictured decoration, use:
- Four burgundy plaid strips
- Four cream strips
- Four green checked strips
Vary the lengths slightly. Keep some around 50–55 cm long and others closer to 65 cm.
These are single hanging strips, not strips folded in half. Approximately 3 cm of each strip will sit inside the clamp, leaving the rest hanging below the wooden bar.
For a shorter cupboard decoration, reduce the strip lengths to approximately 35–45 cm.
3. Fray the Edges
Pull a few threads from the long edges of each strip to create a soft fringe.
If your woven cotton tears neatly along the grain, make a small snip and tear a test strip first. Some fabrics tear beautifully; others wander off in their own direction.
Cut checked fabric instead if tearing distorts the pattern.
Trim away long loose threads, but leave a little unevenness. That relaxed finish is part of the charm.
Tip: Shake out the strips over a bin before assembling. Fraying fabric has a remarkable talent for spreading fluff across the entire room.
4. Arrange the Fabric Colours
Lay the hanger flat with the hook pointing upward.
Arrange the strips below it, alternating plaid, cream and green. Spread them across approximately 28–30 cm, leaving a little exposed wood at each end.
Overlap the side edges slightly so you do not have large gaps between the strips.
Keep the longest strips near the centre and use slightly shorter ones toward the outside. You are aiming for a loose cascade rather than a perfectly straight curtain.
Take a quick photograph once you like the arrangement. It makes putting everything back much easier if the strips shift.
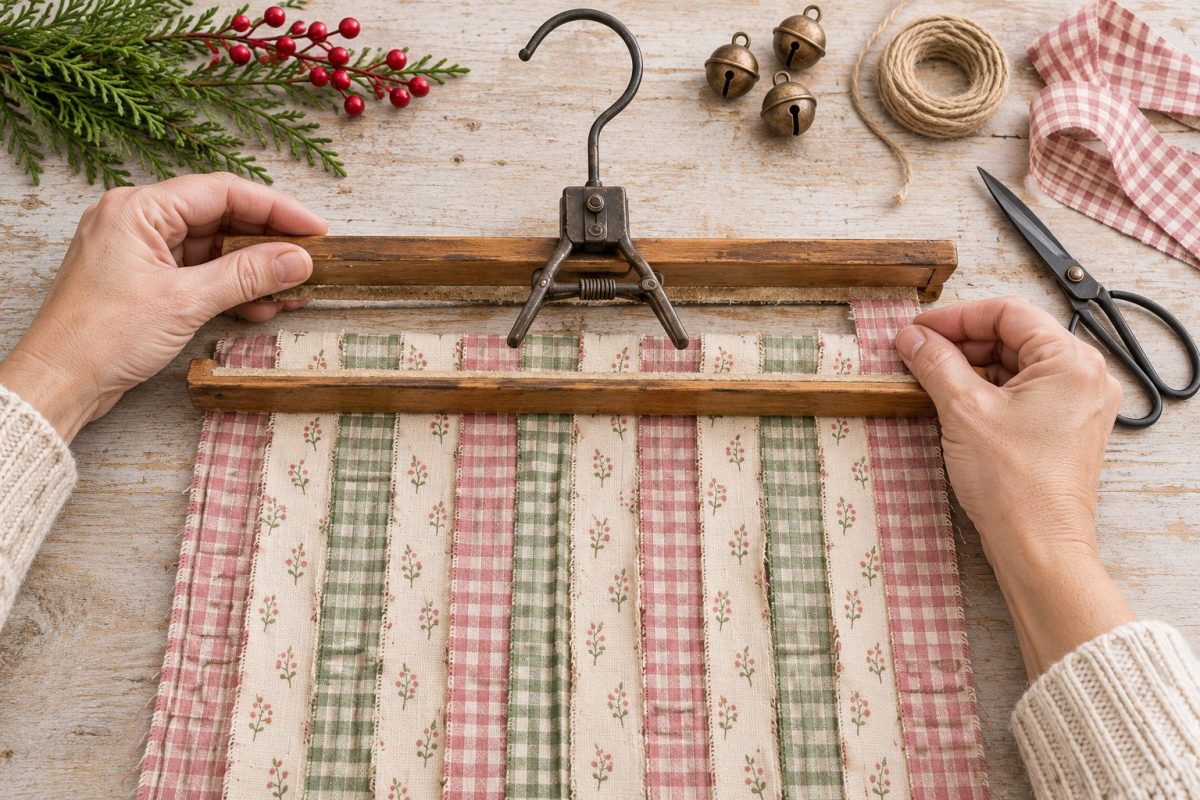
5. Clamp the Fabric Into Place
Open the wooden jaws.
Place approximately 3 cm of the top of each strip between them, keeping the remaining fabric hanging down from the lower edge.
Close the hanger carefully, following its normal locking mechanism.
Lift it over your work surface and gently tug each strip. Every piece should stay in place.
If the clamp will not close properly, reduce bulky overlaps or use thinner fabric. If a strip slips, reposition it so the jaws grip it directly.
Do not continue until the fabric is secure.
6. Attach the Three Hanging Bells
Use lightweight decorative bells with sound attachment loops.
Thread the shortest piece of twine through the first bell’s loop. Tie it securely, then attach the other end around the hanger’s central metal neck, below the hook.
Repeat with the remaining bells and twine.
Adjust the knots so the tops of the bells sit approximately 25 cm, 35 cm and 45 cm below the wooden bar. Exact spacing will depend on the bell size and how much twine the knots use.
Let the cords fall down the front of the fabric. Separate them slightly so the bells remain visible.
Secure each attachment with a double knot and trim excess twine.
The bells should hang from the hanger itself, rather than from the fabric or bow.
7. Make Two Greenery Bundles
Divide the faux greenery into two small bundles.
Arrange one bundle pointing outward to the left and the other pointing outward to the right. Add a berry pick to each side.
Overlap the cut stem ends in the centre, leaving the leafy tips spreading outward and slightly downward.
For a hanger around 30–35 cm wide, an overall greenery width of approximately 40–50 cm gives a generous top without overwhelming the fabric.
Bind each bundle’s stems tightly with floral wire. Cut away excess stem length if necessary.
8. Secure the Greenery to the Hanger
Position the bundles across the front of the wooden bar, with their bound ends meeting near the centre.
Use separate lengths of floral wire to fasten each bundle around the wooden bar. Secure each side in two places so it cannot pivot downward.
Twist the wire ends together at the back, trim them and fold the ends inward with pliers.
Keep the hook clear and check that the hanger remains properly locked.
A little hot glue can help position a loose decorative sprig, but the wire should carry the greenery’s weight.
9. Make the Plaid Bow
Take the long plaid strip and fray its edges lightly.
Form two loops, leaving two tails, and tie a bow. Adjust it to approximately 15–20 cm wide.
Pinch and loosen the loops until they look soft and full. Trim the tails to different lengths if you prefer a more relaxed finish.
Fasten the bow over the central greenery stems using floral wire threaded behind its knot and secured around the bar.
Arrange the tails so they fall among the hanging strips without covering all three bells.
10. Hang and Adjust
Hang the decoration from a sturdy hook and step back.
Separate any fabric strips that have twisted together. Move the bell cords so each bell shows against the fabric.
Trim the lower edge only where needed. A few longer tails look lovely, especially through the centre.
Check that:
- The clamp grips every fabric strip
- The bell knots are secure
- The greenery stays in position
- No sharp wire ends are exposed
- The hook supports the finished decoration comfortably
If displaying it against a painted door, add felt pads to the back of the wooden bar. Position the bells so they do not repeatedly strike the surface.
Tips for a Lovely Rustic Finish
Use a Small Colour Palette
Burgundy, cream and dark green give this decoration its traditional country Christmas feel. Repeating those colours makes mixed checks and plaids look intentional.
Keep the Greenery Light
A few well-placed sprigs are easier to secure than a heavy arrangement. Leave some fabric visible beneath the greenery so the different textures can shine.
Choose Antique-Style Bells
Brown, bronze or aged gold bells suit the fabric beautifully. You can buy bells with an antique finish without using genuinely rusty pieces.
For a separate coordinating decoration, our primitive farmhouse bell made from a metal funnel would look lovely on a nearby peg rail.
Save Glue for Small Finishing Touches
The clamp holds the fabric, knots support the bells, and wire secures the greenery. This also makes the decoration easier to adjust or refresh next Christmas.
Christmas Door Hanger Variations
Neutral farmhouse: Use cream calico, oatmeal linen and brown ticking stripes with bronze bells.
Traditional Christmas: Choose bright red tartan, forest green cotton and cream strips with gold bells.
Soft cottage Christmas: Try faded rose checks, ivory cotton and sage fabric with frosted greenery.
Family keepsake: Cut suitable strips from an old Christmas shirt or a tablecloth with sentimental value.
If you would like to carry the same homespun style through the room, pair your hanger with our primitive Christmas stocking makeover.
Displaying and Storing Your Christmas Swag
This fabric Christmas swag is best displayed indoors. For a sheltered porch, use materials labelled for outdoor use and bring it inside during wet or windy weather.
Keep it away from candles, heaters and fireplaces in use. Display it out of reach of young children and pets because it contains cords, wire and small decorations.
After Christmas, lay it flat in a storage box. Wrap the bells separately in tissue so they do not catch on the fabric, and avoid crushing the greenery.
Next year, give the strips a gentle shake, fluff the bow and it is ready for another Christmas.
A few fabric leftovers, a useful old hanger and some cheerful bells make a surprisingly lovely combination. Sometimes the scrap basket really does know what it is doing.





What do you think of this project? Let us know!