
Get more details about this project
What you need
3 clean plant pots in different sizes, such as 12 cm, 18 cm and 24 cm across
Orange acrylic paint suitable for your pot material
Dark brown acrylic paint
Black acrylic paint, optional
Cream acrylic paint
Compatible primer, if needed
Flat paintbrush or foam brush
Small detail brush
Dry brush or small sponge for distressing
Sturdy corrugated cardboard for indoor lids
Pencil, ruler and scissors or craft knife
Cutting mat, if using a craft knife
Firm packing foam blocks to support the stems inside the pots
3 dry, lightweight branch pieces with flat cut ends
Jute twine
Black-and-white or orange-and-black checked ribbon
Faux autumn leaves, berries and greenery
Florist wire and wire cutters
Craft adhesive compatible with your chosen materials
Low-temperature hot glue gun and glue sticks, optional for embellishments
Clear protective finish compatible with the paint and pot material, optional
For sheltered porch use: Replace cardboard lids with thin exterior-grade plywood discs and use outdoor-rated paint, adhesive and protective finish. Cardboard lids are for indoor use only.
Instructions
An old plant pot might not immediately say “pumpkin,” but a little orange paint and a chunky wooden stem can work wonders. Add checked ribbon, a few autumn leaves and some trailing greenery, and that forgotten pot becomes a lovely piece of handmade fall decor.
What I like about this project is that it does not need a perfectly smooth finish. Slightly uneven painted lines and gentle distressing suit the rustic look beautifully. This is one occasion when a few wonky brushstrokes can work in your favour.
The pots stay upright, with their openings covered to create a top for the pumpkin. Their tapered shape gives the finished decorations a tall, stylised look rather than the round shape of a real pumpkin.
Use three different sizes for a porch-style grouping, or make a single small version to sit beside a decorative fall book stack. Either way, it is a practical excuse to use those spare pots taking up space in the shed.
Instructions
Step 1: Clean and Prepare the Pots
Remove old soil, labels and loose debris. Wash the pots and let them dry completely before painting.
Check terracotta pots for cracks and allow any moisture absorbed during washing to dry out thoroughly.
For plastic or glazed pots, follow your paint manufacturer’s preparation instructions. A compatible primer may be needed to help the paint adhere.
Protect your work surface before starting.
Step 2: Paint the Pumpkin Colour
Paint the outside and rim of each pot orange.
Apply light, even coats, allowing the recommended drying time between coats. Two coats may be enough, but coverage depends on the paint and original pot colour.
Paint slightly inside the opening too, so an unpainted edge does not show around the finished lid.
You can make all three pumpkins orange or mix orange, cream and muted sage for a softer autumn display.
Step 3: Paint the Pumpkin Grooves
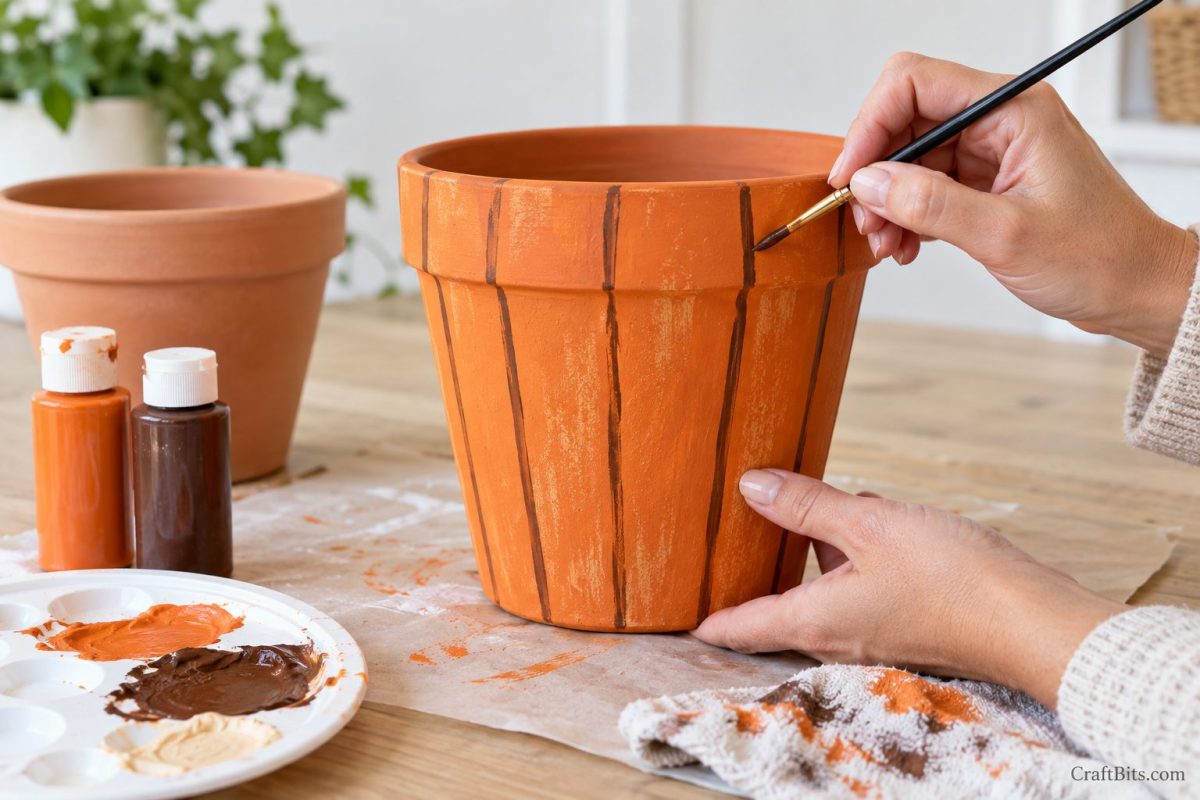
Use a small brush and dark brown paint to create vertical lines from the rim towards the base.
Space the lines around the pot, following its tapered shape. Around six to ten lines is a useful starting point, depending on the pot’s size.
Keep them slightly irregular rather than ruler-straight. These lines suggest pumpkin grooves; they do not need to look like stripes on a football jersey.
Soften one side of each line with a lightly damp brush while the paint is still workable. Test this technique first, as drying time varies between paints.
Add a little black to selected grooves if you want stronger shadows, but use it sparingly.
Step 4: Add Light Distressing
Dip a dry brush into cream paint, then wipe most of it off onto scrap paper.
Lightly brush across the rim and a few areas between the dark grooves. Let the orange remain the main colour.
Add small touches of brown near the base for a gently weathered effect.
Stand back occasionally. It is much easier to add another little mark than to undo an enthusiastic round of distressing.
Step 5: Make the Top Covers
Place each pot upside down on cardboard and trace around its outer rim.
Cut out the circle and check that it covers the opening while resting securely on the rim. Trim as needed.
For a stronger indoor lid, glue two cardboard circles together with the corrugations running in different directions. Allow them to dry flat.
Mark the centre and cut a small opening that fits your branch stem snugly. Paint the lid orange, including the visible edges.
For sheltered porch decorations, use a suitably cut plywood disc instead. Smooth its edges and paint both sides.
Step 6: Support the Wooden Stem
Place a firm packing foam block inside the pot, trimming it so it sits securely and reaches close to the underside of the lid.
Make a snug recess in the foam for the lower end of the branch. The foam supports the stem so its weight does not rest entirely on the cardboard.
Use a dry, lightweight branch rather than a heavy log. As a guide, let approximately 5–10 cm show above the lid, adjusting this to suit the pot’s size.
Test the lid and stem together before gluing. The branch should stand upright without wobbling.
Step 7: Attach the Lid and Stem
Secure the foam support with adhesive suitable for the foam and pot material.
Apply compatible adhesive around the pot rim and position the painted lid. Insert the stem through the lid into its supporting recess, adding adhesive where appropriate.
Check that everything sits straight and let the adhesive cure fully.
Lift the finished decoration by the pot, never by the stem.
Step 8: Wrap the Stem with Twine
Add a small dab of glue near the base of the exposed stem.
Wrap jute twine around it several times, keeping the turns close together. Secure the end at the back.
Leave some natural wood showing above the twine for a rustic finish.
Step 9: Make and Attach the Bow
Layer a checked ribbon bow over a slightly larger burlap bow.
For a simple bow, form two loops and two tails, pinch the centre and secure it with florist wire. Cover the wire with a short piece of ribbon or twine.
Tie the bow around the stem close to the lid. Add a small dab of glue if needed to keep it facing forward.
Vary the ribbon across your three pumpkins so they coordinate without looking identical.
Step 10: Add Autumn Greenery
Arrange a small bundle of faux leaves, berries and greenery before attaching it.
Secure the stems together with florist wire, then position the bundle around the base of the wooden stem. Attach it with suitable adhesive, hiding the joins beneath the bow.
Let a few pieces trail over the rim, but leave plenty of painted pot visible.
A small pumpkin needs only a few accents. Save the fuller arrangement for the largest pot.
Step 11: Style Your Pumpkin Display
Place the tallest pumpkin towards the back, with the smaller two slightly forward.
Add a basket or an unlit decorative lantern nearby for texture. Keep ribbons and greenery away from open flames.
For an indoor display, our yarn-wrapped hair bun donut pumpkins make lovely soft companions to these painted pots.
If you want to extend the look into a larger entryway arrangement, these DIY wooden porch pumpkins offer another way to create pumpkins in different heights.
Helpful Tips
Keep heavy pots low. Large terracotta versions belong on a stable floor or sturdy surface.
Support the stem from inside. A cardboard lid alone is not a reliable support for a chunky branch.
Use the right adhesive. Check compatibility with plastic, terracotta, foam and wood. Hot glue is best reserved for lightweight embellishments rather than relied on for every structural joint.
Protect cardboard from moisture. A coat of sealer does not turn it into an outdoor material.
Keep the pumpkin shape visible. A little ribbon and greenery goes a long way.
Colour Variations
Classic farmhouse: Orange pots, dark brown grooves, burlap and black-and-white checks.
Neutral autumn: Cream pots, light brown shadows, natural linen ribbon and muted greenery.
Halloween: Orange pots, stronger dark grooves, orange-and-black ribbon and a few purple accents.
Modern country: Sage, terracotta and ivory pots with simple ribbon ties and sparse foliage.
Storage
Store the pumpkins upright in a dry place. Loosely cover the embellishments to protect them from dust, and avoid stacking pots once the lids and stems are attached.
These plant pot pumpkins are a lovely reminder that seasonal decorating can begin with something you already own. Pull out those spare pots, choose a ribbon from your stash and make a little pumpkin grouping that feels right at home.




What do you think of this project? Let us know!