
Resin is used in lots of craft work. You don't normally make it at home so search results for how to make resin are misleading. So remember to handle store bought resins with care as per manufacturers directions and only use reputable suppliers. Resin can be a fun project, whether you are working with it for professional or hobby crafts, and you should always take basic precautions.
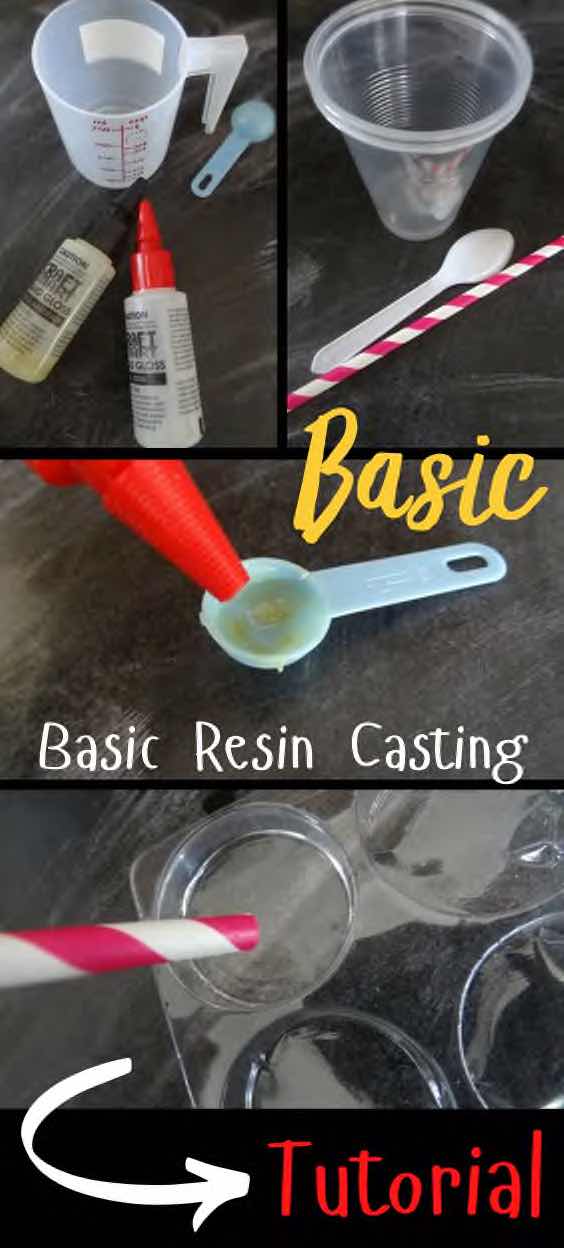
What you need
Casting Resin
Measuring Tools
Disposable Mixing bowl or cup
Disposable tools
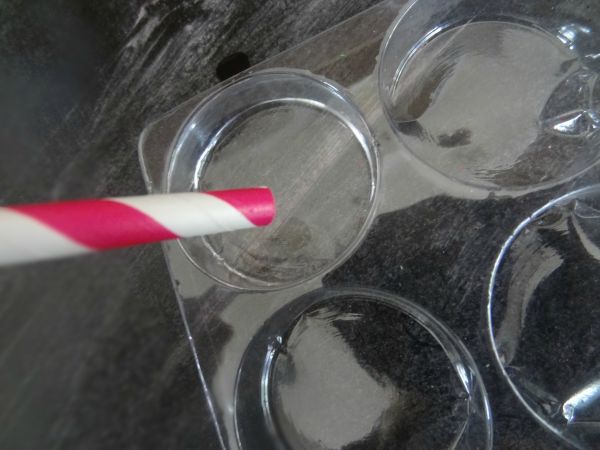
Suitable mold
Cooking Spray
Straw
Items for Embedding


Instructions
Let’s start with the basic types of resins, shall we?
Types of Resins
Polyester Resin : is a liquid plastic that hardens when a few drops of the catalyst are added to create a chemical reaction. Polyester Resin is durable and is the resin of choice for industrial applications and serious crafters who are experienced in resin casting. This resin is highly toxic and should be used in a well ventilated area using protective masks to avoid inhalation. One main advantage of Polyester Resin is the depth in which it can be poured for larger embed projects. Polyester Resin is cheaper to buy than Epoxy resin as it is generally purchased in larger quantities such as 1lt + tins.
Epoxy Resin
Epoxy resins also come in two parts: resin and hardener. The two parts must be mixed in the precise ratio given in the manufacturer’s instructions. Imprecise measuring and mixing prevents the epoxy resin from solidifying or curing. Epoxy resin is also self leveling, giving your project a glass like finish without too much technique. More expensive than the polyester resin but a great way to get started for a small batch of projects.
Always handle resins with care, and follow the proper use that is recommended by the manufacturer.
Pigments and Dyes These come in liquids, powders and pastes . You will need to purchase color dyes that are suitable for your brand of resin. Dye’s are added during the mixing process.
Now let’s move to the different types of molds.
Molds and how to pour your resin
Dimensional Molds: These are molds that create a 3D object, such as a heart shaped pendant, bangle or coaster etc. Latex and Plastic Molds can be purchased for resin casting or you can make your own molds, or use items you have around the home. When choosing molds consider the process for pouring resin into molds. You need to have a mold that is stable and can hold the weight of the resin.
Latex moulds
Plastic molds: You can use store-bought chocolate molds, specific pendant molds or other similar molds. again these are great to use due to the flexibility.
Home molds: Ice cube trays work well for pendants, chocolate box inlays are a great source of small rounded molds. You can use any durable (heat-proof) plastic item you find in your home. You can also use inflexible molds that can be cut or broken away from the casting, such as a glass jar or plastic lunch container.
Mold Release : If you are using a flexible mold there really is no need to add a mold release agent. However, a perfect inexpensive release agent is spray cooking oil. Simply give your mold a quick spray and wipe it over and it’s ready to use.
Flat Objects: You can also pour your resin over flat objects such as scrabble pieces, decorated coasters, trays and flat jewelry pieces.
Ok, so we know about types of resins and the different molds, but how do we mix and use?
How to mix
Your resin will come with its very own set of instructions which you should follow strictly. Basically you will measure the two parts (as per the instructions provided on your product) together and then pour into your mold.
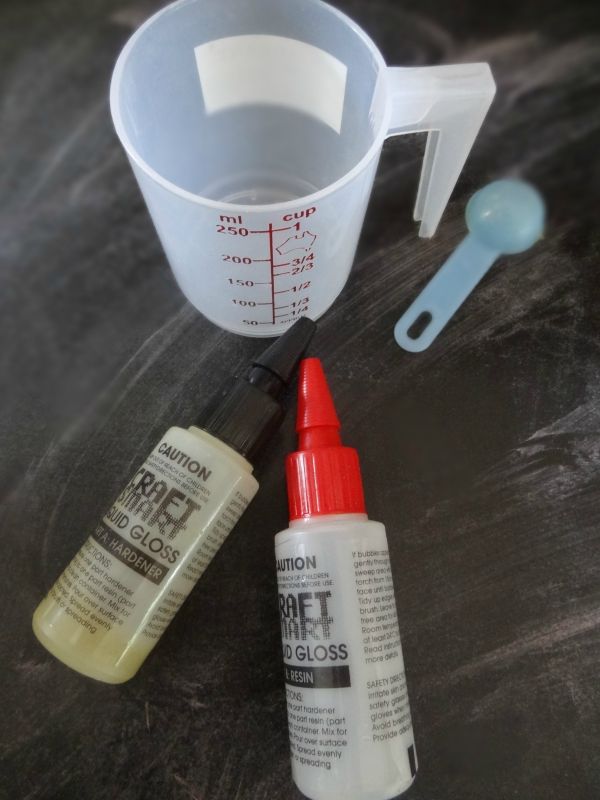
For mixing and measuring use baking spoons and measuring jugs as these will give you an accurate measurement.
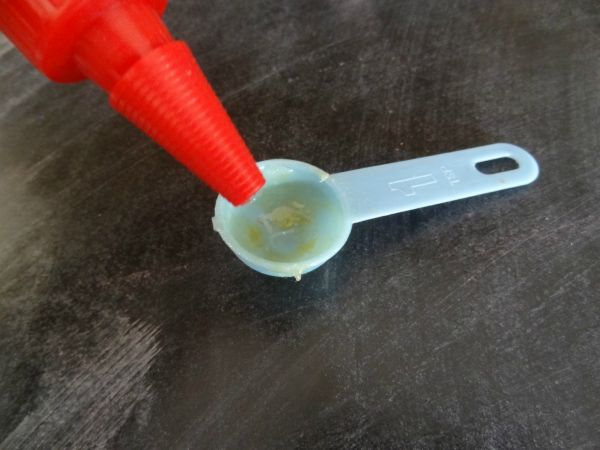
Wipe out your measuring tools after each use, making sure you have separate tools for the resin and hardener parts.
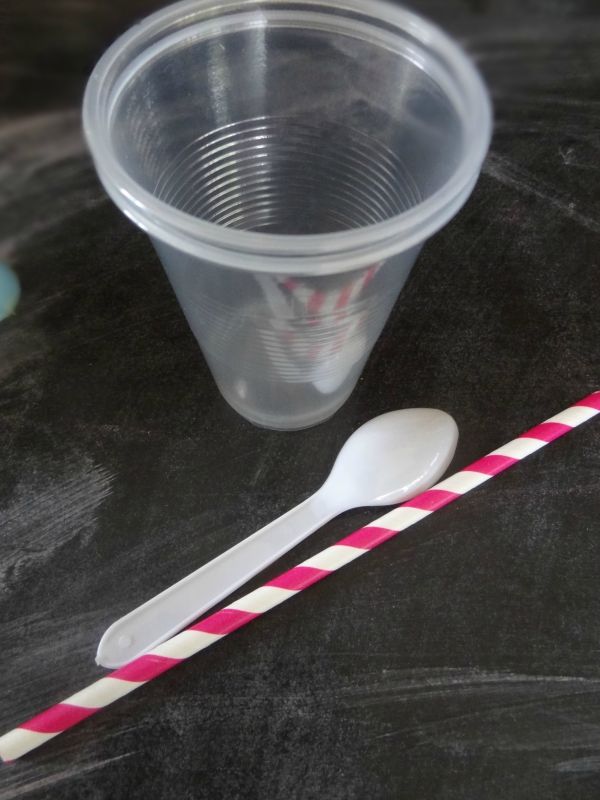
Plastic disposable bowls, spoons or cups work well as you can discard them after each use. Do not over mix or your resin will be filled with air bubbles. Let your resin rest for a few moments before pouring to avoid extra air.
Air Bubbles: Can be gently tapped out or use a straw and your warm breath to blow over the bubble, this disperses the soft resin and releases the air trapped underneath the surface. Larger projects use a warm setting on your hair dryer or embossing gun.
Embedding items
You can embed all sorts of items to make your resin exciting, from plastic toys to coins, dried foliage, and even cake sprinkles.
Photos and images can easily be embedded into your resin but it is advised to coat your image and photo with a sealer first to prevent the ink dyes from running in your resin. Using white clear drying craft glue is one way to seal your image, you can also use a spray varnish or other archival sealer. Make sure it is completely dried before pouring.
And now, the dreaded cleanup.
Cleanup
If you have spilled your image, use an acetone cleaner, such as nail varnish remover or methylated spirits before it cures. Cured resin can be chipped away with knives or chisels. The easiest way to clean up resin is not to spill it in the first place. The best way to remove resin from hands Is acetone.


Can South Africa order off of Amazon.com? I ordered all my supplies from them.
I’d like to cast my wedding boquet or some of the flowers at least in Epoxy resin inside a Beauty and the beast style bell dome – can I do this as the bell dome is made of glass? – any tips greatly appreciated!
HI.. can i apply resin coat on paper quilling dolls.. for make them waterproof and strong??
Is there a class I can take to learn how to get
Best result?
I am looking to make a pillar, maybe knee height, with a sculpture embedded in the middle. I saw that I can use multiple layers so I would do that, but what can I use as a mold for this? Which type of resin would be better for this? I am not an experienced artist or anything.
I am also doing a similar situation. Dud you get an answer to what to use as a mold. Mone needs to be 14 to 16 inches tall and 6 inch wide.
When I used to make soap you can use cardboard tubes or plastic hardware tubes
Would mailing tubes work. May have to cut them down some?
I use plastic irrigation pipe for soap molding. I’ll bet that could work. And there are different sizes too!
I plan to cover a homemade bar of soap with resin. Do you think I need to use some kind of sealant to coat the bar of soap first? What kind of sealant would I use?
Hi, you could seal your soap with either a acrylic sealer or a triple thick spray sealer. Spray a light coat 8 to 10 inches away from the soap. Let it dry and do 3 to 4 coats leaving dry time in between. Good luck.
Could I cast resin in a foam core mold? I use foam core for Rockite casting, but I don’t know ifor it works for resin as well.
I have made a paperweight using resin in a silicone mold. The outer edge that touched the side if the mold is not translucent, it is cloudy. Is there a way to buff this to become clear like the rest of the resin?
That’s a super common issue, if you mix up a small batch or resin and pour it over the cloudy part it will become crystal clear. Just make sure you raise the piece up on a thin base so the excess can drop off without looking around your piece. For small items a few coats of clear nail polish works as well.
Can you pour the resin in two parts. So, pour one layer, let it dry, place the object you want to embed on the dried layer and then pour a second layer?
Yes you can
Excellent! Thank you
Hi. Can I use my baby umbilical cord in rasin to make a pendent and do i need to add anything to it .
I am not sure. Never been asked that before.
I can’t speak specifically to ambilical cords but I’ve done similar projects and you shouldn’t need to add anything to it but make sure that it is completely encased in a thick layer or resin. if exposed to air it will start to roy and nobody wants that!
If you want to do breast milk or an imbilical cord you have to dry the cord completley so either a dehydrator or on a very low temperature in an oven for a long time. Shape it ahead of time and let it dry, then you can layer cast it. Make sure it is completley covered in resin when it is done. Good luck.
I don’t know why this came up in my Google search but I googled directions for Castin craft mold release.. Any info anyone has? I bought some but can’t read the instructions on bottle, it’s worn off.
I have question. Art student trying to do a project with epoxy resin putting them in mold with trash inside. Tried doin this but the resin bonded to the plastic vessel. How do I get the resin to not bond to the vessel? Wanting to put the resin in plastic and glass vessels for shape then be able to take them out once hardened but no one seems to know what to do to help me, hoping you or someone on here can
You need a release agent, you can use a spray oil or a Mold release spray from a Craft store
like cooking spray?
Has anyone casted fondant in clear resin? What’s the best thing to coat them in? And does the heat affect the fondant at all?
I am interested in using a resin to make an opaque colorful pair of shoes for a university project. Any recommendations for which type of mold and which type of resin?
I want to create block layers of color at different angles. Any ideas?
This is my first time experimenting with resin.
Hi, I tried to make a bangle with dried rose petals. I mixed my resin and pored some of the mix in the put the rose petals in going all around the bangle. But by the time I got right around it was getting harder to put the petals into the resin. Then when that was done the rest of my mix would not pore as it began to set. Can I make some fresh resin up and fill the rest of the bangle? And will it come out in one and look OK? This was my first time casting so I knew there could be some challenges at first.
I can find several instructions for using paper and making molds, but I haven’t found and clear instructions on using fabric.
I’d like to make cloth covered coasters. Is there any prep I need to do other than pour resin over coaster?
Denise,
Make sure that the fabric is completely stuck to the coaster before pouring. Any bubbles in the fabric will cause a bubble in the resin.
I wanted to embed some jellybeans sweets. Do they need to be coated first? If so what would you recommend?
Yes, the color will run if you don’t seal them first. I would use a spray varnish.
Hello. Excellent tutorial. I”m casting playing cards in polyester resin and am having a terrible time. pieces are coming out great but the resin is soaking into the edges of the cards. I got the suggestion to use Krylon Workable Fixative to coat the cards. Didn’t work. My fear is that any poly based spray is just going to break down in the resin. Any suggestions would be MUCH MUCH MUCH appreciated!
-Dave
What if you were to laminate the card first?
I think that’s an option which I’m going to try. My fear is that no matter how close I trim the laminate, you’ll still be able to see it and its going to kick my OCD into overdrive. Thank you for the suggestion!
Use a sealer such as modge podge to seal your cards first. Paint on with a small flat paint brush, let it dry.. Turn the card over and do the same.. Give it 2 coats each side.. Make sure that when u do each coat, that it sells the edges too or the resin will get in through the edges.. Follow the directions on the bottle.. I allow about 20-30 minutes in between coats, but you’ll be able to tell when it’s dry by touch.. Good luck, have fun..
@David Gwozdz Try painting the card in mod podge first!
oh and try the matte finish mod podge 🙂
Can you use paper cups for mixing the resin?
Yes I didn’t have a problem with doing that.
go to http://www.little-windows.com. they have videos on how to do it ,how to mix etc! all tools and everything needed. a wonderful website! thanks for this article, it cleared up a view questions I needed answers for. Any news on a resin suppliers in South Africa?
Hi Norah
Chandir is a Resin Supplier in Centurion 0836455595. His products are apparently amazing.
Great article! I am having a problem with my silicone molds not filling out and bubbles in the middle of the projects. Would a vibrating table be useful in moving the epoxy into small details and removing bubbles?
You could use a small vibration to settle it yes,
To remove bubbles from your resin use a heat gun.. Slowly wave the heat gun over the top of your project at a height of about 20-25 cm. this will bring the bubbles to the top and pop them. You can do this throughout your project as you go as sometimes if you leave it to the end you’ll miss more.. Don’t hold the gun for more than a couple of seconds in the one place or you can damage your mould.. Don’t use the gun on the resin for too long either or you will wreck the resin..
where can i buy resin in india ?
I reside in South Africa and would like to start with this as a hobby making jewellary but can’t seem to find any distributer in South Africa. I work with pewter and would like to incorporate this with resin.
Can you please tell me if there are places in our country to buy everything that I need for this new venture?
Kind regards.
Lynne Bindeman
labindeman@gmail.com
Please. Tell me about I can buy resin?
Please
tell me the instruction in spanish
Interesting points, particularly about air bubbles and how to get rid of them
Some good info here but a little confusing as to know the difference between the two types, one comes in two parts (resin & catalyst) and the other comes…in two parts (resin & hardener) hmm, not quite clear on the differences
Any advice on the best way to clean resin castings as I’ve heard water clouds it and also how to polish fingerprints and small scratches off the surface without clouding?
I use micro mesh to polish as the grit goes to 12000. They will make the project shine.
Hi,
I’m not 100% what type of resin to use on this, any help would be great, I’m trying to make a mould that will bond as well as thread, I have a set of old type alloy wheel centre caps chromed/tin, what I’m wanting to do is drill a few holes into the caps, then mount theses into a set of wire wheel knock offs/ spinners, hopefully pour the resin into the caps so this will flow through into the threaded spinner, when set hopefully I’ll be able to remove & replace the spinner when needed, this is not load baring it just a dress up thing, anyone out there that can advise me what resin will be best & tell me how to stop the resin bonding to the spinner, I did think of using spray grease but, would that cause any problems or would it cause a reaction with the resin.
Please help I’m going out of my mind trying to think of the best waycto do this,
kind regards Robert
This was an excellent tutorial. Thanks.
thank you so so much- this has been so helpful x jill in south africa xx
Guest: where in South Africa do you get all your ingredients for resin craft? Please let me know. Thanks!
labindeman@gmail.com
Very good information, clear and easily understood. It’s the first time someone has explained (so I could understand it *g*) the difference between polyester and epoxy resin.
Thanks
How do you pour resin over a flat object and not have it glued down onto the surface you poured it over. I am trying to make magnets out of art on paper that is then glued onto a magnet backing. It worked but some of the resin got on the back of the magnet. The whole thing was messy and then I couldn’t use the magnet.
I have seen people take a flat piece do styrofoam and stick a ton of toothpicks in it and it will allow the resin to drip..you may have to sand the drips that seize with a nail file. But, it’s better than being stuck to everything..lol
If you let the resin sit for a bit to thicken/harden a little before you use it will be much easier and less messy getting it to dome on your pieces. Lots of videos on youtube about how to dome with resin.
First you need to get your project up off the flat surface , ex: i poured resin on a 8×10 portrait.. i used a plastic small container smaller than the item i was pouring on so that the resin could drip off. Before pouring the resin i used masking tape and put on the bottom edges of the board , after which it dryed i was able to pull the tape off & any drips that stuck to it came off with the tape. The potrait was glued on an 8×10 board then i poured resin over it to permanently seal one of a favorite pictures. It turned out beautiful & the masking tape worked great on the bottom of the board..
The magnet idea sounds great but I bet you poured resin onto a rectangle or square.. When you pour onto a shape with sharp corners ie 90degree corners it’s very hard to stop it from escaping over the edge.. But… If you pour you resin onto a shape with rounded edges the resin will form a meniscus which is the domed shape you see on the head of a beer when poured well. The pouring onto paper is an issue too.. I would use a sheet of acetate (the clear plastic that is on the front of the lack of Christmas cards, clear plastic on the front of the toy that you bought at the shops etc, or u can buy it at the newsagents).. Cut the shape out.. Remember rounded edges work best.. Mix your resin, add a coloured pigment or dye chosen to be the BACK of your magnet etc… Pour it carefully onto the acetate shape.. Let it cure.. When hard remove the acetate.. Place this piece with the flat side up.. Glue your picture or art onto this flat side and let sit till the glue is dry.. Mix another lot of resin, this time clear.. Pour over the top carefully so this side is domed too.. Let cure… And bobs your uncle.. Have fun, experiment with shapes..
Hmmnn… great post on resin jewellery…resin casting is perfect for embedding stuffs on your casting… 🙂 we could play with resin casting and have fabulous results…
I want to make a necklace with a real spider imbedded in it. What type of resin would be best for this type of thing, Epoxy or Polyester? Also– I’ve never done this before… I’m a beginner. 🙂 So if you could help me out I would appreciate it.
-Angela.
casting resin is used for clear projects mix the same as polyester one its a clear resin
Dear Marc,
Thanks for your reply. I have never worked with resin; only with pewter and stained glass. Do you have any other info re resin?
Thanks in advance.
Lynne Bindeman
hi im not sure,how to get the right amound of resin,to hardener,as its a tin of polyester clear resin that seems to come with a small10 ml bottle,using drops realy not easy to get the one for beginers,need ,,help,, thanks Angela.
Can you kindly suggest a brand name for resin or a place online I can buy resin material from?
Thanks
Thanks a lot for providing such a lot of information.
I tried casting polyester resin. When i take the cast piece out, it starts bending in the middle. when i am cutting it in between, i find unevenness in its thickness. It’s 6mm on the border, while thickness reduces to 2-3mm in the middle. What can be possible reasons for this? Also, my top surface is bumpy, what can be done to avoid that?
I’m glad this craft is back in popularity. My dad used to make these types of things when I was a child in the 70’s and 80’s. He use to take all the dead scorpions around his job, which was a Marina and make pendants and buckles. LOL Other stuff too, but yeah. Glad to see it’s back.
Thank you for all the great information and tips. I am going to push forward in my new endevour of Resin jewelry.
very good information
very informative: have some resin, but have been afraid to use it!
Great information–but how/where do I get a mold with a hole going through the center (horizontal or vertical)? Could I use an embedded straw?
Thank you – I appreciate the information on the difference in Polyester and Epoxy resin
Thanks much for the info, especially the part about cooking spray and chocolate molds… I like DIY ideas!
thanks for the cooking oil tip
Very informative article, many thanks!
Very informative article, many thanks!
i really appreciate this information, it help my study about what is polyester. thank you to the author of this information… hope you will post more …
Thank you, hopefully this will help in trying to make a few drums =)
The Guest from South Africa, you can buy the silicone called PratlyGlo from most craft or hardware stores. The mould can be found as some of these outlets too. Have a look at DALA Products they are making a plastic silicone to make your own moulds now.
Need a hole? Try a small drill bit or a dremmel tool!;)
Thank you for this instruction on Resin Casting, it’s going to come in very handy soon. I do have a question though, if I needed a small hole in the resin, how would I accomplish this?
thank you. this is very informative, exactly what i was looking for.
Thank god for you, finally clear instructions I can understand. I had given up on attempting any sort of project with resin because there were to many unanswered questions I had about it all, until now !!! More visuals would be great ! Thank you
Cool! Thanks. I did not even know jewelry had anything to do with resins.
The amount of catalyst to resin is confusing on the can. Cannot find a simple table of how much catalyst to resin. Using Castin’craft clear liquid plastic casting resin.
Have not been able to get started.
awesome information. i will definitely bookmark this for my future resin project!
thank you! this is one of the only instructional pieces i’ve read on making resin jewelry and, as a beginner, i have a much better idea of what i need to do to get started.
Good info, I have been looking for good directions since I bought my resin mix last week!
I have been reading about making resin items. I would like to make my own silicone molds. I do not know where to buy silicone and casting resin in South Africa. Can someone please help and let me know by placing comments on this project.
Very clear explanation for beginners
Thank you. You did a wonderful job explaining…everything.
Thank you for giving info on using pictures with resin.
Good information…
ditto on more pictures.
i wanted to see how the final product looked like 🙁
If your using measuring spoons are you really getting the exact amount needed?
It’s great to see others using resin to create something too! I would like to know if you have ever tried to make molds for round beads or the squatter round beads?
Nice!
REally helpful!! thanks!
Good basic info, as others have said, more pictures of the process and of a finished product. Also, a definition for “well ventilated” workspace -for example is it open windows or, if working in winter, a fan?
Very good information! I wish there were more pictures.
Clear, very informative – Thanks so much!
Excellent article!
very helpful
Great info !
These are great instructions for beginning use on resin casts. thanks
thanx alot =)
very good but i wish there were more pictures
Thank you, I was curious about sealing the dried foliage and getting it attached to the base. WHite glue was exactly the answer I was looking for, thank you!
This addressed most of my questions for a project I want to begin.
awesome, wonderful information. Can’t wait to begin project.
Thank you. Not much info. online. Ordered a book but wont be here for 5 days – I want 2 start now! – Thanks again.
thanks for this,I have wanted to learn how to do this.
I have been wanting to try resin casting. Thank you for the wonderful, in-depth information.
has anyone ever made a poured or spilled liquid using resin if so how?
thanks for great article
Can an object covered in or made of resin be used outside in the elements?
Information is clear and easy to understand
more pictures would help, but great info!
very thorough
great info I have been wanting to try looks fun.
Just what I have been looking for 🙂
very usefull thank you
Sounds interesting!!
Loved the article! Very informative.