
Get more details about this project
What you need
White Plastic Bags
Wire ring (or coat hanger)
Ribbon
Embellishments
Stickers or Toys
Baby socks
Instructions
How to Make a Baby Shower Announcement Wreath
1. Make the wreath frame.
Bend a wire coat hanger into a circular shape, leaving the hook at the top so you can use it for hanging. You can also use a ready-made wire ring.
2. Cut the plastic strips.
Cut the white plastic bags into strips approximately 20–30 cm long. Longer strips create a fluffier wreath, while adding more strips makes the wreath thicker and fuller.
3. Tie the strips to the frame.
Tie each plastic strip around the wire using a simple knot. Push the knots close together as you work and continue until the wire frame is completely covered.
4. Fluff the wreath.
Pull and separate the plastic strips so they sit evenly around the frame. Trim any pieces that look noticeably longer than the rest.
5. Add the baby embellishments.
Decorate the wreath with baby socks, small toys, rattles, ribbons and other lightweight items. The original project suggests using double-sided tape or craft glue to secure the decorations.
6. Choose your color theme.
Keep the wreath neutral with white and yellow, create a classic pink or blue version, or use a mix of pastel colors. The original project specifically notes that the design can easily be adapted to suit the baby’s sex or kept unisex.
7. Hang your wreath.
Use the original coat hanger hook or add a ribbon loop for hanging. Display it on the baby shower entrance, nursery door, hospital room door or front door to celebrate the new arrival.
How to begin
Start by bending your coat hanger into a circle, leaving the hook at the top to hang it with or use a ready made ring.
Now take your shopping bags or white garbage bags and cut into strips around 20-30 cms in length. The length will determine how fluffy your wreath is. The quantity you tie on will determine how thick your wreath will be.
Now take your plastic strip and tie it into a knot around the wire circle. Keep doing this until the circle can no longer fit any more plastic strips on.
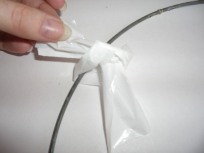
This is a very simple craft but it looks great when completed so stick with it. You will need lots of bags for this around 20. Depending on how tight you want your wreath, it took 2 white garbage bags for us to complete our wreath.
Once your have your wreath created embellish it with baby items.
Then use double sided tape or craft glue to attach the toys to the wreath. You could embellish it with baby rattles and other little trinkets.
I made mine in a unisex theme with both pink, yellow and blue items but if you know the sex of your baby then you could use blue or pink plastic kitchen tags which are now available in most supermarkets.
You could even use this same principal using fabric strips using a non fraying fabric for a better finish.




my sister in law is going to have a girl and i saw this fantastic idea this will be a great gift for the baby shower door and the babys room and for the door when she comes home I love this in my opion this is a great way to say welcome baby!!
I made this for my hospital room door. I tweeked it a lil’ to my liking. Thank you so much for the step by step instructions and pictures for illustration purposes. W/o this I would not have been able to do what I did. I don’t have a crafty bone in me. THANX! really.
I was looking for a really cheap way to make a wreath. So far I have only spent $1 & that was for buying some wash cloths to add as embellishments. My 12 y.o. daughter tied the white bags on the white hanger. It was awsemoe not only spending quality time w/her, but it has so far turned out really pretty. I’m proud of what we have done so far. We are not completely finished w/it, but I just wanted to say thank you from the bottom of my heart for posting this easy & inexpensive way to make a wreath for baby. You deserve a pat on the back & a comp. STARBUCKS coffee, lol!
I love this idea, could also be used at any other holiday if you change the color of the ribbons and the decorations you put on it. =) WONDERFUL!