
What you need
1 Foot 18g wire, soft
1 Handmade bead with hole large enough to fit 2 pieces of 18g wire. (Rondell shape works best)
Instructions
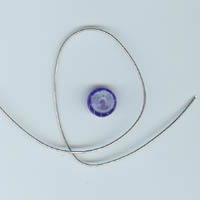
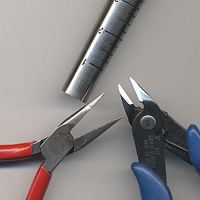
Tools:
Wirecutter
Chain-nose Pliers
Ring Mandrel or dowel in desired ring size – Mandrels can be purchased through jewelry supply outlets and dowels can be found at your local hardware store.
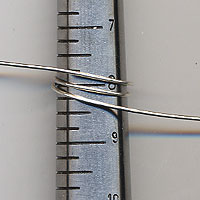
Step 1 – Place center of wire against your form and wrap twice around leaving the tails long.
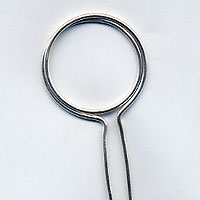
Step 2 – Bend the tails up sharply.
Step 3 – Place the bead onto both wires and slide down to the base of the ring.
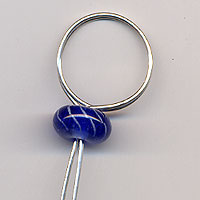
Step 4 – Bend the wires to a right angle directly on the top of the bead.
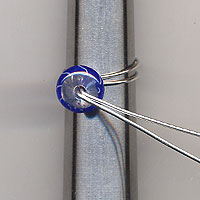
Step 5 – Spiral the wires on top of the bead. This can be a bit tricky, start by making a small circle with one of the wires where it emerges from the bead, then push the other wire behind and against it being careful not to overlap the wires. If you see the spiral start to puff up use a small block of wood and press gently, but firmly on the spiral to push it against the bead as you turn the wires. Continue spiraling until the desired size is achieved. Be sure to leave a tail of at least 2″ on each wire to complete.
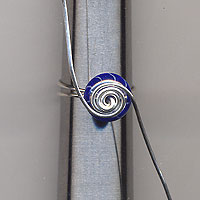
Step 6 – Bring the tail wires down to the ring shank on opposite sides of the bead and wrap around the base of the ring to secure.
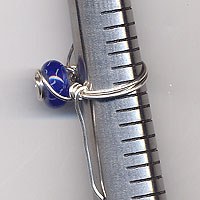
Step 7 – tuck the wire ends down and you are done!
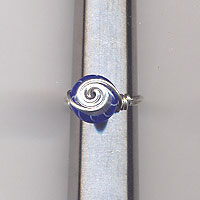
This project was contributed by Beadstudio.com Visit their website for beading supplies, projects, classes and articles



I made the most beautiful ring with this and am overjoyed
with the results. It looks FABULOUS! Thanks so much, and keep up the good work.
5 star ring came out very beautiful thank you very much. very informative
Very Pretty
!
cool!
This ring is beautiful. Thanks for sharing
like it alot.
love this project!!
Very pretty.
This is an awesome project and very detailed. Thank you for sharing this with us. It is going in my bookmarks so that I can share it with the school kids I work with.
what a great idea you are so cleaver that was well explained thankyou
easy cute idea! flat semi presious stone beads look awesome in this design! thanks!
It looks amazing, I am defintaly gonna try that!
I love the step by step pictures for this great project.
this is what im talking about. easy, fun, and cute.
i love making jewelry(btw im 12 :D) and this is so cool another thing to add to my portfolio thanx bunches!!!
THIS RING IS ADORABLE!!!! THANK YOU!!!!
I like it a lot!
Just wondering, I’m highly allergic to just about any metal used for jewelery, what sort of wire does everyone recommend using for this project for people with metal allergies?
Note: Hypoallergenic is still too potent.
Wow, it’s so easy but the end result is really stunning.
I like this ring it got class, style and good work you can’t stop now.
Clear directions with excellent photos.
its realy very very nice, which can be easily done. i love it .
It’s a simple ring for beggining a project.
i’m 14 and i have not done it yet, but i want to so bad! looks so good!
love it
so cool
I’m 9 and probaly could’nt do it but it is one of the best step by step craft!:D
good tho would have been better if told how much wire to use tho idea is simple yet elegant. I make jewelry and I love it
love it
this is great and you can play around with the wire for a diff look &the bead.
its so nice i love it
🙂
I am going to try this project and let you know how it came out.
This is a brilliant idea but a bit hard for me to make thow!
one can also use covered wire of different colors for a more fashionable look
I loved it its very nice i would say beutiful
excellent
Love it!!!!
This is beautiful. I plan to try this in the near future!
cheap
Great gift idea for a teenager.
Wonderful project for the beginner beader. Excellent step-by-step. I enjoyed the project!
So easy!!
Thanks
A great idea!
soooooo cute!
Love the look of this ring and sounds simple to make. Thanks!
its fantastic excellent
this is so beautiful!!!!
Very good instructions, very clear pictures – I’ll make this one today!
This is so cool and so easy. Thanks.
its excellent
very cute. why hasn’t anyone thought of this before?!
I love this ring and directions are incredibly easy to follow.
easy to follow instructions. Great!
fantastic!!
Kinda hard, but so cute. 0.0*
awsome….shahnaz..
I love my spiral wire ring. Thank you for the easy instructions!
Awesome job! They look great!
looks totally rad can’t wait to try it
I have made all types of jewelry, but never have I thought of this! It’s a wonderful idea! Can’t wait to make one!
Nice and modern.
cute!
nice idea!
Unique idea. It looks like a fun project to make.
This is so cool! Thanks for sharing!
Cute ring and it looks easy, thnaks!
Nice……
This is great for me since I’m so clumsy. Haha.
I have made rings professionally. This is much like one we made and a good design but suggest you silver solder & flatten the band for comfort.
best craft ever!!!!!!!!!!!!!!!!!!!!!!!!!!!!!!!!!!!!!!!!!!!!!!!!!!!!!!!!!!!!!!!!!!!!!!!!!!!!!!!!!!!!!!!!!!!!!!!!
WOW!! this looks SOOO fun to make, thanks for the idea.
craZycrafter_kt
OMG that looks SOOO much fun… I can’t wait to try it, thanks!
it’s gorgeous!
this looks easy enough for a klutz like me! thanks for the great demo.
THis is an AmAzInG craft!!!!!!!!
that IS
absolutely magnificent! kudos to you!
beautiful ring. I’m going to try it. Thanks. Ana Verde, Kitimat BC, Canada
Very Nice and very helpful…thank you very much.
Ana Verde
Kitimat, BC Canada
Awesome looking ring! Can’t wait to try it!
This is wonderful. I’m a beginner I this is something I’m going to try. Thanks for showing this craft.
Looks gr8!!!!
The ring looks lovely and seem not too difficult to make.
Beautiful, making one today. Thanks
That is very cool, and I can’t wait to make one now.
easy to follow instructions thanx
I love it! I’m allways ready to try something new, and this is new to me.
Its Unique AND Beautiful I Can’t Wait To Make It For Christmas Gifts! :~)
Lovely Project, thanks!