
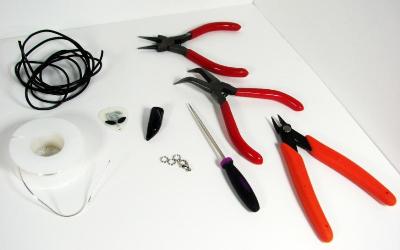
What you need
Tooth-shaped semi-precious top-drilled stone ( I used Agate, but there are a surprising variety of stones available)
Guitar pick of your choice (I chose the glow-in-dark alien. My son thinks it’s cool)
Lobster Claw necklace clasp (optional, but nicest alternative. I’ll show you how to skip this step if you want)
Split rings (need 3) (optional, only if you?re using lobster claw clasp)
18-20 gauge craft wire (I used anti-tarnish silver) you?ll need about 2 feet
Leather Cord (at least 3 feet)
TOOLS
Wire cutters
Needle-nose pliers
Sharp abject, like heavy sewing needle, small nail (I used an awl) to pierce pick
Instructions
1. Assemble your materials and tools.
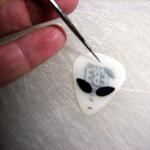
2. Pierce guitar pick in the center of the end you want to mount. Make sure you protect the surface you’re piercing into. You need about a 2mm hole (my kids said I should paint the hole with green or red fingernail polish to look like alien blood, but I declined).
3. Cut leather strapping cord. If you’re going to use the lobster claw, measure the length you want for your necklace (try it on around your neck) and add 3.” If you’re skipping the lobster claw, cut 30″.

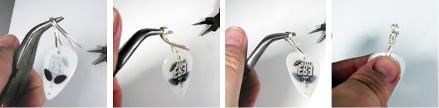
4. To mount the pick, cut 4″ of wire. Pass the wire through the guitar pick, then pinch ends up toward the top. About 1/4″ above the place where wires join, grip both wires with pliers and bend ends at 90* angle. Grip pliers at joint after angle, and wrap ends back over pliers to form a loop, bringing wires down and around the vertical shank wires. Wrap ends around shank a few times, cutting any rough or uneven ends. Tuck edges in to avoid getting scratched by raw edges, and file if necessary with metal fingernail file.
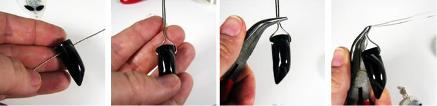
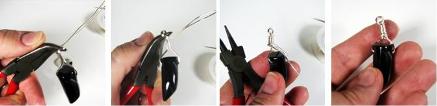
5. To mount the stone, cut 8″ wire. Pass through holes in stone, then pinch ends up toward the top. About 1/4″ above the place where wires join, grip both wires with pliers and bend ends at 90* angle. Grip pliers at joint after angle, and wrap ends back over pliers to form a loop, bringing wires down and around the vertical shank wires. Wrap ends around shank a few times, cutting any rough or uneven ends. Tuck edges in to avoid getting scratched by raw edges, and file if necessary with metal fingernail file.
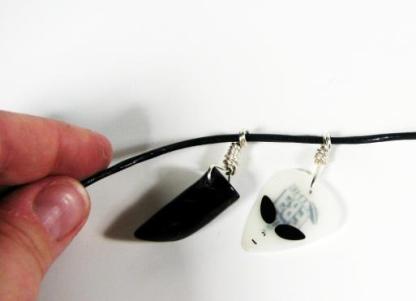
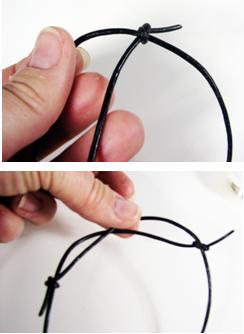
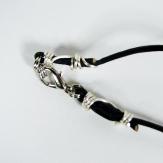
6. String the tooth stone and the pick onto the cord. If you?re skipping the clasp, use a 30″ piece of cord. Take each end and make a small over hand knot of one cord around the other cord, about 4″ from the end. Turn the necklace around, and tie another over hand knot with the end of the free cord over the other cord. Pull both knots tight, and trim about 1/4″ from the knot.
7. To adjust the necklace, use both hands, one hand on each knot, and pull your arms apart. You will see the necklace shorten as the knots pull further apart. To loosen, pull the knots closer together. Slip over your head, and pull necklace to tighten to a length that suits for wearing. Congratulations! You’re done!
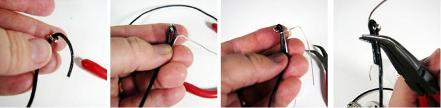
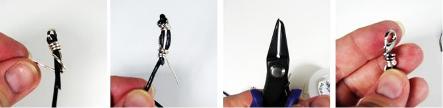
8. To attach the lobster claw clasp, cut 6″ of wire. Slip a split ring on one side of the cord. Double the cord over about 3/4″ and pinch the cord tightly. Bend a 90* angle in the wire about 1/2″ from the end of one side, lay the wire against the folded cord and grip near the split ring/fold. Applying pressure so the wire will not slip, wind the wire around the cord tightly about 4 times to secure the cord and the wire. Angle the wire down toward the loose cut end of the folded over cord, and wind 3 or four times very tightly to secure the clasp assembly. Attach the lobster claw clasp to the split ring. There are special pliers for this, and though they are not really necessary, they work pretty well. If this project is not just a one-time jewelry attempt and you want to make more, I suggest you purchase a pair for yourself. Using them makes split rings less aggravating.
9. Repeat on the other side, without the lobster claw on the end. Instead, attach another split ring to the first ring that is strung on by the leather cord. Congratulations! You’re done!

10. The sky’s the limit with this design. I’ve seen some people use metal guitar string instead of cord, and it looks really nice. Good Luck!


Awesome! I didn’t have a tooth, but I had a guitar pick.
What did you use to pierce the pick? I make a lot of jewelry and i want to make these for my best freind (soon to be a godmother{and doesn’t know it}) but i don’t know what you used to pierce the pick. Thank You. VERY creative. MERRY CHRISTMAS AND HAPPY HOLIDAYS!
Dude really cool!! Gonna make one for my son and daughter!!
an easier way to make a necklace is to just drill a hole at the top of the guitar pick.
this is so awesome,,,,i want to make my guitar pick into a necklace so i wont loose it,,,but i dont have the right tools to do it,,,,D=,,,,,
so cool! my brother is way into the guitar stuff. i have got to make one for him!
THIZ IZ AWESOME!!!! =D
this is just my opinion but other people probably realy like it
cool!
i like it and my kid did too
very nice to see good, do the same
Looks like a lot of fun. A good activity for a rainy summer day! Thanks!
great idea as a gift for musos!
Really nice instructions with pictures.
Wow! This is pretty awesome!
really like this
as a teen in the ’70’s i made pierced earrings with guitar picks!