
Get more details about this project
What you need
Silicone gap filler or hardware-store silicone
Corn flour
A disposable mixing surface or bowl
Gloves
A small object to mold, such as a shell, charm, button, or pendant
A flat surface for drying
Instructions
If you have ever wanted to make your own small craft molds without buying fancy mold-making kits, this simple DIY silicone mold idea is a handy one to keep in your crafty back pocket.
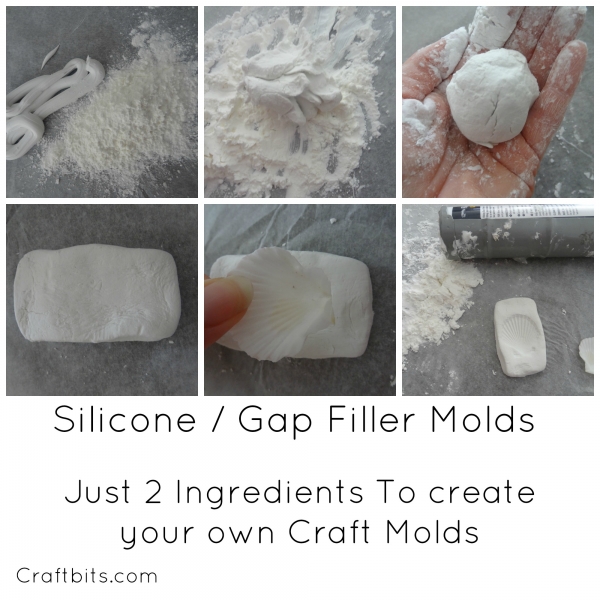
This homemade mold uses just two basic ingredients: silicone gap filler from the hardware store and corn flour. Once mixed together, they form a soft dough-like material that can be pressed around small objects to create custom molds for jewellery making, polymer clay shapes, resin-style embellishments, and other small craft projects.
For this tutorial, we used a small shell to create the mold, but you could also try buttons, charms, beads, small cabochons, flat ornaments, or little found objects from your craft stash. Just make sure the item has enough detail to leave a clear impression.
Safety Note
Silicone gap filler can have a strong smell while it is curing, so work in a well-ventilated area and wear gloves. This type of handmade mold is intended for craft use only and should not be used for food, baking, chocolate, or anything edible.
How To Make The Silicone Mold
Start by adding some corn flour to your work surface or disposable bowl.
Squeeze a small amount of silicone gap filler into the corn flour. Begin mixing the two ingredients together. It will feel sticky at first, but as the corn flour blends into the silicone, it should start to turn into a soft, pliable dough.
Keep adding small amounts of corn flour until the mixture no longer sticks to your fingers and can be rolled into a ball. You are looking for a dough-like consistency — soft enough to press an object into, but firm enough to hold its shape.
Once the mixture feels right, roll it into a ball and then flatten it into a rectangle or square. Aim for around 1/2 inch thick, depending on how deep your object is. If you are molding something chunkier, make the base slightly thicker so it has enough depth to hold the impression.
Now press your shell, charm, or chosen object firmly into the dough. Push it in evenly so the details transfer properly.
Carefully lift the object away and check the impression. If you are not happy with the result — perhaps it slipped, went in crooked, or didn’t press deeply enough — simply roll the mixture back into a ball, flatten it again, and start over. That is the lovely forgiving part of this project.
When you are happy with the mold impression, place it somewhere safe to dry.
Drying Time
The mold usually takes around 2 to 3 days to fully dry, depending on the weather, humidity, and thickness of the mold. Warmer, drier weather will help it cure faster, while damp conditions may take a little longer.
Once dry, your homemade silicone mold can be used for small craft casting projects, polymer clay shapes, handmade jewellery components, and other decorative embellishments.
Tips For Better DIY Silicone Molds
Use small objects with clear details for the best results.
Avoid items with deep undercuts, as they may be difficult to remove from the mold.
Make sure your mold base is thick enough so it does not tear when removing your finished piece.
Keep this mold for craft materials only.
This is such a useful little technique when you need a quick custom mold and do not want to buy a full mold-making kit. It is especially handy for jewellery makers, polymer clay crafters, and anyone who loves experimenting with odds and ends from the craft cupboard.
add a faq section
DIY Silicone Mold FAQ
Can I use any silicone gap filler for making molds?
Most basic hardware-store silicone gap fillers will work for this type of craft mold, but avoid anything that has added texture, grit, paint, or expanding foam properties. A plain silicone sealant or gap filler is best.
Is this mold food safe?
No. This DIY silicone and corn flour mold is not food safe. Use it for craft projects only, such as polymer clay, resin-style embellishments, jewellery pieces, buttons, charms, and decorative shapes. Do not use it for chocolate, fondant, ice, soap for skin use, or anything edible.
Why do I need corn flour?
Corn flour helps turn the sticky silicone into a workable dough. It makes the mixture easier to handle, shape, and press objects into without it sticking to everything. Think of it as the difference between a gooey mess and something you can actually roll into a ball without muttering under your breath.
What consistency should the silicone mixture be?
The mixture should feel like soft dough or modelling clay. It should hold together, roll into a ball, and not stick badly to your fingers. If it is too sticky, add a little more corn flour. If it becomes too dry or crumbly, you may have added too much corn flour.
How long does a homemade silicone mold take to dry?
Most DIY silicone molds take around 2 to 3 days to cure fully, depending on the thickness of the mold and the weather. Humid or cold conditions can slow drying time, so place the mold somewhere dry and well ventilated.
Can I reuse this mold?
Yes, once fully dry, the mold can usually be reused several times for small craft projects. How long it lasts will depend on the thickness of the mold, the material you are casting, and how gently you remove each piece.
What can I cast in this homemade mold?
You can use it for small craft materials such as polymer clay, air-dry clay, resin-style craft embellishments, plaster, or jewellery components. Always test a small amount first, especially if using resin or other products that heat while curing.
What objects work best for making impressions?
Small items with clear surface detail work beautifully. Shells, charms, pendants, buttons, beads, cabochons, small clay shapes, and flat ornaments are all good options. Avoid objects with lots of deep undercuts, as they can get stuck or tear the mold.
What should I do if the impression does not look right?
Before the mold dries, simply roll the mixture back into a ball and start again. That is one of the best parts of this method. You can keep reshaping it until you get a clean impression you are happy with.
Can I make a deeper mold with this method?
Yes, but make sure your silicone dough base is thick enough to support the object you are pressing into it. For deeper pieces, make the mold thicker than 1/2 inch so it does not become too thin at the bottom.
Why is my silicone mold sticky after drying?
If the mold is still sticky after a few days, it may need more curing time, especially in humid weather. It can also happen if the silicone and corn flour were not mixed thoroughly. Leave it in a well-ventilated spot for another day or two before using it.
Can children make this craft?
This project is best for adults or older teens with supervision because silicone gap filler can smell strongly while curing and can be messy to handle. Gloves and good ventilation are recommended.
It will take 2-3 days, depending on the weather to dry.


I’ve used this method and it’s great, had loads of different shaped flower buttons and other items, pressed them into molding, gently removed from flexable molding and hey presto you can make many more, brilliant idea. Thanks for sharing
I am guessing corn flour = corn starch? in the US?
Yes
I think this is rather cute.But what to do with this afterwards? You also say you can make Jewelry with this?
Julia,
You are using it for casting shapes, Then use the shapes for normal crafting hobbies