
Get more details about this project
What you need
Approximately 85 g or 3 oz of soft knitting yarn
Straight knitting needles in the size needed to achieve gauge
Crochet hook suitable for your yarn
Yarn needle for seaming
Scissors
Damp cloth for gentle blocking
Small piece of cardboard for making tassels, optional
A soft sport-weight or light DK yarn is a sensible place to begin, but gauge is more important than the yarn label. Choose something comfortable against the skin and preferably machine washable. Bed socks have a habit of finding tea spills and biscuit crumbs—I speak from experience.
Instructions
Pdf Version available on Etsy
Finished Measurements
- Foot length: approximately 9¾ inches or 25 cm
- Length from the top of the cuff to the lower edge of the heel: approximately 10½ inches or 27 cm
The knitted fabric has some stretch, but these are intended as soft bed socks or slipper socks rather than tightly fitted walking socks.
Gauge
24 stitches and 22 rows = 4 inches or 10 cm in garter stitch
The original vintage gauge was written as:
- 6 stitches per inch
- 11 rows per 2 inches
Check your gauge before beginning, particularly when substituting modern yarn and needles.
Abbreviations
- K – knit
- P – purl
- St/sts – stitch/stitches
- K2tog – knit two stitches together
- Rep – repeat
- YO – yarn over
- RS – right side
- WS – wrong side
Before You Begin
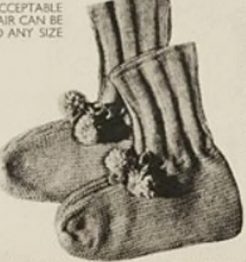
This is a wonderfully simple vintage bed sock pattern worked as one flat piece. The wide garter-stitch section becomes the foot, while the narrower ribbed section forms the cuff.
The finished sock is created by folding and seaming rather than by knitting a shaped heel and toe. This means the actual knitted socks will have a soft, simple vintage slipper shape rather than the closely shaped toe found on modern hand-knitted socks.
The cleaned instructions are based on the vintage Jaeger Hand-Knit Series No. 44 pattern included in the uploaded PDF.
Free Bed Socks Knitting Pattern
Make two socks following the instructions below.
Cast On
Cast on 110 stitches.
When using a knitted cast-on or two-needle cast-on, work through the back loop of each cast-on stitch on the first row to create a firmer edge.
This is not necessary when using the long-tail or thumb cast-on method.
Knit the Foot
Work every row in knit stitch until the piece measures 4¾ inches or 12 cm from the cast-on edge.
This creates garter stitch.
Shape the Upper Foot
Cast off 25 stitches at the beginning of the next row.
Knit to the end.
Cast off 25 stitches at the beginning of the following row.
Knit to the end.
You will have 60 stitches remaining.
Make the Eyelet Row
Next row:
*K1, YO, K2tog; repeat from * to the end of the row.
Next row:
Knit all stitches.
The eyelets will later hold the crocheted drawstring.
Knit the Ribbed Cuff
Begin a K4, P4 rib:
Row 1:
*K4, P4; repeat from * across.
Continue working in established K4, P4 rib until the cuff measures 6 inches or 15 cm from the eyelet row.
Cast off loosely in rib.
A stretchy cast-off is helpful here. A tight cast-off edge can make the socks difficult to pull over the heel.
Making Up the Bed Socks
Lay the knitted piece flat with the wrong side facing upward.
Fold the work lengthwise so the two sides of the ribbed cuff meet and the garter-stitch foot section is folded evenly.
Using matching yarn and a yarn needle:
- Sew the back seam of the ribbed cuff.
- Continue the seam down around the heel.
- Join the open edges of the garter-stitch foot to form the sole and toe.
- Secure the yarn carefully and weave in all ends.
Use mattress stitch where possible for a neat finish. Around the garter-stitch section, a small overcast or whip stitch can also work well.
Turn the sock right side out and gently shape the toe and heel with your fingers.
Repeat for the second sock.
Crochet the Drawstrings
Using doubled yarn and a crochet hook, make a crochet chain approximately 20 inches or 51 cm long.
Fasten off securely.
Thread the chain in and out through the eyelet row, beginning and ending at the centre front of the sock.
Make a second cord for the other sock.
Add the Tassels
Make two small tassels for each sock.
Attach one tassel securely to each end of the crocheted cord.
Pom-poms can be substituted for tassels, although small, lightweight decorations are best. Very large pom-poms may look charming in photographs but can become surprisingly irritating when they flop under your heel at 2 a.m.
Crochet the Top Edging
Join yarn to the upper edge of the ribbed cuff.
Work one round of:
- UK double crochet, or
- US single crochet
Work evenly around the top edge without pulling the stitches too tightly.
Join with a slip stitch and fasten off.
Repeat on the second sock.
Blocking and Finishing
The vintage instructions recommend pressing the knitting beneath a damp cloth. Modern yarns can react differently to heat, so check the yarn label before using an iron.
A safer option is to:
- Lightly dampen the finished socks.
- Shape them gently by hand.
- Lay them flat on a towel.
- Allow them to dry completely.
Do not flatten the ribbing during blocking.
How to Adjust the Size
The original pattern describes the design as easy to adapt, but vintage patterns often leave the calculations to the knitter.
The cast-on width controls the foot length because the wide foot section is folded in half during assembly.
For a rough adjustment:
Desired foot length × stitch gauge × 2 = approximate cast-on stitch count
For example, using a gauge of 6 stitches per inch for a 10-inch foot:
10 × 6 × 2 = 120 stitches
The number of stitches left after casting off at each side controls the cuff and ankle fit.
When changing the stitch count:
- Keep the remaining cuff stitches divisible by 8 for the K4, P4 rib.
- Keep the eyelet-row stitch count divisible by 3.
- Knit a small swatch before committing to a resized pair.
- Remember that garter stitch stretches and relaxes with wear.
For only a small size adjustment, changing the needle size may be easier than rewriting the stitch counts.
Helpful Bed Sock Variations
For a simpler finish, leave out the tassels and thread a narrow satin ribbon through the eyelets instead.
For warmer slipper socks, use a soft wool-blend yarn and add a thin suede or non-slip fabric patch to the sole after seaming.
For hospital or care-package gifts, omit dangling cords entirely and work the cuff without the eyelet row. This creates a safer and more practical version while keeping the cosy vintage style.
These flat-knit bed socks are a lovely little project for using soft yarn from the stash, and they make an especially thoughtful handmade gift for winter, Mother’s Day, Christmas hampers or anyone who permanently complains about cold feet.





What do you think of this project? Let us know!